15
5.
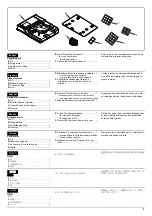
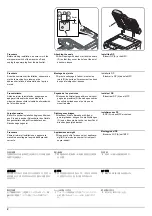
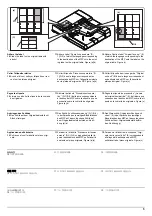
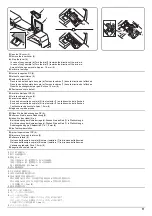
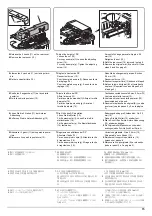
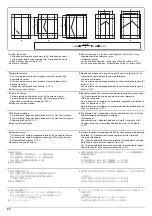
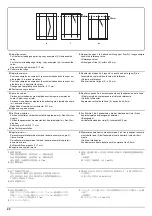
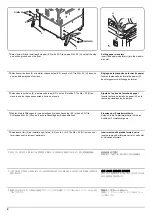
Release the 2 hooks (11) on the rear cover.
6.
Remove the rear cover (
1
2).
Amount of change per scale: Approx. 0.5
mm (15)
Retighten the nut (13).
8.
Refit the rear cover (12) removed in step 6.
9.
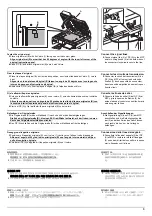
Remove the original mat (B) and refit it (see
steps 2 and 3 on page 3).
5.
Libérez les 2 crochets (11) sur le capot arri-
ère.
6.
Retire le capot arrière (12).
Quantité de changement par pas: Environ
0,5 mm (15)
Resserrez l’écrou (13).
8.
Reposer le capot arrière (12) déposé à l'étape 6.
9.
Retirez le tapis d’original (B) et remettez-le
en place. (Reportez-vous aux étapes 2 et 3
à la page 3.)
5.
Suelte los 2 enganches (11) de la cubierta
posterior.
6.
Quite la cubierta posterior (12).
Cantidad de cambio de escala: Aprox. 0,5 mm (15)
Vuelva a apretar la tuerca (13).
8.
Vuelva a colocar la cubierta posterior (12)
desmontada en el paso 6.
9.
Desmonte la plancha de original (B) y vuelva
a colocar (vea los pasos 2 y 3 en la página
3).
5.
Lösen Sie die 2 Haken (11) der hinteren
Abdeckung.
6.
Entfernen Sie die hintere Abdeckung (12).
Änderungsbetrag pro Skalenstrich: Ca. 0,5
mm (15)
Ziehen Sie die Mutter (13) wieder fest.
8.
Die in Schritt 6 entfernte hintere Abdeckung
(12) wieder anbringen.
9.
Die Originalmatte (B) abnehmen und wieder
anbringen (siehe Schritte 2und 3 auf Seite 3).
5.
Rilasciare i 2 ganci (11) sul coperchio poste-
riore.
6.
Rimuovere il coperchio posteriore (12).
Variazione graduale: Circa 0,5 mm (15)
Stringere di nuovo il dado (13).
8.
Reinserire il coperchio posteriore (12)
rimosso nel passo 6.
9.
Rimuovere il coprioriginale (B) e reinserirlo
(vedere i passi 2 e 3 a pagina 3).
5.
後カバーのフック (11)2 箇所を外す。
6.
後カバー(12) を取り外す。
7.
DP の高さを調整する。
ナット (13) をゆるめる。
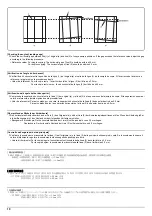
コピーサンプル (f) の場合:調整ビス (14)
をゆるめる。
コピーサンプル (g) の場合:調整ビス (14)
を締める。
5.
取下后盖板的 2 个卡扣(11)。
6.
取下后盖板(12)。
每 1 格的移动量 :约 0.5mm(15)
将螺母(13)按原样紧固好。
8.
重新安装在步骤 6 中拆下的后盖板(12)。
9.
拆下原稿垫(B),参照第 3 页的步骤 2 和 3
再次装上。
5.
후면 커버의 후크 (11) 2 개를 풉니다 .
6.
후면 커버 (12) 를 제거합니다 .
1 개 변화량:약 0.5mm(15)
너트 (13) 를 원래대로 조입니다 .
8.
순서 6 에서 제거한 뒷 커버 (12) 를 원래대
로 장착합니다 .
9.
원고매트 (B) 를 제거하고 3 페이지 순서 2,
3 을 참고로 다시 부착합니다 .
12
11
X
14
13
15
1 目盛り当たりの変化量:約 0.5mm(15)
ナット (13) を元通り締める。
8.
手順 6 で取り外した後カバー(12) を元通り
取り付ける。
9.
原稿マット (B) を取り外し、3 ページの手順
2、3 を参考に再度取り付ける。
7.
DP 의 높이를 조정합니다 .
너트 (13) 를 느슨하게 합니다 .
벨크로 (f) 의 경우:조정나사 (14) 를 느슨하
게 합니다 .
벨크로 (g) 의 경우:조정나사 (14) 를 조입니
다 .
7.
调整 DP 的高度。
松驰螺母(13)。
复印样张(f)时 :松弛调整螺丝(14)。
复印样张(g)时 :紧固调整螺丝(14)。
7.
Regolazione dell’altezza del DP
Allentare il dado (13).
Per un esempio di copia (f): Allentare la vite
di regolazione (14).
Per un esempio di copia (g): Stringere la vite
di regolazione (14).
7.
Die Höhe des DP einstellen.
Lösen Sie die Mutter (13).
Für Kopienmuster (f): Lösen Sie die Ein-
stellschraube (14).
Für Kopienmuster (g): Die Einstellschraube
(14) festziehen.
7.
Ajuste la altura del DP.
Afloje la tuerca (13).
Para la copia de muestra (f): Afloje el tornillo
de ajuste (14).
Para la copia de muestra (g): Apriete el
tornillo de ajuste (14).
7.
Réglez la hauteur du DP.
Desserrez l’écrou (13).
Pour l’exemple de copie (f): Desserrez la vis
de réglage (14).
Pour l’exemple de copie (g): Serrez la vis de
réglage (14).
7.
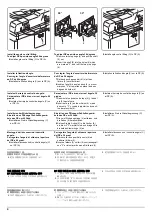
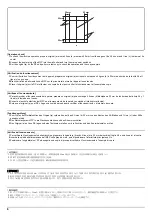
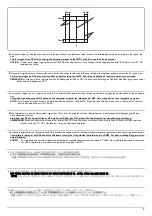
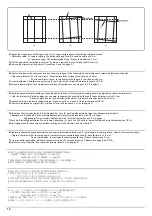
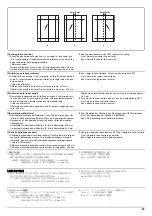
Adjust the height of DP.
Loosen the nut (13).
For copy example (f): Loosen the adjusting
screw (14).
For copy example (g): Tighten the adjusting
screw (14).
Содержание TASKalfa 3010i
Страница 1: ...SERVICE MANUAL Published in September 2016 842NL11B 2NLSM06B Rev B TASKalfa 3010i TASKalfa 3510i ...
Страница 10: ...This page is intentionally left blank ...
Страница 100: ...2NL 2P8 1 2 76 This page is intentionally left blank ...
Страница 286: ...2NL 2P8 1 3 186 This page is intentionally left blank ...
Страница 443: ...2NL 2P8 1 5 59 This page is intentionally left blank ...
Страница 463: ...2NL 2P8 2 1 18 Figure 2 1 23 Duplex conveying section block diagram EPWB DU_SENS DU_CL_REM YC14 5 YC8 1 DUCL DUS ...
Страница 471: ...2NL 2P8 2 2 8 This page is intentionally left blank ...
Страница 532: ...Installation Guide DP 770 B Document processor DP 772 Document processor Installation Guide ...
Страница 568: ...DP 773 Document processor Installation Guide ...
Страница 594: ...PF 791 500 x 2 Paper feeder Installation Guide ...
Страница 602: ...PF 810 3000 sheet deck Installation Guide ...
Страница 615: ...DF 791 3000 sheet finisher Installation Guide ...
Страница 630: ...DF 770 D 1000 sheet finisher Installation Guide ...
Страница 648: ...AK 740 Bridge unit Installation Guide ...
Страница 650: ...MT 730 B Mailbox Installation Guide ...
Страница 665: ...PH 7A C D Punch unit Installation Guide ...
Страница 686: ...DT 730 B Document tray Installation Guide ...
Страница 731: ...5 2013 5 302LC56750 01 H F G D D 6 4 3 7 E C D D M4 8 M4 8 M4 8 M4 8 ...
Страница 732: ...FAX System W B Installation Guide ...

