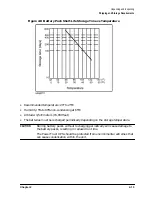
Chapter 3
3-7
Installing the UPS
Rackmounting Procedures
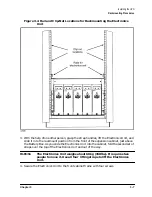
Figure 3-4 Rail and Clip-Nut Locations for Rackmounting the Electronics
Unit
3. With the help of one other person, grasp the strap handles, lift the Electronics Unit, and
slide it into the rackmount position from the front of the expansion cabinet, just above
the Battery Box. As you slide the Electronics Unit into the cabinet, fold the second set of
straps over the top of the Electronics Unit and out of the way.
WARNING
The Electronics Unit weighs about 68 kg (150 lbs). It requires two
people to move it. Use all four lifting straps to lift the Electronics
Unit.
4. Secure the Electronics Unit to the front cabinet frame with four screws.
Содержание PowerTrust A3589A
Страница 7: ...Contents Contents 5 ...
Страница 8: ...Contents 6 Contents ...
Страница 10: ...Contents 8 Figures ...
Страница 12: ...Contents 10 Tables ...
Страница 14: ...2 ...
Страница 20: ...Preface 8 ...
Страница 22: ...Preface 10 ...
Страница 52: ...1 30 Chapter1 Overview Specifications Figure 1 8 UPS Input Voltage Transfer Points ...
Страница 56: ...1 34 Chapter1 Overview UPS Modes Figure 1 10 Simplified UPS 5 5 kVA UPS Block Diagram ...
Страница 62: ...1 40 Chapter1 Overview Support Information ...
Страница 76: ...2 14 Chapter2 Unpacking and Inspecting Shipping and Storage Requirements ...
Страница 104: ...3 28 Chapter3 Installing the UPS Examples of PowerTrust Connections in a System ...
Страница 116: ...5 4 Chapter5 Verification Procedures Load Testing ...
Страница 148: ...7 6 Chapter7 Cleaning and Maintenance Exchanging Batteries Fan ...
Страница 190: ...A 42 AppendixA HP UX UPS Monitor Error Messages Log Only Messages ...
Страница 218: ...C 8 AppendixC Configuring the OS for the PowerTrust UPS Power Failing the UPS ...


