


4-2
Chapter 4
Power-On/Power-Off Procedures
Power-On Procedures
Power-On Procedures
Initial Power-On or Power-On After Shutdown
Use the following procedure to power-on the UPS for the first time after it is installed or
after the UPS has been shutdown for an extended of time (see “Powering-Off the UPS for
an Extended Time”). Allow time for the temperature of the equipment to stabilize before
applying input AC power.
1. Set the BYPASS switch to the NORMAL position.
2. Check that AC input power is being provided to the UPS.
3. Set the MAIN and BYPASS INPUT breakers to the ON position.
4. Set the UPS/BATTERY switch to
ENABLE
.
5. Set the Output On/Output Off switch to
Output On
.
6. Confirm that the UPS powered on properly by checking the following indicators:
• AC Output LED: on
• Battery LED: off
• Attention LED: off
• Audible Alarm: none
• Enable LED: on
• Caution LED: off
If any of the indicators differ from the above, the UPS did not power up correctly. Refer
to Chapter 6, “Troubleshooting.” to identify the problem.
7. Set the OUTPUT breakers appropriate for your system to the On position. Output
breakers 1, 2, and 3 control Output Receptacles (IEC 320 C19) 1, 2, and 3, respectively.
Output breaker 4 controls Output Receptacle 4, which is either a NEMA L6-30P
receptacle or a hardwired output.
The UPS is now in Normal mode and is providing AC power and power failure protection
to the equipment connected to the UPS.
Powering On the UPS After Being Powered Off for a Short Time
Use the following procedure to power-up the UPS if it has been shutdown for a short time
(following a short duration power off procedure). See “Powering Off the UPS for a Short
Time”.
1. Check that AC input power is being provided to the UPS.
2. Set the Output On/Output Off switch to
Output On
.
3. Confirm that the UPS powered on properly by checking the following indicators:
Содержание PowerTrust A3589A
Страница 7: ...Contents Contents 5 ...
Страница 8: ...Contents 6 Contents ...
Страница 10: ...Contents 8 Figures ...
Страница 12: ...Contents 10 Tables ...
Страница 14: ...2 ...
Страница 20: ...Preface 8 ...
Страница 22: ...Preface 10 ...
Страница 52: ...1 30 Chapter1 Overview Specifications Figure 1 8 UPS Input Voltage Transfer Points ...
Страница 56: ...1 34 Chapter1 Overview UPS Modes Figure 1 10 Simplified UPS 5 5 kVA UPS Block Diagram ...
Страница 62: ...1 40 Chapter1 Overview Support Information ...
Страница 76: ...2 14 Chapter2 Unpacking and Inspecting Shipping and Storage Requirements ...
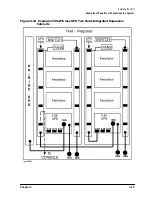
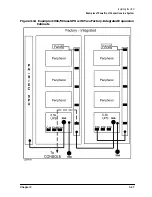
Страница 104: ...3 28 Chapter3 Installing the UPS Examples of PowerTrust Connections in a System ...
Страница 116: ...5 4 Chapter5 Verification Procedures Load Testing ...
Страница 148: ...7 6 Chapter7 Cleaning and Maintenance Exchanging Batteries Fan ...
Страница 190: ...A 42 AppendixA HP UX UPS Monitor Error Messages Log Only Messages ...
Страница 218: ...C 8 AppendixC Configuring the OS for the PowerTrust UPS Power Failing the UPS ...