14 – 11
Section 14
•
Slide Calibration
Vission 20/20 • Operation and Service Manual • Emerson • 35391SC 2.7
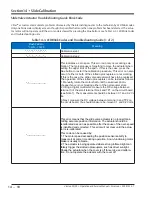
Table 14-3. LED Blink Codes and Troubleshooting Guide (2 of 2)
Flash Pattern
* = ON - = OFF
Meaning
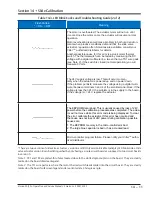
*--*--*-----------------
The motor is overheated. The actuator motor will not run until
it cools. Once the motor cools, the actuator will resume normal
operation.
Motor overheating is sometimes a problem in hot humid environ-
ments when process conditions demand that the slide valve
actuators reposition often. Solutions are available; consult your
Vilter
TM
authorized distributor for details.
Another possible cause for this error is a stuck motor thermal
switch. The thermal switch can be tested by measuring the DC
voltage with a digital multimeter be- tween the two TS1 wire pads
(see Note 2). If the switch is closed (normal operation) you will
measure 0 Volts.
*********************
The 24V supply voltage is low. This will occur momen-
tarily when the actuator is powered up and on power down.
If the problem persists, measure the voltage using a digital multi-
meter between terminals 3 and 4 of the small terminal block. If the
voltage is less than 24V, the problem is in the supply to the board.
If the voltage is >= 24V, replace the actuator.
-********************
The EEPROM data is bad. This is usually caused by loss of 24V
power before the calibration procedure was completed. The actua-
tor will not move while this error code is being displayed. To clear
the error, calibrate the actuator. If this error has occurred and
the cause was not loss of 24V power during calibration, possible
causes are:
1. The EEPROM memory in the micro-controller is bad.
2. The large blue capacitor is bad or has a cracked lead.
*****----*--------------
Micro-controller program failure. Please notify your Vilter
TM
autho-
rized distributor.
*There are two versions of slide valve actuators, version A and B. Only version B is able to display LED blink codes. Slide
valve actuator version B can be distinguished by only having a single circuit board as supposed to two circuit boards
in version A.
Note 1: TP1 and TP2 are plated-thru holes located close to the slotted optocouplers on the board. They are clearly
marked on the board silkscreen legend.
Note 2: The TS1 wire pads are where the motor thermal switch leads solder into the circuit board. They are clearly
marked on the board’s silkscreen legend and are oriented at a 45 degree angle.
Содержание Vilter Vission 20/20
Страница 1: ...Vission 20 20TM Micro controller Operation and service manual Version 2 7 ...
Страница 2: ......
Страница 4: ......
Страница 220: ...B 2 Blank Vission 20 20 Operation and Service Manual Emerson 35391SC 2 7 ...
Страница 300: ...D 2 Blank Vission 20 20 Operation and Service Manual Emerson 35391SC 2 6 ...
Страница 336: ......
Страница 337: ......

