Page 34
CP390i and CPF390i
WAAS 3D
WAAS 3D
Cursor
Ship
Icon
2
1
Cursor
window
3
1
2
3
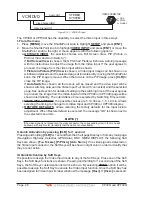
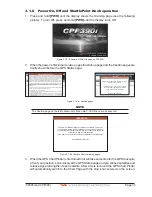
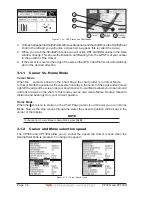
Figure 3.1.0c - GPS Status and Chart pages
4. On the Chart page the ShuttlePoint knob is used to pan around the chart. Move the ShuttlePoint
knob to the left and you will notice a cross hair appear, this is called the cursor.
5. When you move the ShuttlePoint knob you will notice DST and BRG values in the Data
window change. This shows the Distance and Bearing from the GPS Fix of your vessel
to the position of the Cursor.
6. If the cursor is moved to the edge of the screen the GPS Chart Plotter will automatically
pan in the desired direction.
3.1.1 Cursor Vs. Home Mode
Cursor Mode
When the cursor is shown on the Chart Page, the chart plotter is in Cursor Mode.
In Cursor Mode the position of the vessel will not stay in the center of the page and will move
right off the edge of the screen (as your boat moves). Cursor Mode allows you to pan around
and look at areas on the chart. In this mode you can also create Marks, Routes, measure
distance and bearings from your current position.
Home Mode
When the ship icon is shown on the Chart Page (cursor is not shown) you are in Home
Mode. Now as the ship moves through the water the vessel’s position will be kept in the
center of the display.
NOTE
To change from Cursor Mode to Home Mode press
[CLR]
.
3.1.2 Cursor and Menu selection speed
The CP390i and CPF390i allow you to control the speed the Cursor moves when the
ShuttlePoint knob is pressed. To change the speed:
Figure 3.1.2 - Cursor Speed menu
Summary of Contents for CP390i
Page 1: ......
Page 5: ...Page 6 CP390i and CPF390i ...
Page 15: ...Page 16 CP390i and CPF390i ...
Page 29: ...Page 30 CP390i and CPF390i ...
Page 43: ...Page 44 CP390i and CPF390i ...
Page 53: ...Page 54 CP390i and CPF390i ...
Page 67: ...Page 68 CP390i and CPF390i ...
Page 75: ...Page 76 CP390i and CPF390i ...
Page 83: ...Page 84 CP390i and CPF390i ...
Page 87: ...Page 88 CP390i and CPF390i ...
Page 109: ...Page 110 CP390i and CPF390i ...
Page 145: ...Page 146 CP390i and CPF390i Figure 17 16 C Card Restore settings ...
Page 147: ...Page 148 CP390i and CPF390i ...
Page 153: ...Page 154 CP390i and CPF390i ...
Page 157: ...Page 158 CP390i and CPF390i ...
Page 168: ......


