Page 104
CP390i and CPF390i
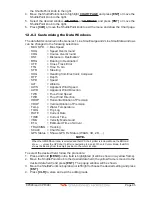
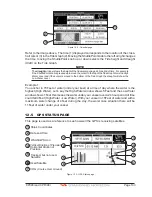
The WAAS/GPS Icon area may change due to the satellite reception:
ACQUIRING
: the GPS is trying to receive a valid position fix.
GPS2D
: The GPS is receiving at least 2 valid Satellites
GPS3D
: the GPS is receiving at least 3 Satellites.
WAAS 2D/3D
: the GPS is receiving a 2D or 3D position and the correction from the WAAS Satellite.
HDOP
: Horizontal Dilution of Precision
VDOP
: Vertical Dilution of Precision
12.5.0 WAAS/EGNOS Setting
From this page it is possible to disable the WAAS/EGNOS function following this procedure:
1.
Press
[MENU]
, move
the ShuttlePoint knob to enter
GPS STATUS
page
and press
[ENT]
.
2. Press and hold
[ENT]
. The GPS SETUP menu appears on the screen.
3.
Move the ShuttlePoint knob to highlight
DIFF CORRECTION SOURCE
and press
[ENT]
.
4.
Move the ShuttlePoint knob to highlight
None
(to disable) and press
[ENT]
.
5.
Press
[CLR]
until the menu disappears or an easier method is to move the ShuttlePoint
knob to the left until the menu disappears.
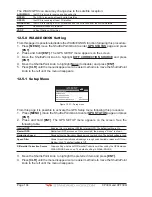
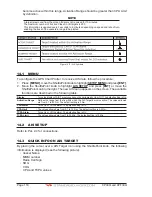
12.5.1 Setup Menu
INTERNAL GPS
RESTART GPS
NAVIGATION SPEED
NAVIGATION FILTER
High
DIFF CORRECTION SOURCE
WAAS/EGNOS
Off
On
Figure 12.5.1 - Setup menu
From this page it is possible to activate the GPS Setup menu following this procedure:
1. Press
[MENU]
, move the ShuttlePoint knob to enter
GPS STATUS
page
and press
[ENT]
.
2. Press and hold
[ENT]
. The GPS SETUP menu appears on the screen. See the
following table:
Internal GPS
: Enables (On) or disables (Off) the Internal GPS. The default setting is On.
Restart GPS
: Restarts all GPS processes. Once executed, the message "Done" is shown.
Navigation Speed
: Allows setting the Navigation Speed among Low and High. The default setting is High.
Speed Filter
: Allows to resolve erratic speed readings in rough seas. Available values are Off, Low,
Medium, High. The default setting is Off.
Differential Correction Source
: Allows setting what kind of Differential Correction will be used by the GPS between
WAAS-EGNOS and none. The default setting is WAAS-EGNOS.
3.
Move the ShuttlePoint knob to highlight the preferred item and press
[ENT]
.
4.
Press
[CLR]
until the menu disappears or an easier method is to move the ShuttlePoint
knob to the left until the menu disappears.
Summary of Contents for CP390i
Page 1: ......
Page 5: ...Page 6 CP390i and CPF390i ...
Page 15: ...Page 16 CP390i and CPF390i ...
Page 29: ...Page 30 CP390i and CPF390i ...
Page 43: ...Page 44 CP390i and CPF390i ...
Page 53: ...Page 54 CP390i and CPF390i ...
Page 67: ...Page 68 CP390i and CPF390i ...
Page 75: ...Page 76 CP390i and CPF390i ...
Page 83: ...Page 84 CP390i and CPF390i ...
Page 87: ...Page 88 CP390i and CPF390i ...
Page 109: ...Page 110 CP390i and CPF390i ...
Page 145: ...Page 146 CP390i and CPF390i Figure 17 16 C Card Restore settings ...
Page 147: ...Page 148 CP390i and CPF390i ...
Page 153: ...Page 154 CP390i and CPF390i ...
Page 157: ...Page 158 CP390i and CPF390i ...
Page 168: ......

