


5.5
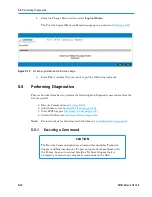
Performing Diagnostics
5-16
501610 Rev. 07-01-19
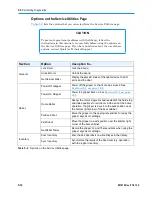
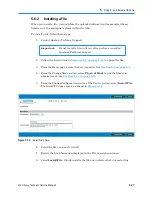
Options on the Service Utilities Page
Table 5-2
lists the options that you can select from the Service Utilities page.
CAUTION
To prevent operational problems with the library, follow the
instructions in this manual very carefully before using the options on
the Service Utilities page. If you have questions about the use of these
options, contact Qualstar Technical Support.
Section
Option
Use option to...
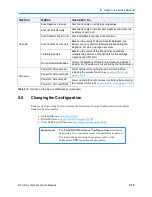
General
Lock Doors
Lock the door(s)
Unlock Doors
Unlock the door(s)
Get Cabinet Status
Display the physical status of the light curtains, the I/O
ports, and the door
Robot
Power Off Gripper
Power off the gripper so that it can be serviced. See
Section 12.1 on page 12-2
.
Power On Gripper
Power the gripper back on. See
Section 12.1 on page
12-2
.
Home Robot
Realign the motor magnetics and reestablish the hard stop
and index positions for all robots. At the end of the home
operation, the gripper is moved to the park position near
the bottom right corner of the base cabinet.
Position Robot
Move the gripper to the appropriate position for using the
gripper alignment cartridge
Park Robot
Move the gripper to a safe position near the bottom right
corner of the base cabinet
Get Robot Status
Record the gripper
’s X and Theta positions when using the
gripper alignment cartridge
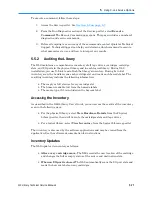
Inventory
Scan Inventory
Scan the barcode labels on all cartridges in the library
Sync Inventory
Synchronize the results of the Scan Inventory operation
with the logical inventory
Table 5-2
Options on the Service Utilities page
Summary of Contents for XLS Series
Page 1: ...Technical Service Manual Document No 501610 Rev 07 01 19 XLS Series of Tape Libraries...
Page 14: ...501610 Rev 07 01 19 Part I Before You Begin Notes...
Page 58: ...3 7 Cabling for the Carousel Controller 3 12 501610 Rev 07 01 19 Notes...
Page 70: ...4 5 Inspecting and Cleaning the Gripper and Barcode Reader 4 12 501610 Rev 07 01 19 Notes...
Page 72: ...Part II Using X Link 501610 Rev 07 01 19 Notes...
Page 96: ...Part III Replacing FRUs 501610 Rev 07 01 19 Notes...
Page 136: ...8 8 Bringing a Tape Drive Online 8 14 501610 Rev 07 01 19 Notes...
Page 158: ...9 5 Replacing a Drive Bay with a Cartridge Bay 9 22 501610 Rev 07 01 19 Notes...
Page 172: ...10 3 Replacing a Side Panel 10 14 501610 Rev 07 01 19 Notes...
Page 186: ...11 3 Upgrading a Fixed Port Assembly to an I O Port 11 14 501610 Rev 07 01 19 Notes...
Page 226: ...12 6 Replacing the Y Motor Assembly 12 40 501610 Rev 07 01 19 Notes...
Page 324: ...Part IV Reference 501610 Rev 07 01 19 Notes...
Page 352: ...B 2 Packing the XLS B 14 501610 Rev 07 01 19 Notes...
Page 354: ...C 2 501610 Rev 07 01 19 Notes...


