


XLS Library Technical Service Manual
4-1
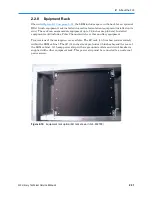
4
Preventive Maintenance
This chapter provides instructions for performing preventive maintenance on the XLS.
Preventive maintenance tasks include the following:
•
Checking the air filters (see
Section 4.1
)
•
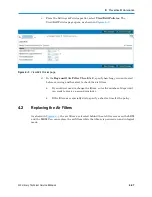
Replacing an air filter (see
Section 4.2 on page 4-3
)
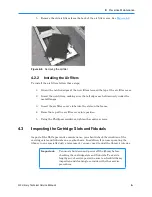
•
Inspecting the cartridge slots and fiducials (see
Section 4.3 on page 4-5
)
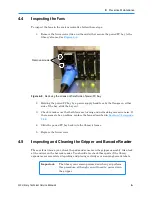
•
Inspecting the fans (see
Section 4.4 on page 4-7
)
•
Inspecting and cleaning the gripper pads and sensors and the mirror on the
barcode reader (see
Section 4.5 on page 4-7
)
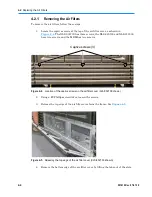
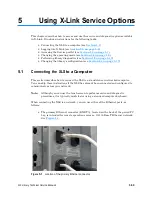
4.1
Checking the Air Filters
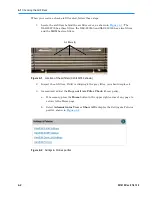
Fans in the system controller, each power supply, and each drive carrier draw outside air
through filters located behind the air filter covers on the LRM and MEM. The filters help
keep dust and dirt from entering the library and degrading the performance of the tape
drives and media. To ensure the best reliability, periodically check and replace the air
filters.
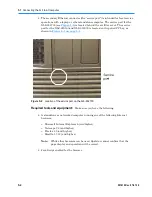
To order replacement filters, see
Section 1.6.2 on page 1-10
.
Important:
The air filters help protect the library from large
contaminants but are not intended to keep the tape
drives clean. For best performance, clean the tape drives
according to the manufactu
rer’s
recommendations.
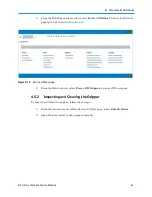
X-Link automatically alerts users to check the air filters after the amount of time
specified by the Days until Air Filter Check library policy. Because filters should be
replaced more frequently in dusty environments, the recommended time between air filter
changes varies with the installation environment. When the XLS is first installed, inspect
the filters frequently. Then, as required, adjust the time specified for the Days until Air
Filter Check policy.
Summary of Contents for XLS Series
Page 1: ...Technical Service Manual Document No 501610 Rev 07 01 19 XLS Series of Tape Libraries...
Page 14: ...501610 Rev 07 01 19 Part I Before You Begin Notes...
Page 58: ...3 7 Cabling for the Carousel Controller 3 12 501610 Rev 07 01 19 Notes...
Page 70: ...4 5 Inspecting and Cleaning the Gripper and Barcode Reader 4 12 501610 Rev 07 01 19 Notes...
Page 72: ...Part II Using X Link 501610 Rev 07 01 19 Notes...
Page 96: ...Part III Replacing FRUs 501610 Rev 07 01 19 Notes...
Page 136: ...8 8 Bringing a Tape Drive Online 8 14 501610 Rev 07 01 19 Notes...
Page 158: ...9 5 Replacing a Drive Bay with a Cartridge Bay 9 22 501610 Rev 07 01 19 Notes...
Page 172: ...10 3 Replacing a Side Panel 10 14 501610 Rev 07 01 19 Notes...
Page 186: ...11 3 Upgrading a Fixed Port Assembly to an I O Port 11 14 501610 Rev 07 01 19 Notes...
Page 226: ...12 6 Replacing the Y Motor Assembly 12 40 501610 Rev 07 01 19 Notes...
Page 324: ...Part IV Reference 501610 Rev 07 01 19 Notes...
Page 352: ...B 2 Packing the XLS B 14 501610 Rev 07 01 19 Notes...
Page 354: ...C 2 501610 Rev 07 01 19 Notes...


