


17
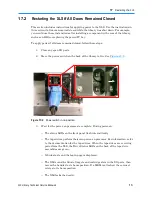
Restarting the XLS
XLS Library Technical Service Manual
17-
307
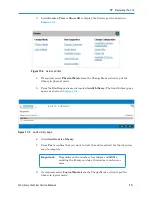
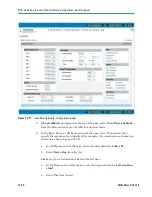
7. Press
Save Configuration
and wait while the XLS updates its internal
databases. The revised databases allow it to locate any new resources and to stop
accessing any removed resources.
8. Refer to
Section 17.5.3 on page 17-17
to scan the fiducials and the inventory.
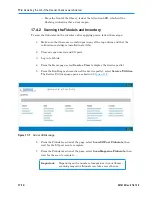
17.5.3 Scanning the Fiducials and Inventory
To scan the fiducials and the inventory after applying power, follow these steps:
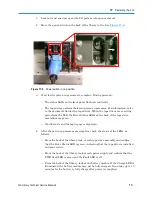
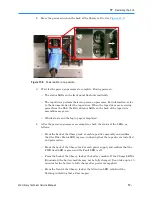
1. Make sure that there are no cartridges in any of the tape drives and that the
calibration cartridge is installed in slot G50.
2. Close any open doors and I/O ports.
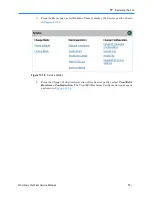
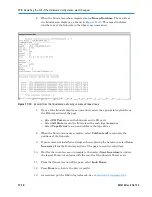
3. Access the View/Edit Hardware Configuration page as described in
Section 17.5.2 on page 17-14
.
4. From the Fiducials section of the page, select
I/O Ports
, then wait for the I/O
port scan to complete.
5. From the Fiducials section of the page, select
All Slots,
then wait for the scan to
complete.
Important:
Depending on the number of magazines in your library,
scanning magazine fiducials can take several hours.
Summary of Contents for XLS Series
Page 1: ...Technical Service Manual Document No 501610 Rev 07 01 19 XLS Series of Tape Libraries...
Page 14: ...501610 Rev 07 01 19 Part I Before You Begin Notes...
Page 58: ...3 7 Cabling for the Carousel Controller 3 12 501610 Rev 07 01 19 Notes...
Page 70: ...4 5 Inspecting and Cleaning the Gripper and Barcode Reader 4 12 501610 Rev 07 01 19 Notes...
Page 72: ...Part II Using X Link 501610 Rev 07 01 19 Notes...
Page 96: ...Part III Replacing FRUs 501610 Rev 07 01 19 Notes...
Page 136: ...8 8 Bringing a Tape Drive Online 8 14 501610 Rev 07 01 19 Notes...
Page 158: ...9 5 Replacing a Drive Bay with a Cartridge Bay 9 22 501610 Rev 07 01 19 Notes...
Page 172: ...10 3 Replacing a Side Panel 10 14 501610 Rev 07 01 19 Notes...
Page 186: ...11 3 Upgrading a Fixed Port Assembly to an I O Port 11 14 501610 Rev 07 01 19 Notes...
Page 226: ...12 6 Replacing the Y Motor Assembly 12 40 501610 Rev 07 01 19 Notes...
Page 324: ...Part IV Reference 501610 Rev 07 01 19 Notes...
Page 352: ...B 2 Packing the XLS B 14 501610 Rev 07 01 19 Notes...
Page 354: ...C 2 501610 Rev 07 01 19 Notes...


