


XLS Library Technical Service Manual
17-1
17
Restarting the XLS
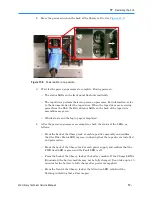
This chapter describes how to restart the XLS after it has been shut down for a service
procedure using the instructions in
Chapter 6,
“
Shutting Down the XLS
.”
Important:
If this is the first time you have powered on the library,
refer to the instructions in
XLS Library Installation
.
As described in
Section 17.1
, the process for restarting the XLS depends on what service
operations occurred when the XLS was shut down.
17.1
Overview of Restarting the XLS
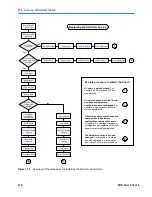
Figure 17-1 on page 17-2
provides an overview of the four procedures for restarting the
XLS after service. As shown in the figure, the steps for restarting the XLS depends on
what occurred when the XLS was shut down, as follows:
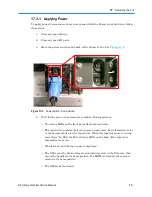
•
All doors remained closed
. For example, you replaced a component at the back
of the library such as an HBA or the power/PC bay. For instructions, see
Section 17.2 on page 17-3
.
•
A door was opened, but the fiducial positions and hardware
configuration were unchanged.
For example, you replaced a light curtain
sensor, X- or Y-motor, or door sensor. For instructions, see
Section 17.3 on page
17-4
.
•
A door was opened and the fiducial positions were altered.
However, the
hardware configuration remained the same. For example, you replaced a
cartridge magazine or drive bay or reinstalled the front panel. For instructions,
see
Section 17.4 on page 17-8
.
•
A door was opened and the hardware configuration was changed.
For
example, you upgraded a cartridge bay to a drive bay or installed new door slots
or an I/O port. For instructions, see
Section 17.5 on page 17-12
.
Summary of Contents for XLS Series
Page 1: ...Technical Service Manual Document No 501610 Rev 07 01 19 XLS Series of Tape Libraries...
Page 14: ...501610 Rev 07 01 19 Part I Before You Begin Notes...
Page 58: ...3 7 Cabling for the Carousel Controller 3 12 501610 Rev 07 01 19 Notes...
Page 70: ...4 5 Inspecting and Cleaning the Gripper and Barcode Reader 4 12 501610 Rev 07 01 19 Notes...
Page 72: ...Part II Using X Link 501610 Rev 07 01 19 Notes...
Page 96: ...Part III Replacing FRUs 501610 Rev 07 01 19 Notes...
Page 136: ...8 8 Bringing a Tape Drive Online 8 14 501610 Rev 07 01 19 Notes...
Page 158: ...9 5 Replacing a Drive Bay with a Cartridge Bay 9 22 501610 Rev 07 01 19 Notes...
Page 172: ...10 3 Replacing a Side Panel 10 14 501610 Rev 07 01 19 Notes...
Page 186: ...11 3 Upgrading a Fixed Port Assembly to an I O Port 11 14 501610 Rev 07 01 19 Notes...
Page 226: ...12 6 Replacing the Y Motor Assembly 12 40 501610 Rev 07 01 19 Notes...
Page 324: ...Part IV Reference 501610 Rev 07 01 19 Notes...
Page 352: ...B 2 Packing the XLS B 14 501610 Rev 07 01 19 Notes...
Page 354: ...C 2 501610 Rev 07 01 19 Notes...


