


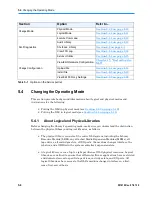


5.4
Changing the Operating Mode
5-10
501610 Rev. 07-01-19
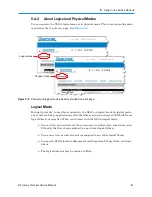
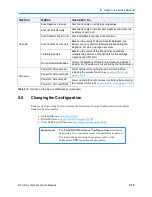
Physical Mode
If you are an XLS administrator, you may occasionally need to operate the XLS in
physical mode
. In physical mode, you interact with X-Link from a physical library
perspective. When you interact with the XLS in physical mode:
•
You can view and control all resources in the library, whether or not they have
been assigned to a logical library.
•
You specify physical addresses for each cartridge slot, I/O port slot, or tape drive.
•
All logical libraries must be offline.
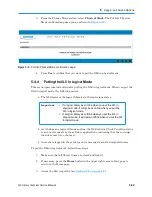
5.4.3
Putting the XLS in Physical Mode
If you need to perform a task that could change the internal state of the physical library,
you must put the XLS in physical mode. When you put the XLS in physical mode, the
following occurs:
•
The XLS completes any current or pending operations for the software
applications, then it takes all defined logical libraries offline.
•
The XLS returns Check Condition status to any new requests by the software
applications, indicating that it is not ready.
•
An event is logged in the event log and a message is sent to designated users.
•
The tape drives remain accessible to the software applications and can continue
reading and writing data.
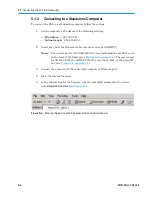
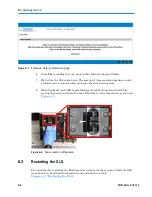
To put the XLS in physical mode, follow these steps:
1.
If necessary, press the
Home
button in the upper right corner of any page to
return to the Home page.
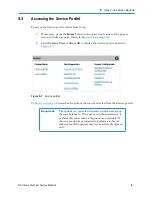
2.
Access the Service portlet (see
Section 5.3 on page 5-7
).
Summary of Contents for XLS Series
Page 1: ...Technical Service Manual Document No 501610 Rev 07 01 19 XLS Series of Tape Libraries...
Page 14: ...501610 Rev 07 01 19 Part I Before You Begin Notes...
Page 58: ...3 7 Cabling for the Carousel Controller 3 12 501610 Rev 07 01 19 Notes...
Page 70: ...4 5 Inspecting and Cleaning the Gripper and Barcode Reader 4 12 501610 Rev 07 01 19 Notes...
Page 72: ...Part II Using X Link 501610 Rev 07 01 19 Notes...
Page 96: ...Part III Replacing FRUs 501610 Rev 07 01 19 Notes...
Page 136: ...8 8 Bringing a Tape Drive Online 8 14 501610 Rev 07 01 19 Notes...
Page 158: ...9 5 Replacing a Drive Bay with a Cartridge Bay 9 22 501610 Rev 07 01 19 Notes...
Page 172: ...10 3 Replacing a Side Panel 10 14 501610 Rev 07 01 19 Notes...
Page 186: ...11 3 Upgrading a Fixed Port Assembly to an I O Port 11 14 501610 Rev 07 01 19 Notes...
Page 226: ...12 6 Replacing the Y Motor Assembly 12 40 501610 Rev 07 01 19 Notes...
Page 324: ...Part IV Reference 501610 Rev 07 01 19 Notes...
Page 352: ...B 2 Packing the XLS B 14 501610 Rev 07 01 19 Notes...
Page 354: ...C 2 501610 Rev 07 01 19 Notes...


