,QVWDOOLQJD
0XOWL5HV
'DXJKWHUERDUG
,QWHUIDFHVDQG'DXJKWHUERDUGV
4
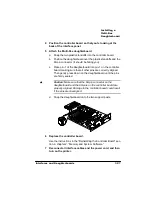
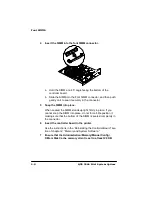
Position the controller board so that you’re looking at the
back of the interface panel.
5
Attach the Multi-Res daughterboard.
a
Snap the two plastic standoffs into the controller board.
b
Position the daughterboard over the plastic standoffs and the
60-pin connector (it should be facing you).
c
Place pin-1 of the daughterboard into pin-1 on the controller
board, making sure that all other pins are correctly aligned.
Then gently press down on the daughterboard until the pins
are firmly seated.
V
Caution: Make sure that the 60-pin connector on the
daughterboard and the 60-pins on the controller board are
properly aligned. Damage to the controller board could result
if the pins are misaligned.
d
Snap the daughterboard onto the two support posts.
6
Replace the controller board.
7
Reconnect all interface cables and the power cord, and then
turn on the printer.
.......................................
.......................................
Summary of Contents for 2060
Page 1: ...406 3ULQW 6 VWHP 2SWLRQV...
Page 9: ...QWURGXFWLRQ Q 7KLV KDSWHU About This Manual on page 1 2 Typographic Conventions on page 1 3...
Page 126: ......
Page 127: ...6HFXULW H DQG DUQLQJ X HU Q 7KLV KDSWHU Security Key on page 6 2 BuzzBox Lite on page 6 6...
Page 146: ......
Page 154: ......
Page 160: ......


