77
Setting procedure for Ethernet online connection
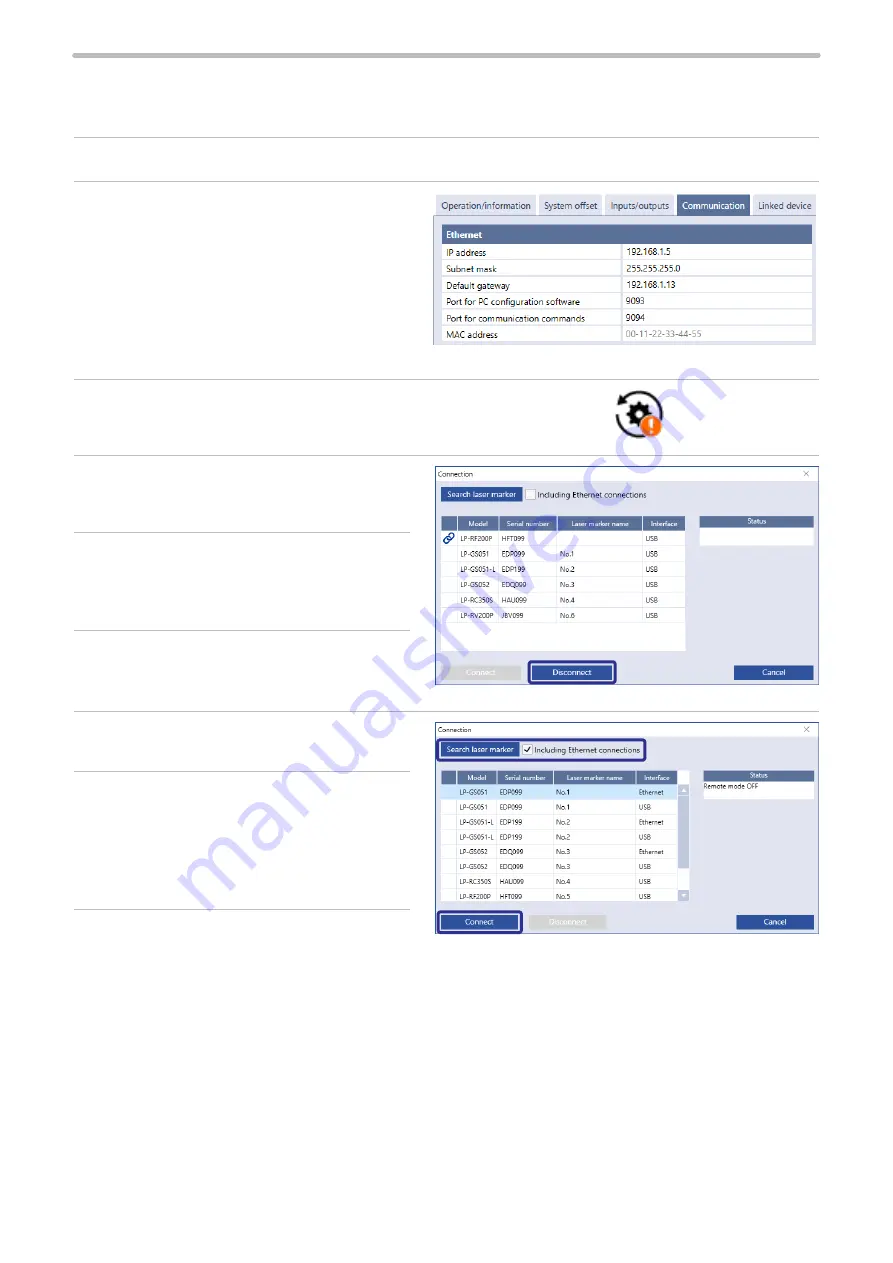
For communication between the laser marker and PC terminal using Ethernet, you need to configure the following
communication settings first.
1.
Connect Laser Marker NAVI smart and laser marker to online via a USB cable.
2.
Go to the “System settings” screen and select
“Communication” tab.
Input the Ethernet settings according to the
network settings.
Set a separate IP address not to overlap between
the laser marker and PC on the network.
3.
Select “Apply to laser marking system” on the left side of the ribbon.
4.
Select the “Connection” tool in the ribbon.
5.
In the “Connection” dialog, select “Disconnect”.
The online connection with the laser marking
system is now disconnected.
6.
Turn off the power of the laser marking system,
wait five seconds and then restart the system.
7.
On the “Startup” screen, select “Online” to open
the “Connection” dialog.
8.
To use the Ethernet connection, select “Including
Ethernet connections”, and then select “Search
laser marker”.
Check that an Ethernet connection appears in the
list.
9.
Select the laser marking system that you want to
connect and select “Connect”. When the online
connection is established, the “Marking settings” screen appears.
“Apply to laser marking
system” tool
ME-LPRH-SM-3
Summary of Contents for LP-RH Series
Page 19: ...1 Product Overview ME LPRH SM 3...
Page 42: ...2 Laser Marker Installation ME LPRH SM 3...
Page 68: ...3 Operation Method ME LPRH SM 3...
Page 90: ...4 External Control Using I O ME LPRH SM 3...
Page 138: ...5 External Control by Communication Commands ME LPRH SM 3...
Page 147: ...6 Link Control with External Devices ME LPRH SM 3...
Page 172: ...7 Maintenance ME LPRH SM 3...
Page 201: ...Troubleshooting ME LPRH SM 3...
Page 236: ...Index ME LPRH SM 3...
Page 239: ......


