BASIC OPERATIONS
2-9
Adjust Tear off Position/Cutter Position/Dispenser Position
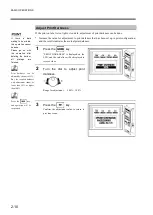
If the printed label shows slippage, adjust the operation positions according to different printing
modes.
* Increase the value for adjustment to operation position that has been set up in print
configuration, and the results indicates the acutual operation position.
Please read the following for spacific operation positions under different printing modes.
Under TEAR OFF mode: Refer to “3.3.5 Setting of Tear off Position” on page 3-18.
Under CUTTER mode: Refer to “3.3.2 Setting of Cutter Position” on page 3-15.
Under DISPENSER mode: Refer to “3.3.3 Setting of Dispenser Position” on page 3-16.
1
Press the
key.
The term of operation position is displayed
on the LCD and the value line will be
displayed in reverse video.
2
Turn the dial and change the
adjustment value.
Range for adjustment
:
-50.000mm ~ 50.000mm
Adjustment interval
:
0.042mm
3
Press the
key.
Confirm the adjustment value to return to
previous scene, and testing for the relevant
printing mode will start.
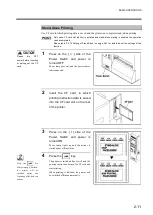
Confirm the results of testing. If further
adjustment is necessary, do the operations
again from step 1.
Under TEAR OFF mode
Test-print one piece of label and the
tearing off operation will be carried out.
Under CUTTER mode
Test-print one piece of label and the
cutting operation will be carried out.
Under DISPENSER mode
Test-print one piece of label and the
dispensing operation will be carried out.
Press the
key,
and operation will be
suspended.
If there is data waiting
to be printed, this
operation cannot be
done.
Please go on with this
operation after
deleting the data or all
printings are finished.
Summary of Contents for DURA SI600
Page 1: ...THERMAL PRINTER INSTRUCTION MANUAL ...
Page 2: ......
Page 19: ...BEFORE OPERATION 1 3 Rear View ...
Page 20: ...BEFORE OPERATION 1 4 Operating Panel ...
Page 36: ...BEFORE OPERATION 1 20 ...
Page 48: ...BASIC OPERATIONS 2 12 ...
Page 54: ...SETUP PROCEDURE 3 6 3 1 3 Menu Flow of Setting Mode ...
Page 166: ...INSTALLING AND REMOVING THE OPTIONAL UNIT 5 12 ...
Page 167: ...INSTALLING AND REMOVING THE OPTIONAL UNIT 5 13 ...
Page 174: ......
Page 175: ...P N A2302B SECOND VERSION ...


