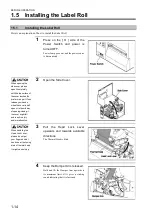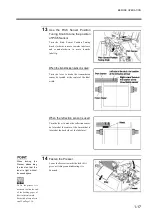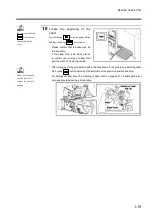
BEFORE OPERATION
1-15
5
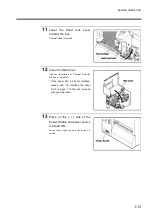
Release the Presser.
Push the Presser Release Lever and the
Presser is released.
Lift the Presser and fasten it with
Magnet.
6
Broaden the Centering Guide.
Loosen the Fastening Nail with your fingers
and broaden the Centering Guide slowly.
If you move the Centering Guide in front of
you, the inside Centering Guide linked to it
will also be moved.
7
Remove the Label Holder from
the Label-holding Axis.
Release the lock lever of Label Holder, and
remove the Label Holder from the Label-
holding Axis.
8
Install the Label Roll onto the
Label-holding Axis, decide its
position with the Label Holder
and fasten it.
Install Label Roll onto the Label-holding
Axis.
Install the Label Holder onto the Label-
holding Axis and push it in, and fasten it
with the lock lever so that there is no
clearance from Label Roll.
Please do not turn
the Fastening Nail
more than 3 turns.
Please confirm that after
the Presser is released it is
well fastened with the
Magnet.
If you release your hands
in the midway of
opening/closing, the
Presser might fall and
result in injury.
Summary of Contents for DURA SI600
Page 1: ...THERMAL PRINTER INSTRUCTION MANUAL ...
Page 2: ......
Page 19: ...BEFORE OPERATION 1 3 Rear View ...
Page 20: ...BEFORE OPERATION 1 4 Operating Panel ...
Page 36: ...BEFORE OPERATION 1 20 ...
Page 48: ...BASIC OPERATIONS 2 12 ...
Page 54: ...SETUP PROCEDURE 3 6 3 1 3 Menu Flow of Setting Mode ...
Page 166: ...INSTALLING AND REMOVING THE OPTIONAL UNIT 5 12 ...
Page 167: ...INSTALLING AND REMOVING THE OPTIONAL UNIT 5 13 ...
Page 174: ......
Page 175: ...P N A2302B SECOND VERSION ...


