


Steinberg Nuendo and Cubase
Before using the Genesys with a Nuendo/Cubase system, please ensure
that both systems are properly configured as outlined on page Error:
This involves:
•
Setting the IP addresses on Genesys and the DAW computer.
•
Connecting the network ethernet cabling.
•
Installing the ipMIDI driver.
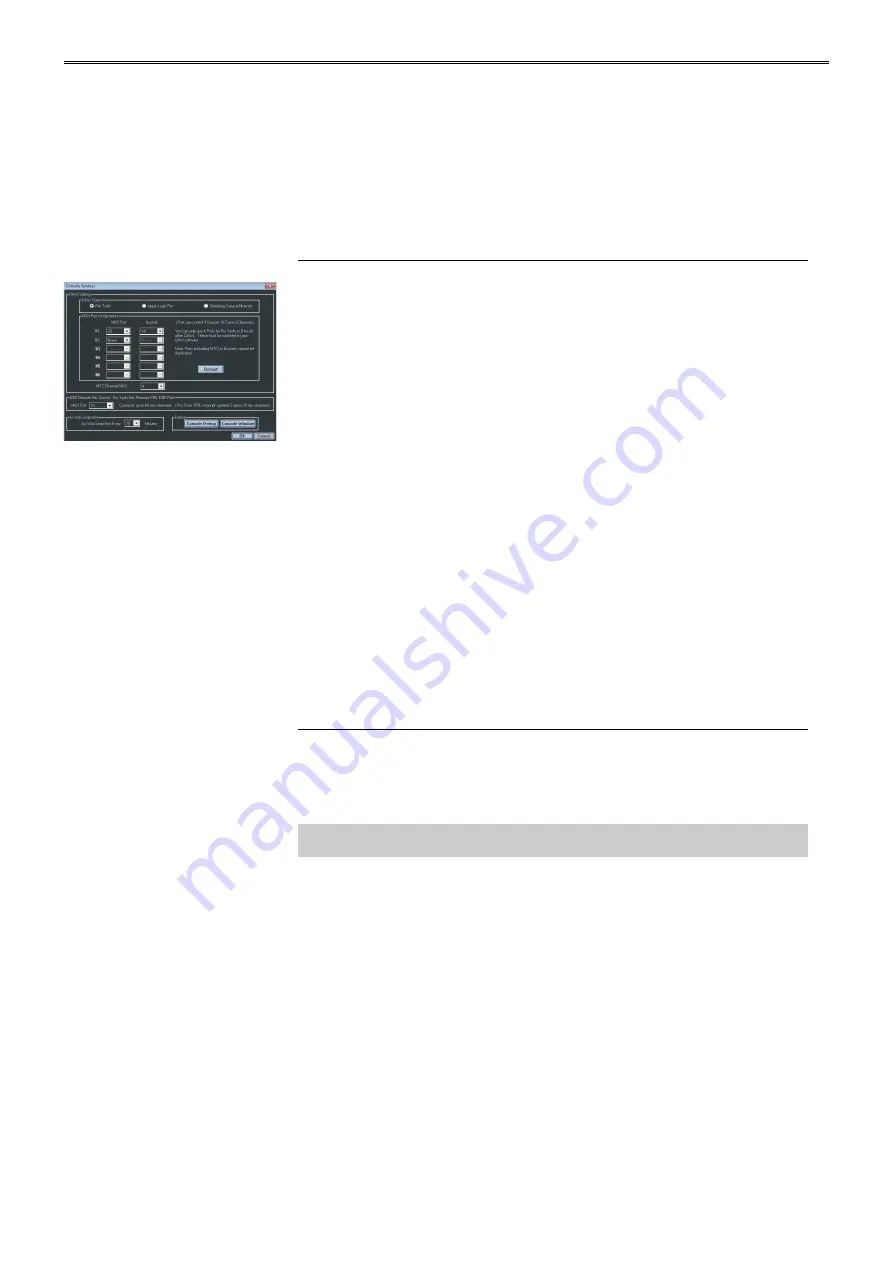
Genesys Setup
u
Go to
Settings
/
Services
and make sure
Steinberg
Cubase/Nuendo
is selected at the top of the screen.
u
For
#1
, select the MIDI Port, then the console 8 block of faders on
which you wish these DAW tracks to appear.
NB:
The 8T faders are referred to in the pull-down list of options as
Master
.
u
Repeat for all the other available MIDI Ports and fader blocks on the
console.
NB:
This mapping must match that set in Nuendo/Cubase. The same MIDI
Port cannot be used more than once (including the one set for Midi
Timecode). The 8 block of faders can only be linked to a single MIDI Port
and not repeated.
The DAW control is limited to controlling a maximum of 48
Nuendo/Cubase tracks or 6 MIDI Ports (this does not include the MIDI
Port used for MTC).
u
Once set, click
OK.
Follow the on-screen instructions to re-launch the
software to apply the new changes.
Nuendo/Cubase Setup
u
In your DAW open the
Devices Setup
dialogue from
Devices
menu.
u
Click the
+
button in the top left of the screen and select
Mackie
Control
.
You need to setup the DAW MIDI Ports in reverse order to correctly assign
the DAW tracks to Genesys.
The following assumes you have a 8 channel Genesys Black console and
the Genesys software has been set to 1-8 as MIDI Port 1 and 9-16 as
MIDI Port 2.
u
Change the
MIDI Input
and
MIDI Output
to '
xx
. Ethernet MIDI
'.
Where
xx
is the last assigned MIDI Port in the Genesys software. In this
case select '
02. Ethernet MIDI
'.
u
Click the
Apply
button.
u
Click the
Reset
button.
u
Click the
+
button and select
Mackie Control
.
u
Change the
MIDI Input
and
MIDI Output
to '
01. Ethernet MIDI
'.
u
Click
Apply
then click
Reset
.
u
In the left
Devices
column select
Mackie Control 2
and click
Reset
- 184 -


