5.
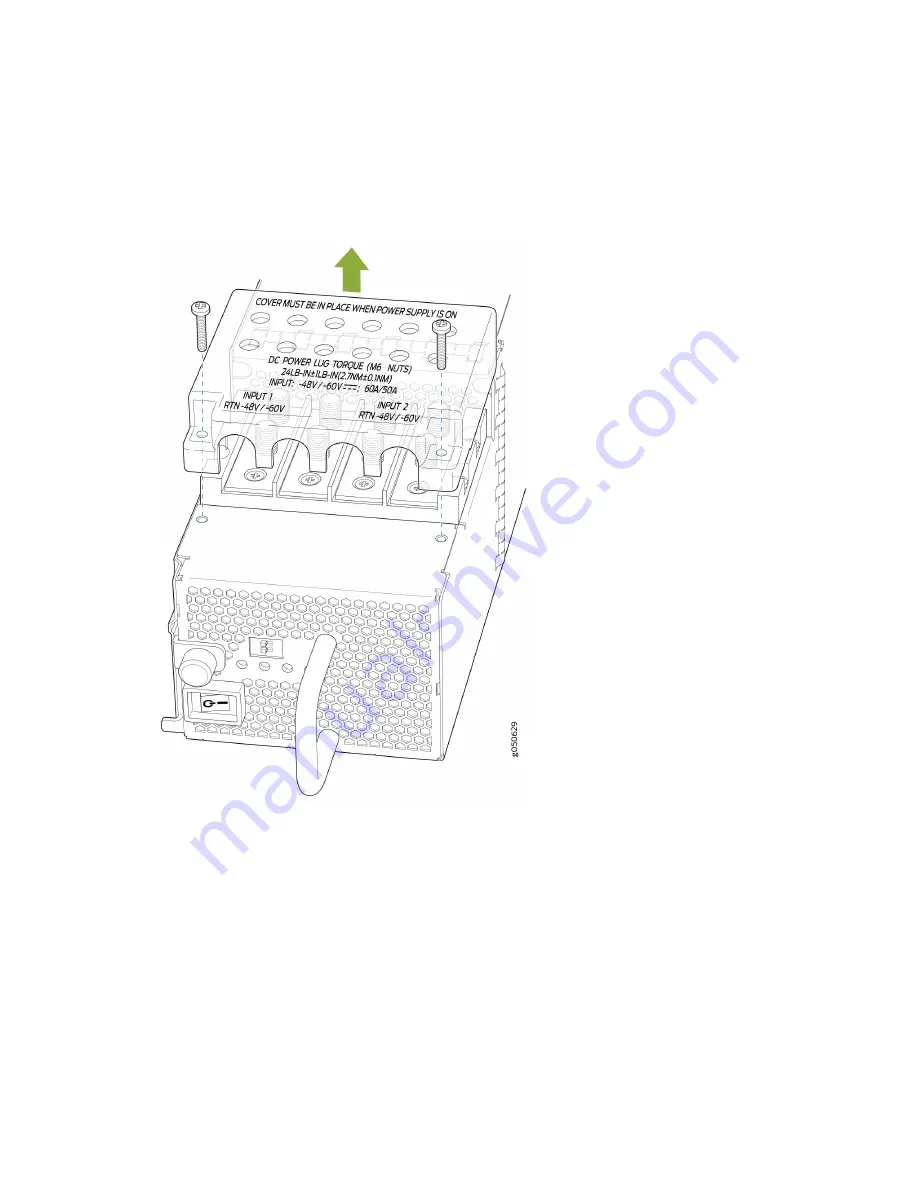
Remove the plastic cable cover from the DC power input terminals by using the
Phillips (+) screwdriver, number 2, to loosen the screws (see
).
Figure 139: Removing the Plastic Cable Cover on a QFX10000-PWR-DC Power Supply
6.
Remove the nuts from each DC power input terminal, using the 13/32 in. (10 mm) nut driver or
socket wrench to loosen the nuts.
7.
Ensure that the power source circuit breaker is open so that the voltage across the DC power
source cable leads is 0 V and that the cable leads do not become active while you are connecting
DC power.
8.
Install a power lug on each DC power cable. Ensure the lug meets the double hole standard lug
terminal for 4 AWG wire. The lugs should be dual, 1/4 in. spaced 5/8 in. apart. The terminal must
accommodate double hole standard lug terminal for 4 AWG or larger wire.
9.
Verify that the DC power cables are correctly labeled before making connections to the power
supply. In a typical power distribution scheme where the return is connected to chassis ground at
288
Summary of Contents for QFX10016
Page 1: ...QFX10016 Switch Hardware Guide Published 2022 09 09...
Page 10: ...Compliance Statements for Environmental Requirements 428 x...
Page 15: ...Figure 1 on page 5 shows a front and rear view of the QFX10016 4...
Page 16: ...Figure 1 QFX10016 Front and Rear 5...
Page 239: ...RELATED DOCUMENTATION QFX10008 Installation Overview QFX10002 System Overview 228...
Page 270: ...1 ESD point Figure 113 ESD Point on QFX10016 Chassis Rear 1 ESD point 259...
Page 287: ...Figure 130 Installing a JNP10K PWR AC2 in a QFX10016 276...
Page 322: ...Figure 159 Installing a JNP10K PWR DC2 in QFX10016 311...
Page 366: ...5 CHAPTER Troubleshooting Troubleshooting QFX10000 Modular Chassis 356...


