background image

Paper Jams

207

 Problem

 Solving

11

E-5: Paper Jams in Bypass Tray

Follow the steps below to clear a paper jam in the Bypass tray.

1

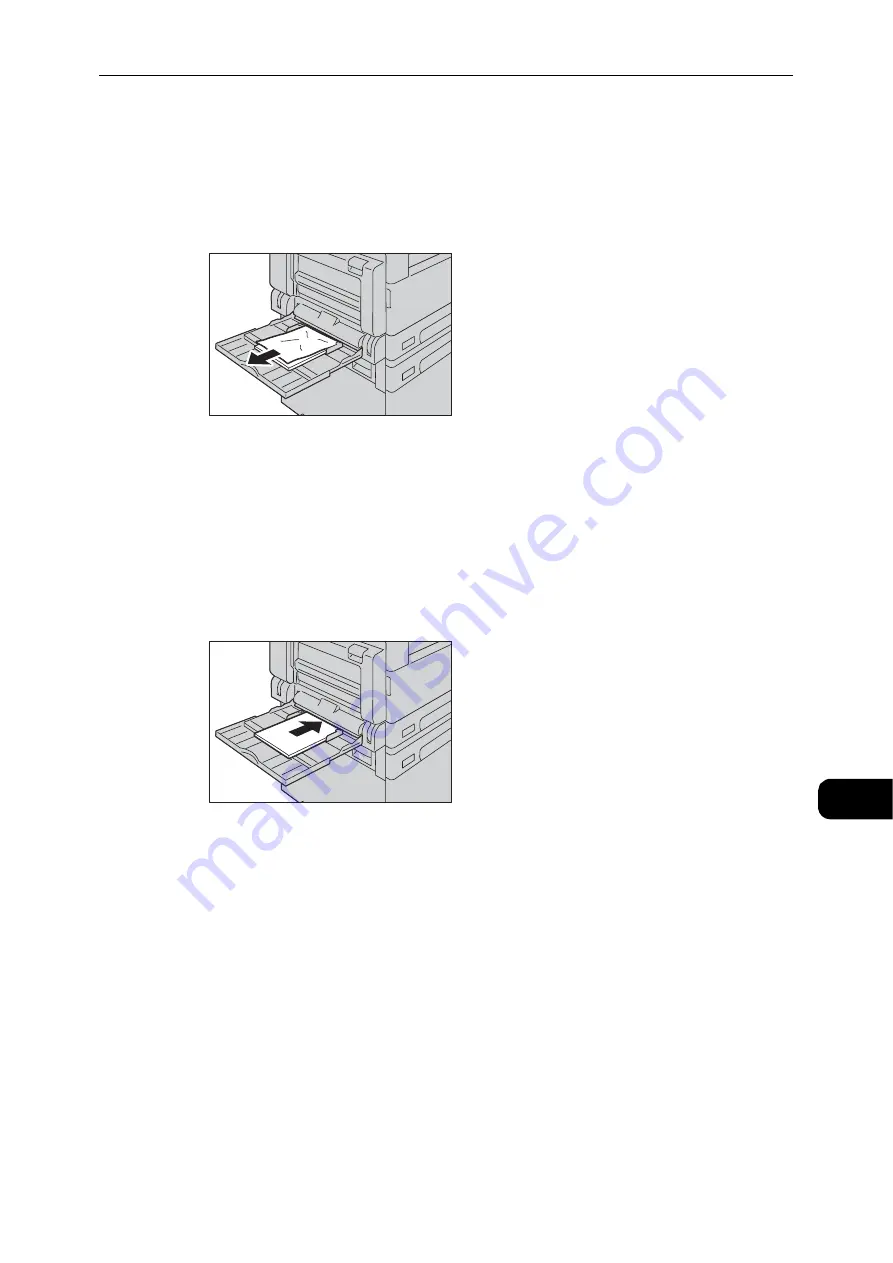
Inspect the inside (around the paper feed entrance) of the Bypass tray, and remove the 
jammed paper.

Important

z

If multiple sheets of paper were loaded, remove all the paper while you clear the jam.

Note

z

If the paper tears, check to make sure there are no remaining shreds in the machine.

2

If multiple sheets of paper were loaded, align the corners of the removed paper.

3

Insert the paper with the side to print on facing down, aligning it so that its leading edge 
lightly contacts the paper feed entrance.

4

Remove the jammed paper by referring to "E-1: Paper Jam in Left Cover [A]" (P.202).

Summary of Contents for DocuCentre S2110

Page 1: ...DocuCentre S2110 User Guide ...

Page 2: ...ved in the hard disk of the machine may be lost if there is any problem in the hard disk Fuji Xerox is not responsible for any direct and indirect damages arising from or caused by such data loss Fuji Xerox is not responsible for any breakdown of machines due to infection of computer virus or computer hacking Important 1 This manual is protected under copyright laws and cannot be copied or modifie...

Page 3: ... Address IPv4 23 Setting the Machine s IP Address IPv6 23 Setting the Machine s IP Address with the Support Tool 24 Activating the Communication Port To Use 25 Using CentreWare Internet Services 27 CentreWare Internet Services 27 Supported Environments and Settings 27 Starting CentreWare Internet Services 28 Setting Items on CentreWare Internet Services 29 Properties Tab 30 Support Tab 38 Installi...

Page 4: ...usable Paper 70 Storing and Handling Paper 71 Loading Paper 72 Loading Paper in Trays 1 and 2 Optional 72 Loading Paper in Bypass Tray 74 Changing Paper Size 76 Changing the Paper Size for Trays 1 and 2 76 Setting the Paper Size 78 Setting the Paper Type 80 5 Copy 83 Overview of Copy Operations 84 Placing Document 84 Making Advanced Settings 87 Entering the Number of Copies 88 Starting the Copy Jo...

Page 5: ...ent Scan Job 115 7 Print 117 Major Print Driver Functions 118 Printing 119 Operations during Printing 120 Stopping the Print Job 120 8 Tools 121 System Settings Procedure 122 Enter System Administration Mode 122 Change Settings 123 Exit System Administration Mode 124 System Administrator Program List 125 Clock Settings 125 System Settings 125 Account Mode Settings 130 Network Settings 132 Feature ...

Page 6: ...82 Unable to Scan 182 Unable to Load Scan Data to a Computer 182 Scan Image Quality Problems 183 Network Related Problems 185 Problems Using TCP IP LPD Port9100 185 Problems Using CentreWare Internet Services 185 Internet Intranet Connection Problems 186 IPv4 or IPv6 Connection Problems 188 Error Code 189 Paper Jams 201 E 1 Paper Jam in Left Cover A 202 E 2 Paper Jam in One Tray Module Cover B 204...

Page 7: ...py Feature 221 Notes and Restrictions on the Use of the Print Feature 221 Notes and Restrictions on the Use of the Scan Feature 222 Notes and Restrictions when Connecting to Internet or Intranet 222 Notes and Restrictions when Operating from Computers 223 Notes and Restrictions for Using TCP IP LPD Port9100 223 Notes and Restrictions for IPv6 Connection 223 Index 225 ...

Page 8: ...8 ...

Page 9: ...1 1Before Using the Machine ...

Page 10: ...ion on the environment of the personal computer in use and the basic knowledge and operations of networking environments refer to the manuals provided with the personal computer operating system and network system After reading this guide be sure to keep it handy for quick reference It will be useful in case you forget how to perform operations or if a problem occurs with the machine Warning The e...

Page 11: ...solving for this machine Software Product Manual Disc This media contains User Guide Refer to the product manuals contained on the media Help Accessible from the Software Driver Help The help describes the print or scan features and operations Guides for Optional Components Optional components are available for this machine Optional components come with an installation procedure guide that provide...

Page 12: ... use CentreWare Internet Services 4 Loading Paper Describes the types of paper and other media that you can use on the machine and how to load paper in a tray 5 Copy Describes the basic operation and features of the copy feature 6 Scan Describes the basic operations and features of the scan feature 7 Print Describes the basic printing operations 8 Tools Describes the System Administration mode as ...

Page 13: ...tures z A cross reference included in this guide z Names of features screen messages and input text z Folders files applications button or menu names displayed on the screen z Names of menus commands windows or dialog boxes displayed on the computer screen and their buttons and menu names button z Hardware buttons on the control panel key z Keys on the keyboard of the computer z Path to a certain ...

Page 14: ...opyright 1994 2006 The FreeBSD Project All rights reserved Redistribution and use in source and binary forms with or without modification are permitted provided that the following conditions are met Redistributions of source code must retain the above copyright notice this list of conditions and the following disclaimer Redistributions in binary form must reproduce the above copyright notice this ...

Page 15: ... also granted to make and use derivative works provided that such works are identified as derived from the RSA Data Security Inc MD5 Message Digest Algorithm in all material mentioning or referencing the derived work RSA Data Security Inc makes no representations concerning either the merchantability of this software or the suitability of this software for any particular purpose It is provided as ...

Page 16: ...Before Using the Machine 16 Before Using the Machine 1 ...

Page 17: ...2 2Environment Settings ...

Page 18: ...puter with a USB cable Use as a Network Printer Print from network connected computers using the TCP IP protocol To use the machine as a network printer you need to activate the port to use for printing z LPD Activate this setting when using the LPD port z Port9100 Activate this setting when using the Port9100 port Reference z For information on how to set TCP IP refer to Setting the Network Envir...

Page 19: ...the Media Software Product Manual Reference z For information on how to use this feature refer to Loading Scan Data Using the PC Based Application P 113 Using the Network connection Scan with PC application Uses the Network TWAIN SOAP to import scan data in a computer with a TWAIN or Windows Image Acquisition WIA compatible application To use this function you must install the scan driver from the...

Page 20: ...B Interface The machine supports the USB 2 0 interface Note z You can use a cable up to 5 m in length according to the USB 2 0 standard To connect the USB interface 1 Press the power switch to the position to turn the power OFF Note z Check that the display of the status machine diagram is turned off 2 Connect a USB cable to the USB 2 0 interface connector 3 Connect the other end of the USB cable ...

Page 21: ...terface To connect the Ethernet interface 1 Press the power switch to the position to turn the power OFF Note z Check that the display of the status machine diagram is turned off 2 Connect a network cable to the Ethernet interface connector Note z Prepare a network cable suitable for your network connection When you replace the network cable contact our Customer Support Center ...

Page 22: ...Environment Settings 22 Environment Settings 2 3 Press the power switch to the position to turn the power ON ...

Page 23: ...IP address from the control panel refer to Network Settings P 132 After setting the program numbers from 1008 to 1020 print out the System Settings Report and check the applied settings Setting the Machine s IP Address IPv6 The machine supports IPv6 addresses in an IPv6 network environment The machine s IP address type is set to IPv4 by factory default To use the machine in an IPv6 network environ...

Page 24: ...our computer The Launcher runs automatically 2 Select Support Tools Manuals on the main menu screen 3 Select IP Address Settings under Support Tools 4 Select Advanced on the Configure Printer screen 5 Enter your settings on the IP Address Settings screen and select Next 6 Check your settings on the Confirm the settings screen and select Apply The specified settings are applied 7 Select Finish on t...

Page 25: ...ntreWare Internet Services refer to Setting Items on CentreWare Internet Services P 29 To activate a communication port 1 Start CentreWare Internet Services Reference z For more information refer to Starting CentreWare Internet Services P 28 2 Click the Properties tab 3 From the menu on the left select Connectivity Port Description SNMP Activate this port to use the SNMP protocol used for operatio...

Page 26: ...Environment Settings 26 Environment Settings 2 4 Click Port Settings and check the checkbox of the desired port 5 Click Apply Note z Restart the machine to enable the new settings ...

Page 27: ... Network Environment P 23 z You can change any settings on CentreWare Internet Services when the machine is in standby status or Power Saver mode and has no running job Supported Environments and Settings Operating Systems and Web Browsers The operation of CentreWare Internet Services has been verified for the following web browsers Operating System Web Browsers Windows 10 Windows Internet Explore...

Page 28: ...wsing History 3 In the Temporary Internet Files tab select Every time I visit the webpage or Every time I start Internet Explorer for Check for newer versions of stored pages 4 Click OK 5 Click OK in the Internet Options dialog box Starting CentreWare Internet Services To start CentreWare Internet Services 1 Start your computer and a web browser 2 In your web browser s address bar enter the machin...

Page 29: ...ernet Services P 27 and System Administrator Settings Security P 37 z You cannot enter the system administration mode from a computer while the machine control panel is being used or the machine side is in the system administration mode or there are any current or pending jobs Also you cannot operate the machine control panel while entering the system administration mode from a computer Important ...

Page 30: ...You can enter machine comments up to 255 ASCII code characters Apply button You can apply changes by pressing this button Usage Counters General Setup You can check the total number of pages printed for each service Power Saver Settings General Setup Time to Low Power Mode You can set the time elapse from the last operation until the machine enters Low Power mode You can set a value between 1 and ...

Page 31: ...k IPv4 or IPv6 The Dual Stack setting lets you use both IPv4 and IPv6 addresses Default IPv4 General Protocol Enabled is displayed Physical Connection Ethernet is displayed Host Name Host Name is displayed IPv4 z IP Address Resolution You can set the method used to acquire the IP Address Subnet Mask and Gateway Address You can select from STATIC DHCP BOOTP RARP or DHCP Autonet for the address acqu...

Page 32: ...advanced SNMP v1 v2c settings by pressing this button z Community Name Read Only You can enter the community name to acquire up to 32 ASCII code characters Default blank public z Community Name Read Write You can enter the community name to acquire write up to 32 ASCII code characters Default blank private z Trap Community Name You can enter the community name for trap notification up to 32 ASCII ...

Page 33: ...can set the UDP port No for entry a value between 1 and 65535 z SNMP Version You can specify the SNMP version for entry as v1 or v2c Default v1 z Trap Community Name You can enter the trap community name for entry between 1 and 32 ASCII code characters Default SNMP_trap z Trap to be Received You can set whether to send notification of Print Cold Start and Authentication Failure events Delete butto...

Page 34: ...ty Protocols You can set Port9100 General Port9100 Port Status You can check Enabled to use Port9100 Default On Physical Connection Ethernet is displayed Port Information TCP Port Number You can set the Port9100 port No a value between 1 and 65535 You must set a unique number for each port Default 9100 Maximum Connections per Port The maximum number of connections is displayed End of Job Timeout Y...

Page 35: ... from Internet Services or Printer Model IP Address Default Internet Services Apply button You can apply changes by pressing this button Note z Reboot the machine to enable new settings Network TWAIN You can set the Network TWAIN protocol General Network TWAIN Port Status You can check Enabled to use Network TWAIN Default On Physical Connection Ethernet is displayed Connection Time Out Set the con...

Page 36: ...IP address Default 0 Delete button You can delete the accessible IPv4 address IPv6 Filtering IP Filtering You can check Enabled to enable IP Filtering Default Off Delete Edit selection checkbox You can select the IP Filter to edit delete IP Filter Rule List The accessible IPv6 address is displayed Add button The Add IP Filter Rule IPv6 screen is displayed Adds an accessible IPv6 address You can ad...

Page 37: ...trator s Passcode You can set the system administrator s passcode between 4 and 12 ASCII code characters or blank Default x admin Retype Administrator s Passcode You need to re enter the system administrator s passcode Maximum Login Attempts When login attempts using the system administrator s user ID fail repeatedly access is denied when the number of failed attempts reaches the number set here S...

Page 38: ...ink for support information by pressing this button Name You can enter the link name between 1 and 63 ASCII code characters URL You can enter the link address between 1 and 63 alphanumeric characters including the at symbol percent sign period colon forward slash underline _ hyphen tilde question mark and ampersand which are valid Apply button You can apply changes by pressing this button ...

Page 39: ... Print Scan Hub P 40 To install a specific driver use the Custom Installation menu Reference z For more information refer to the Media Information included in the Media Software Product Manual Driver Name Description Print Driver The recommended print driver for this model Common Print Driver The V4 print driver which can be used commonly for various models z Common Print Driver is suitable for pr...

Page 40: ... Manual into your computer Quick Setup To install easily the basic drivers and software 1 Select Quick Setup on the main menu screen Reference z For more information on Quick Setup refer to Installing the Print Driver Scan Driver P 39 Custom Installation To install Print Scan Hub only 1 Select Software under Custom Installation on the main menu screen 2 Select Print Scan Hub under Install Software...

Page 41: ...3 3Product Overview ...

Page 42: ... Panel P 50 4 Center tray Copies and prints are delivered here facing down 5 Front cover Open this cover to replace consumables 6 Tray 1 standard tray Load paper here 7 Tray 2 One Tray Module Optional Optional tray Load paper here 8 Stand Mounts the machine on the floor Contains storage space for paper This stand is available when the One Tray Module is installed 9 Locking casters Locks the wheels...

Page 43: ...Component Description 1 Power switch Switches the power of the machine on and off Reference z For more information refer to Power Source P 46 2 Power cord connector Connects the power cord 3 Adjusting foot Prevents the machine from toppling over Move the machine to its installation site and then rotate this adjuster in clockwise direction until it touches a floor 4 USB 2 0 interface connector Type...

Page 44: ... Inside No Component Description 1 Toner cartridge Contains toner the powder used to form the image 2 Drum cartridge Contains photoconductors 3 Fusing unit Fuses toner on paper Important z Do not touch this unit as it is extremely hot 1 3 2 ...

Page 45: ...lear paper jams 2 Document feeder cover Open this cover to clear paper jams 3 Inner cover Open this cover to clear paper jams 4 Document guides Use these guides to align the edges of documents 5 Document feeder tray Load documents here 6 Document stopper Prevents outputs from falling off 7 Document output tray Scanned documents are delivered here 8 Constant velocity transport glass Scans a loaded ...

Page 46: ...htly longer than normal depending on the device configuration Switch the power off at the end of the day or when not using the machine for an extended period of time 1 Press the power switch to the position to switch the power on Note z While the machine is warming up the status machine diagram displays as shown in the image The machine is not accessible while it s warming up z Make sure that the ...

Page 47: ... is being printed z While a job is being copied z While a job is being scanned z When switching the power off wait 5 seconds after outputs have been delivered Note z When powering the machine on after it has been switched off wait 10 seconds after the display goes off 1 Before switching the power off make sure that the machine has completed all copy or print jobs Then make sure that the Data indic...

Page 48: ...he control panel lights up when the machine is in the Power Saver mode You can set the length of time to wait until the machine enters Low Power Sleep mode Low Power mode is set to 1 minute and Sleep mode to 1 minute as default If the machine is left idle for 1 minute it switches to Low Power mode If it is left idle for another minute it switches to Sleep mode You can set the amount of time the ma...

Page 49: ...m Administration mode from a computer z Pressing any button on the control panel z Taking paper out or putting in a tray z Opening or closing any cover of the machine Exiting Sleep mode z Receiving a job z Entering System Administration mode from a computer z Pressing the Power Saver button z Pressing any button on the control panel This feature is available only when the Return from Sleep Mode by...

Page 50: ... Card Copy P 98 3 Original Size button Press this button to specify the scanning size and orientation for using the document glass When the document is placed on the document feeder the scanning size is set automatically The scanning size changes on the status machine diagram every time that the button is pressed Reference z For more information refer to Original Size P 102 Press this button to sw...

Page 51: ... other than system errors such as paper jam or out of paper occurs in the machine 11 Data indicator Blinks while the machine is sending or receiving data from a client 12 Last Original button Press this button when the last document has already been scanned This button blinks while the machine is scanning a document and lights up while the machine is waiting for the next document to scan 13 C Clea...

Page 52: ...P 96 20 Lighten Darken button Press this button to select a copy density level or toner saver mode The selection moves to the right on the status machine diagram every time that the button is pressed When the button is pressed while the rightmost icon toner saver mode is lit the selection moves back to the leftmost icon Reference z For more information refer to Lighten Darken P 96 21 Original Type...

Page 53: ...feature Normally the light is off Off The selection moves to the right from Off disabled J 2 up J 4 up every time that the button is pressed When the button is pressed while 4 up is lit the light is turned off again When 2 up or 4 up is selected the scanning size and orientation that matches the paper size are displayed on the original size display area of the status machine diagram Reference z Fo...

Page 54: ...ystem Administrator ID program number and job type Prt for Print Scn for Scan and Err for Error 4 Total Copy display area Displays the total number of copies Also displays a program number or an error code 5 Original Size display area Displays the scanning size and orientation that are specified with the Original Size button when the document glass is used When the document is placed in the docume...

Page 55: ...dge This icon is lit when the drum cartridge needs to be replaced in the near future Prepare a new drum cartridge No error code is displayed at this point The icon blinks when the drum cartridge needs to be replaced immediately Replace the drum cartridge with a new one The error code J 4 appears on the status machine diagram Reference z For information on how to replace the Drum Cartridge refer to...

Page 56: ...artridge runs out of ink and the drum cartridge ends its life Area blinking When a paper document jam occurs or any cover is open the notification area blinks as shown below When any paper or document jam occurs will also appear Front cover Left cover A One tray module cover B Tray 1 Tray 2 Bypass tray Document feeder ...

Page 57: ...ecute copy jobs on the machine Important z Passcode entry is not required for print jobs or scan jobs Multiple Account Mode Up to 10 user accounts are set on the machine in the Multiple Account Mode You can set a desired passcode for each user account Users are required to enter their account number and passcode to log in to the machine The system administrator can set the copy job limit on each u...

Page 58: ...e system administrator s passcode used for entering the system administration mode from the control panel For information refer to Enter System Administration Mode P 122 For security reasons as you enter each digit of the passcode a hyphen appears in the display instead of the actual number that you enter Numeric keypad ...

Page 59: ...ered passcode is correct the machine enters Copy Mode and 1 appears in the display The Log In Out button is lit while you are logged in to the machine Note z You do not need to log in to the machine for a scan job or print job z To log out press the Log In Out button again Start button Log In Out button ...

Page 60: ...s in Multiple Account Mode When the machine is in Multiple Account Mode Id _ _ appears blinking in the status machine diagram Reference z For information on how to select an account mode in the system settings refer to Account Mode Settings P 130 1 Enter an account number using the numeric keypad The account number that you enter appears in the display Numeric keypad ...

Page 61: ..._ appears in the status machine diagram 3 Enter a passcode which corresponds to the account number that you just entered using the numeric keypad For security reasons as you enter each digit of the passcode a hyphen appears in the display instead of the actual number that you enter Start button Numeric keypad ...

Page 62: ...ntered passcode is correct the machine enters Copy Mode and 1 appears in the display The Log In Out button is lit while you are logged in to the machine Note z You do not need to log in to the machine for a scan job or print job z To log out press the Log In Out button again Start button Log In Out button ...

Page 63: ...When using this function activate the SNMP port Default Enabled z If you failed to retrieve information of machine configuration or are using the USB interface connection set the information of machine configuration manually For more information click Help on the screen to display Help Information Follow the steps below to set the option configuration 1 From your computer s Start menu select Print...

Page 64: ... Click Bi Directional Setup 4 Click Get Information from Printer If Printer Searching Method is displayed The machine s information is not loaded onto the print driver Complete the following operations 1 Select Specify Address and click Next ...

Page 65: ...Setting the Options Configuration 65 Product Overview 3 2 Enter the printer name or IP Address in the Printer Name or IP Address field 3 Click Finish 5 Click OK ...

Page 66: ...Product Overview 66 Product Overview 3 ...

Page 67: ...4 4Loading Paper ...

Page 68: ...nt driver or from a tray that does not support the loaded paper Select the correct paper size type and tray to ensure successful printing Note z Basis weight is the weight of one sheet of paper of 1 m2 in size z Ream weight is the weight of 1 000 sheets of duodecimo size 788 x 1 091 mm paper Supported paper sizes z Maximum A3 11 x 17 z Minimum A5 WARNING Do not use conductive paper such as origami...

Page 69: ...ndard paper the following paper also can be used Paper Type Quality Lightweight 60 to 63 gsm Plain 1 64 to 74 gsm Plain 2 75 to 90 gsm Paper Name Basis Weight gsm Paper Type Notes Countermeasure P paper 64 Plain 1 Tough plain paper suitable for internal documents at the office Paper Name Basis Weight gsm Paper Type Notes Countermeasure Business 70 Plain 1 75 Plain 2 80 Plain 2 Performer 70 Plain 1...

Page 70: ...treatments z Paper with rough surface such as pulp paper or fibrous paper z Punched paper z Transparency film Paper Name Basis Weight gsm Paper Type Notes Countermeasure DOUBLE A 80 Plain 2 Ncolor209 209 Extra HW Colotech 90 Plain 2 100 Heavyweight Xerox Laser Copier White Label 1 cut Label paper Xerox Laser Copier White Label 8 cut Label paper Xerox Laser Copier White Label 16 cut Label paper Xer...

Page 71: ...e keep the following points in mind when loading paper in a tray z Align the stack of paper neatly before loading it in a tray z Do not use creased or wrinkled paper z Do not use warped or curled paper z Do not load paper of mixed sizes together into a tray z Take care not to touch the print side Oils from your skin may adhere to the print media which may affect printing quality If unavoidable be ...

Page 72: ...ning the paper of the same size and orientation that was being used for copying or printing and continue copying or printing Auto Tray Switch feature Loading Paper in Trays 1 and 2 Optional The following describes the procedure for loading paper in Trays 1 and 2 When the machine runs out of paper during copying or printing and an error code is displayed on the screen add paper in the tray Copying ...

Page 73: ...orrect position before loading paper 4 Load paper with the side to copy or print on facing up Align the leading edge of paper with the left side of the tray Important z Do not load paper above the maximum fill line It may cause paper jams or machine malfunctions z Do not place any paper or objects in the empty space on the right side of Tray 1 or 2 It may cause paper jams or machine malfunction ...

Page 74: ... of paper to be loaded Important z To prevent paper jams or loading errors do not remove paper from its packaging until needed Note z Fan the stack of paper well before loading paper in a tray It prevents paper from sticking to each other and reduces paper jams 1 Open the Bypass tray Note z If necessary pull out the extension tray Pull out the extension tray gently 2 Load paper with the side to be...

Page 75: ...Loading Paper 75 Loading Paper 4 3 Gently align the paper guides to paper loaded 4 Execute the copy or print operation ...

Page 76: ...the paper size and orientation settings refer to Setting the Paper Size P 78 Changing the Paper Size for Trays 1 and 2 The following describes the procedure for changing paper size in Trays 1 and 2 1 Pull out the tray until it stops Important z While the machine is copying or printing do not pull out the tray that the job uses z To prevent paper jams or loading errors do not load different sizes o...

Page 77: ... side of the tray Important z Do not load paper above the maximum fill line It may cause paper jams or machine malfunctions 6 Push the tray in gently until it stops Important z When pushing the tray in do it slowly If the tray is pushed with too much force it may cause machine malfunctions Note z Affix the paper size label to the front of the tray 7 Set the paper size setting Reference z Refer to ...

Page 78: ...Paper Supply button to select a tray where the paper you will specify the paper size and orientation is loaded In the status machine diagram the tray indicator lights up on the selected tray and its paper size and orientation are displayed on the paper size display 2 Press and hold the Size Press 2sec button for more than 2 seconds until the paper size in the paper size display area starts blinkin...

Page 79: ...e displayed in the status machine diagram The Start button lights up blinking during the settings 4 Press the Start button to confirm the settings To exit paper size setting mode without saving the settings press the Clear All button or the Stop button Important z Be sure to press the Start button Otherwise the settings of paper size and orientation are canceled and remain the previous settings ...

Page 80: ...Note z When loading paper in the bypass tray to print from a computer you can set the paper type also on the print driver screen For more information refer to the print driver help Reference z Refer to Supported Paper Type P 69 1 Enter the System Administration Mode Reference z Refer to Enter System Administration Mode P 122 2 Press the program number of the tray that you want to confirm and press...

Page 81: ...utton After the entered program number blinks twice the new setting is confirmed 5 After you confirm the setting press the Log In Out button and exit the System Administration mode Note z When you exit the System Administration mode the Log In Out button light is turned off Program Number Item 0 Normal 2 Heavyweight 5 Lightweight ...

Page 82: ...Loading Paper 82 Loading Paper 4 ...

Page 83: ...5 5Copy ...

Page 84: ...ct one of the following alternative document sizes For more information refer to System Settings P 125 z 8 5 x 13 or 8 5 x 14 z China 8K 16K or Taiwan 8K 16K Supported documents types weights Documents with weights from 38 to 128 gsm 50 to 128 gsm for 2 Sided documents can be placed in the document feeder and scanned The document feeder accepts the following number of sheets Important z To avoid p...

Page 85: ...ided document facing up Important z Make sure to exit the power saver mode before loading documents on the document feeder Note z The document indicator lights up when a document is placed in the document feeder If the indicator is not lit place the document again 3 Align the document guides to each side of document 4 Open the document stopper Lights up ...

Page 86: ...fer to Original Size P 102 Follow the steps below to place document on the document glass You can place a single sheet document or bound document such as book on the document glass 1 Open the document cover Important z When using the document glass make sure to close the document cover after finishing your copy job 2 Place the document face down and align it against the top left corner of the docu...

Page 87: ... Size P 102 Making Advanced Settings Note z The displayed settings may vary according to models z You may need to enter a passcode to use the copy feature Ask your system administrator for the passcode Reference z For more information on advanced settings refer to Advanced Copy Settings P 91 z For more information on entering a password refer to Enter System Administration Mode P 122 ...

Page 88: ... 999 for the number of copies 1 Use the numeric keypad to enter the desired number of copies The entered value appears in the status machine diagram Note z If you have entered an incorrect value press the C Clear button and then enter the correct value Numeric keypad C Clear button ...

Page 89: ...r Code P 189 Placing document on the document glass Copying multiple sets of documents If any of the following features are set a copy job may not be started after loading a document due to the blinking Last Original button z Collated On z 2 Sided 1 J 2 Sided or 2 J 2 Sided z Pages per Side 2 Pages or 4 Pages z ID Card Copy On In this case press the Last Original button after scanning the last doc...

Page 90: ...Copy 90 Copy 5 Operations Performed While Copying You can stop the currently copying job Canceling the Current Copy Job To cancel the currently executing copy job 1 Press the Stop button Stop button ...

Page 91: ...paper same appearance as the documents Setting Item Description See Page 2 Sided Used to select 1 Sided or 2 Sided copying P 91 Pages per Side Used to copy multiple documents on a single page P 93 Collated Sets the output method to use when making multiple sets of copies P 94 Original Type Sets the document type P 95 Lighten Darken Adjusts the copy density P 96 ID Card Copy Used to copy ID cards P...

Page 92: ...ed for short side binding change the binding side setting and place the document in landscape orientation It is not copied properly for short side binding when either the document or paper is placed in portrait orientation or sing the Pages per Side feature Reference z For more information refer to Feature Settings P 136 2 When using the document glass 1J2 Sided or 2J2 Sided is selected and all do...

Page 93: ...ign the top edge of the paper against the top edge of the tray Note z Setting Pages per Side automatically sets the Reduce Enlarge setting to automatic z The reduction enlargement is adjusted automatically within the range of 25 to 400 1 Press the Pages per Side button to select the desired copy method Off Disables the Pages per Side feature 2 Pages Copies 2 documents on a single page 4 Pages Copi...

Page 94: ...g sets of multiple documents 1 Press the Collated button to select the desired output method Off the light is off Uncollated The machine outputs the specified number of copies and sorts sheets by page On The machine outputs sheets sorted into sets that are arranged in page order When a document is placed in the document feeder it automatically turns on You can also change the setting to off Last O...

Page 95: ...iginal Type You can set the type of document to optimize copies 1 Press the Original Type button to select a document type Text Select this option when the document contains sharp black and white objects such as text Photo Text Select this option when the document contains both text and photos Photo Select this option when the document contains only photos Last Original button Original Type button...

Page 96: ...ies with a fairly dark density Use this setting to scan documents containing fairly light objects Normal Creates copies with the same density as the document Lighten 1 Creates copies with a fairly light density Use this setting to scan documents containing fairly dark objects Lighten 2 Creates copies with the lightest density Use this setting to scan documents containing dark objects Toner Saver C...

Page 97: ...ts an appropriate zoom ratio by calculating the document size and the specified paper size to enable the document to fit on the page Note z When using the automatic zoom ratio you cannot select the automatic paper selection Fixed zoom ratio You can set the zoom ratio by selecting from the fixed zoom ratios Preset zoom ratio Custom You can set a custom zoom ratio in the System Administration mode V...

Page 98: ... becomes disabled z When a document is placed in the document feeder the ID Card Copy feature becomes disabled z The default image quality settings for the ID Card Copy feature are as follows z Original Type Photo Text z Background Suppression Off You can select the copy mode from the one card mode and the multiple mode The following shows some examples of output images z One card mode Copying bot...

Page 99: ...ard Copy feature 1 Place an ID card face down at least 5mm away from the top left corner of the document glass and then close the document cover Placing the ID card too close to the corner of the document glass may not copy the edge of the ID card properly Important z The document cover must be closed so that the machine can detect the document size correctly z When the machine cannot detect the d...

Page 100: ... of cards in advance refer to Feature Settings P 136 One Card Mode The scanning area varies depending on the status of the skew correction feature z When the skew correction feature is enabled the machine detects the card size in the range of 150 x 150 mm and rotates the scanned image so as to set the output image at a right angle Note z The machine can adjust the inclination angle between 15 and ...

Page 101: ...o manually Reference z For more information on how to set the skew correction feature refer to Feature Settings P 136 Multiple Mode The machine scans the documents placed on the document glass within 210 x 297 mm and detects the size of each document You can copy various types of cards and documents in one sheet The scanning process can be repeated up to eight times 4 Press the Paper Supply button...

Page 102: ...llows 8 When the multiple mode is selected press the Last Original button after you finished scanning all of the documents to be copied Note z The machine finishes scanning after repeated the process eight times and starts to print Original Size You can set the document size and orientation After placing the document on the document glass make sure to set the size and orientation of the document I...

Page 103: ...ze and the zoom ratio When using the document feeder Aut Automatic document size detection When a document is placed in the document feeder the machine automatically detects a document size from the supported standard sizes Paper Supply You can set the tray for copying Note z If you load paper in the bypass tray the paper supply is automatically set to the bypass tray 1 Press the Paper Supply butt...

Page 104: ...background suppression in the System Administration mode For more information refer to System Administrator Program List P 125 Edge Erase You can set to erase the black shadows created around the edge of the paper when copying with the document cover open or copying a bound document You can set a value between 0 and 40 mm in 1 mm increments for the Edge Erase feature Note z The value set for edge ...

Page 105: ...e with Accounting function z Display set the passcode z Display the total number of copied impressions z Display set the maximum number of impressions permitted for copying z Clear the total number of impressions Reference z For information on accounting modes refer to Account Mode Settings P 130 Operations when using the Copy Feature The operation procedure differs depending on the account mode t...

Page 106: ...Copy 106 Copy 5 ...

Page 107: ...6 6Scan ...

Page 108: ...r Supported document sizes You can place the standard size document in the document feeder When document is placed in the document feeder the machine detects the document size automatically The following standard size documents are detected automatically A5 A5 A4 A4 A3 B5 B5 B4 8 5 x 11 8 5 x 11 8 5 x 13 8 5 x 14 11 x 17 16K and 8K Note z The document sizes with an asterisk can be automatically de...

Page 109: ...ent on the document feeder You can place a single or multiple pages of a document 1 Remove any paper clips or staples from document before placing it in the document feeder 2 Place the document in the center of the document feeder with the side to be scanned or the front surface of a 2 Sided document facing up Important z Make sure to exit the power saver mode before loading documents on the docum...

Page 110: ... x 14 11 x 17 16K and 8K China 8K 16K and Taiwan 8K 16K Note z TWAIN driver supports the document sizes described above The supported document size by Windows Image Acquisition WIA driver depends on the running application Follow the steps below to place document on the document glass You can place a single sheet document or bound document such as book on the document glass CAUTION z Do not apply ...

Page 111: ...ocument cover Important z When using the document glass make sure to close the document cover after finishing your scan job 2 Place the document face down and align it against the top left corner of the document glass 3 Close the document cover ...

Page 112: ...anned image may be slightly larger than the document size in some cases This is due to the margin of error introduced with processing Scan Function Connection Details See Page Using an application Network USB Scan data is loaded into the computer using the TWAIN or Windows Image Acquisition WIA compatible application P 113 ...

Page 113: ...ble and Windows Image Acquisition WIA compatible applications you are using z The supported applications are 32 bit only Follow the steps below to perform the operation 1 Place the document on the machine Reference z Refer to Placing the Document P 108 2 Start the PC application on your computer 3 Select the menu item for selecting a scanner source 4 Select FX DocuCentre S2110 Setting the Machine ...

Page 114: ...Scan 114 Scan 6 5 Make advanced settings as needed Note z For information on the Scan functions click Help in the screen to display Help Information 6 Click Scan ...

Page 115: ...s during Scanning You can stop the currently scanning job Canceling the Current Scan Job To cancel the currently scanning job On the machine 1 Press the Stop button On the computer 1 Press Cancel on the screen that appears while scanning Stop button ...

Page 116: ...Scan 116 Scan 6 ...

Page 117: ...7 7Print ...

Page 118: ... Options tab is required to make the functions available Any functions not displayed on the screen are not available For information on how to set the option information refer to Setting the Options Configuration P 63 Pages Per Sheet Prints a multiple page document on a single page 2 Sided Print Prints on both sides of each page Poster Enlarges one page of print data to the specified size and prin...

Page 119: ...dure The steps below are the operation used in the FX DocuCentre S2110 print driver screen 1 Select Print from the application s File menu 2 Select FX DocuCentre XXXXX XXXXX Displayed as S2110 3 If needed click Preferences to make advanced settings Note z For information on the Print functions click Help in the print driver screen to display the Help Information 4 Click OK 5 Click OK in the Print ...

Page 120: ...nting job On the machine 1 Press the Stop button On the computer 1 Double click the printer icon located on the task bar in the lower right corner of the screen 2 Select the document name that you desired to cancel and then press the Delete key If there is no document displayed on the window cancel it manually on the machine Stop button ...

Page 121: ...8 8Tools ...

Page 122: ...be performed z Receiving a print job and starting a print or scan job Enter System Administration Mode 1 Press and hold the Log In Out button for more than 4 seconds until the screen below is displayed 2 Use the numeric keypad to enter the password and then press the Start button Note z The password is initially set to 11111 five digits of 1 z The password can be changed For more information refer...

Page 123: ...nput screen appears and shows the letter P Change Settings 1 Enter a program number using the numeric keypad Reference z For more information refer to System Administrator Program List P 125 2 Press the Start button to confirm the entered value Numeric keypad ...

Page 124: ...Tools 124 Tools 8 Exit System Administration Mode 1 Press the Log In Out button Note z The Log In Out button light is turned off when the machine exits the System Administration mode Log In Out button ...

Page 125: ...the machine s system clock 0 23 5 Minute Set the minute of the machine s system clock 0 59 6 Date Format Set the date display format 0 YYMMDD 1 MMDDYY 2 DDMMYY 7 Time Format Set the time display format 0 12h 1 24h Program Numbers Menu Items Descriptions Values Default setting 100 Low Power Mode Timer Set the amount of time that the machine waits before entering Low Power mode You can set a value b...

Page 126: ...You can set a value between 1 and 240 seconds in 1 second increments 1 240 seconds Default 10 seconds 104 Auto Scan Complete Timer Set the amount of time that the machine waits before automatically processing the next job determined that there is no additional document to be loaded when using the document glass 1 20 seconds 2 30 seconds 3 60 seconds 4 90 seconds 105 Job Cancel Timer Set the amount...

Page 127: ...n the Auto Reset 208 Error Display of Drum Cartridge Life Set the frequency to display the error code when the drum cartridge life ends Note z To exit the screen with the error code press any buttons of the control panel 0 Do not display 1 When switching the machine ON and OFF 2 When reached the timeout on the Auto Reset 209 Error Display of Toner Cartridge Replacement Set the frequency to display...

Page 128: ...mited display of the paper document size Set whether to limit the display of the paper document size on the status machine diagram 0 No Limit 1 8 5 x 11 308 Limited display of the paper document size Set whether to limit the display of the paper document size on the status machine diagram 0 No Limit 1 8 5 x 13 309 Limited display of the paper document size Set whether to limit the display of the p...

Page 129: ...word 0 9 Default 1 404 5th digit of the System Administrator Password Set the 5th digit of the system administrator password 0 10 When the password is 4 digit enter 10 Default 1 405 6th digit of the System Administrator Password Set the 6th digit of the system administrator password 0 10 When the password is 5 digit enter 10 Default 10 500 Paper Type in Tray 1 Set the paper type in Tray 1 0 Plain ...

Page 130: ...on Select the machine s region of use 36 Australia 156 China 158 Taiwan 344 Hong Kong 360 Indonesia 410 Korea 458 Malaysia 554 New Zealand 608 Philippines 702 Singapore 704 Viet Nam 764 Thailand 9001 Fault Message Language for MIB Select the language for fault messages used in the Management Information Base MIB 0 English 1 Simplified Chinese Program Numbers Menu Items Descriptions Values Default ...

Page 131: ...gits 4 6 digit numbers Default 0009 610 Account Number 10 Password Specify the account number 10 s password using three digits 4 6 digit numbers Default 0010 611 Account Number 1 Copy Job Limit Specify the maximum number of pages allowed to copy for the account number 1 0 No Limit 255 1 1 000 612 Account Number 2 Copy Job Limit Specify the maximum number of pages allowed to copy for the account nu...

Page 132: ...mber 3 7104 Account Number 4 Copy Count Shows the total number of copies made under account number 4 7105 Account Number 5 Copy Count Shows the total number of copies made under account number 5 7106 Account Number 6 Copy Count Shows the total number of copies made under account number 6 7107 Account Number 7 Copy Count Shows the total number of copies made under account number 7 7108 Account Numb...

Page 133: ...IPv4 Set the 2nd 8 bit of the machine s subnet mask using the IPv4 0 255 1015 Manual Subnet Mask 3 on IPv4 Set the 3rd 8 bit of the machine s subnet mask using the IPv4 0 255 1016 Manual Subnet Mask 4 on IPv4 Set the 4th 8 bit of the machine s subnet mask using the IPv4 0 255 1017 Manual Gateway Address1 on IPv4 Set the 1st 8 bit of the machine s gateway address using the IPv4 0 255 1018 Manual Ga...

Page 134: ...d IPv4 IP Address 2 4 0 255 1034 IPv4 Access Control Mask bit length 2 Set the bit length 2 of Access Control Mask for IPv4 0 32 1038 Allowed IPv4 IP Address 3 1 Set the 1st 8 bit of the Allowed IPv4 IP Address 3 1 0 255 1039 Allowed IPv4 IP Address 3 2 Set the 2nd 8 bit of the Allowed IPv4 IP Address 3 2 0 255 1040 Allowed IPv4 IP Address 3 3 Set the 3rd 8 bit of the Allowed IPv4 IP Address 3 3 0...

Page 135: ...8 bit of the Allowed IPv4 IP Address 6 3 0 255 1065 Allowed IPv4 IP Address 6 4 Set the 1st 8 bit of the Allowed IPv4 IP Address 6 4 0 255 1066 IPv4 Access Control Mask bit length 6 Set the bit length 6 of Access Control Mask for IPv4 0 32 1070 Allowed IPv4 IP Address 7 1 Set the 1st 8 bit of the Allowed IPv4 IP Address 7 1 0 255 1071 Allowed IPv4 IP Address 7 2 Set the 1st 8 bit of the Allowed IP...

Page 136: ...t the 1st 8 bit of the Allowed IPv4 IP Address 10 3 0 255 1097 Allowed IPv4 IP Address 10 4 Set the 1st 8 bit of the Allowed IPv4 IP Address 10 4 0 255 1098 IPv4 Access Control Mask bit length 10 Set the bit length 10 of Access Control Mask for IPv4 0 32 1103 SNMP Port Status Set the start status of SNMP port 0 Disabled 1 Enabled 1104 LPD Port Status Set the start status of LPD port 0 Disabled 1 E...

Page 137: ...e value of the sharpness 0 Soft 2 1 Soft 1 2 Normal 3 Sharp 1 4 Sharp 2 3007 Background Suppression Copying Set whether to suppress the document s background color 0 Off 1 On 3008 Document Size Copying Set the default document size when the program number 206 is set to 2 Inch Series 8 x 14 1 11 x 17 2 A3 6 8 5 x 14 7 8 5 x 13 9 A4 10 8 5 x 11 16 8 5 x 11 17 5 5 x 8 5 18 A4 22 7 25 x 10 5 134 Expec...

Page 138: ... 2 Sided Copying Set the default setting of 2 Sided 0 1 J 1 1 1 J 2 2 2 J 1 3 2 J 2 3010 Preset Zoom Ratio Copying Set the preset zoom ratio You can set a value between 25 and 400 in 1 minute increments 25 400 Default 81 3011 Background Suppression Level Copying Set the suppression level of Background Suppression Program number 3007 when the feature is set to ON This feature is available when scan...

Page 139: ...efault Skew Correction for ID Card Copy Set the skew correction type for ID Card Copy when the scanning mode is Scanning 1 card 0 Disabled 2 Rotation up to 15 degrees 3019 Default Frame Margin for ID Card Copy Set the amount of frame margin for ID Card Copy 4 8 mm Default 4 mm 3030 Substitute Paper Selection Printing Set whether to switch the paper size between A4 and Letter when paper of the spec...

Page 140: ...Tools 140 Tools 8 ...

Page 141: ...9 9Machine Status ...

Page 142: ...the job execution results Prints the results of the most recent jobs up to 50 jobs worth Note z When the Job History exceeds 50 jobs each new job replaces the oldest job in the history z When printed a job single page job continuously the error information of the jammed page may not be recorded Error History Report Prints information on errors generated in the machine Up to 42 errors are recorded ...

Page 143: ...xit the System Administration mode Note z When you exit the System Administration mode the Log In Out button light is turned off Checking the Job Counter You can check the number of pages printed by the machine under the Billing Information on the System Settings Report output Meter 1 The total number of pages printed or copied is displayed Meter 2 The total number of pages copied is displayed Met...

Page 144: ...tly needed Reorder Replacement is currently not needed but the cartridge will need to be replaced soon Make sure to have a new toner cartridge on hand Replace Soon Replacement is needed soon Drum Status Shows the drum cartridge status OK Replacement is not currently needed Reorder Replacement is currently not needed but the cartridge will need to be replaced soon Have a new drum cartridge on hand ...

Page 145: ...the program number of the group that you want to check press the Start button Copied Impressions Copy Limit Program Number Description 7101 Copied impressions by User 1 7102 Copied impressions by User 2 7103 Copied impressions by User 3 7104 Copied impressions by User 4 7105 Copied impressions by User 5 7106 Copied impressions by User 6 7107 Copied impressions by User 7 7108 Copied impressions by ...

Page 146: ...by pressing the Start button when appears z To return to the program number input screen press the Stop button 4 When you finish checking press the Log In Out button and exit the System Administration mode Note z When you exit the System Administration mode the Log In Out button light is turned off ...

Page 147: ...10 10Maintenance ...

Page 148: ...e into an open flame Remaining toner in the cartridge may catch fire and cause burn injuries or explosion If you have a used toner cartridge no longer needed contact your local Fuji Xerox representative for its disposal CAUTION z Keep drum cartridges and toner cartridges out of the reach of children If a child accidentally swallows toner spit it out rinse mouth with water drink water and consult a...

Page 149: ...les periodic replacement parts in stock z When calling our Customer Support Center to order consumables periodical replacement parts have the product codes ready z The use of consumables periodic replacement parts not recommended by Fuji Xerox may impair machine quality and performance Use only consumables periodic replacement parts recommended by Fuji Xerox Checking the status of consumables You ...

Page 150: ...n the remaining amount of toner is low the machine may stop printing and display an error code If this occurs replace the toner cartridge to resume copying or printing z Leave the machine s power ON when replacing the toner cartridge Follow the steps below to replace the toner cartridge 1 Make sure that the machine is not operating and open the front cover When the toner cartridge icon is lit blin...

Page 151: ... Return the used toner cartridges to your local Fuji Xerox representative 4 Unpack a new toner cartridge and shake it lightly up down and left right 10 times Important z Do not touch the shutter WARNING z Never throw a toner cartridge into an open flame Remaining toner in the cartridge may catch fire and cause burn injuries or explosion z If you have a used toner cartridge no longer needed contact...

Page 152: ...10 5 Orient the toner cartridge with the arrow K facing up and insert it as far as it will go 6 Close the front cover Note z If the front cover is not completely closed an error code will appear and the machine will remain paused ...

Page 153: ...s Have a replacement drum cartridge ready When the drum cartridge icon is lit blinks for three seconds the drum cartridge will need to be replaced after about 1 000 pages Have a replacement drum cartridge ready When the error code appears the drum cartridge icon starts blinking and the error icon is lit the drum cartridge needs to be replaced Replace the drum cartridge When the error code appears ...

Page 154: ...he machine Note z Do not expose drum cartridges to direct sunlight or strong indoor fluorescent lights Do not touch or scratch the drum surface Print quality may be affected 1 Make sure that the machine is not operating and open the front cover When the error code appears and the drum cartridge icon is lit blinks for three seconds it is time of expiration for the warranty period of performance on ...

Page 155: ...cartridge 2 4 Hold the bottom of the drum cartridge as shown in the illustration and gently pull out the drum cartridge from the machine 5 Take the new drum cartridge out of the box and insert the used drum cartridge into the supplied plastic bag and place it into the box Important z Do not place the new drum cartridge in an upright position z Return the used drum cartridge to your local Fuji Xero...

Page 156: ...Maintenance 156 Maintenance 10 6 Peel the protective sheet off the new drum cartridge 7 Insert the new drum cartridge 8 Tighten the two screws clockwise 9 Peel off the drum cartridge s protective strip ...

Page 157: ... error code will appear and the machine will remain paused 11 Gently close the left cover and the Bypass tray Note z If the left cover is not completely closed an error code will appear and the machine will remain paused 12 Enter the System Administration mode Reference z Refer to Enter System Administration Mode P 122 ...

Page 158: ...Maintenance 158 Maintenance 10 13 Enter the program number 8000 and press the Start button 14 Enter the value 950807 and press the Start button Start button Start button ...

Page 159: ...Replacing Consumables 159 Maintenance 10 15 In the confirmation screen press the Start button When the initializing is completed the end screen will appear Start button ...

Page 160: ... documents during copying scanning or printing 1 Wipe the exterior with a firmly wrung soft cloth moistened with water Important z Do not use cleaning agents other than water or neutral detergent Note z If you cannot remove the dirt easily gently wipe the machine with a soft cloth moistened with a small amount of neutral detergent 2 Wipe off any excess water with a soft cloth WARNING z When cleani...

Page 161: ... machine to malfunction or damage documents during copying or scanning 1 Wipe the document cover with a soft cloth moistened with water to remove any dirt and then wipe it with a soft dry cloth Important z Do not use cleaning agents other than water or neutral detergent Note z If you cannot remove dirt easily gently wipe the document cover with a soft cloth moistened with a small amount of neutral...

Page 162: ...e documents during copying or scanning 1 Wipe the document presser with a soft cloth moistened with water to remove any dirt and then wipe it with a soft dry cloth Important z Do not press the film with an excessive force as it can be easily damaged z Do not use cleaning agents other than water or neutral detergent Note z If you cannot remove dirt easily gently wipe the document presser with a sof...

Page 163: ...t the latch of the document feeder cover until it is completely open Note z When you fully open the cover it enters a fixed position Open the cover gently 2 While turning the rollers wipe them with a soft cloth moistened with water Important z Do not use cleaning agents other than water or neutral detergent z Use a cloth firmly wrung to prevent water drops from falling into the machine If water ge...

Page 164: ...Maintenance 164 Maintenance 10 ...

Page 165: ...11 11Problem Solving ...

Page 166: ...displayed Cause Is there a paper or document jam No Yes Action For information on paper jams refer to Paper Jams P 201 For information on document jams refer to Document Jams P 208 No Cause Is an error code displayed Action Refer to Error Code P 189 The image quality is poor Action Refer to Image Quality Problems P 171 No Yes Trouble during copying Action Refer to Copying Problems P 177 No Yes Tro...

Page 167: ...ver or another cover open Follow the instructions in the displayed error code to take the required action Reference z Refer to Error Code P 189 The display is dark Is the Power Saver button lit The machine is in the Power Saver mode Press the control panel s Power Saver button to turn off the Power Saver mode Unable to print or copy Is there an error code displayed in the control panel s display F...

Page 168: ...nce z Refer to Cleaning the Document Cover and the Document Glass P 161 Is the document a transparency or highly translucent medium Use the document glass to copy the document placing a sheet of white paper on top of it Is the document in the correct position Place the document correctly Reference z Refer to Placing Document P 84 Is the document loaded correctly Are the document guides on the docu...

Page 169: ...z Refer to Loading Paper in Bypass Tray P 74 Is the paper finely cut out Some paper types may not be cut out finely Load the paper after fanning it well A document is not fed onto document feeder Is the document small The minimum size of document that can be loaded into the document feeder is A5 An error code appears when paper is loaded in Bypass tray and the Start button is pressed Check the pos...

Page 170: ...e of torn paper remaining in the document feeder Open the document feeder cover and check inside Reference z Refer to Document Jams P 208 An edge of the document is folded Is the document curled Flatten the curl and load the document again Symptom Possible Cause Remedy ...

Page 171: ...nt on glossy printing paper Glossy printing paper easily sticks to the document glass and shadows can resemble dirt in the copy Place a transparency or transparent film under the document before copying Black lines appear in copies Is the document feeder s constant velocity transport glass dirty Clean the constant velocity transport glass Reference z Refer to Cleaning the Document Presser and the ...

Page 172: ...pack Is the paper in the tray creased or wrinkled Remove any problematic sheets or replace the paper with paper from an unopened pack Are you copying a cut and pasted or creased document Cut and pasted or creased parts of the document may not be making proper contact with the document glass Place a stack of white paper on top of the document to bring it into proper contact with the document glass ...

Page 173: ...a new one Reference z Refer to Replacing the Drum Cartridge P 153 The constant velocity transport glass is dirty Clean the constant velocity transport glass Reference z Refer to Cleaning the Document Presser and the Constant Velocity Transport Glass P 162 Dirt appears at regularintervalsin the printout Paper feed direction The paper feed path is dirty Print several sheets The drum cartridge has de...

Page 174: ...er The entire printout is black The drum cartridge has deteriorated or been damaged Replace the drum cartridge with a new one Reference z Refer to Replacing the Drum Cartridge P 153 A high voltage power supply failure may have occurred Contact our Customer Support Center The printout is blank Multiple pages were fed through the machine at once double feeding Riffle through the stack of paper thoro...

Page 175: ...e of the paper actually loaded Load paper of the correct type and size in the Bypass tray Reference z Refer to Loading Paper in Bypass Tray P 74 Multiple pages were fed through the machine at once Riffle through the stack of paper thoroughly before loading it The paper is wrinkled The paper is unsuitable Replace the paper with new paper Paper has been added to the paper loaded The paper is damp Te...

Page 176: ...ge P 153 The toner cartridge has run out of toner Replace the toner cartridge with a new one Reference z Refer to Replacing the Toner Cartridge P 149 The printout is slanted The paper cassette s paper guides are not aligned to the correct position Align the horizontal and vertical paper guides properly Reference z Refer to Loading Paper in Trays 1 and 2 Optional P 72 z Refer to Loading Paper in By...

Page 177: ...ocument guides are misaligned Align the document guides properly to match the document size There are document shreds stuck in the document feeder Open the document feeder cover and remove the document shreds Reference z Refer to Document Jams P 208 You have placed a document containing pages of different sizes You cannot place documents with different size pages Symptom Possible Cause Remedy Copi...

Page 178: ...opened pack The paper in the tray is creased or wrinkled Remove any problematic sheets or replace the paper with paper from an unopened pack The document has been cut and pasted or is creased Cut and pasted or creased parts of the document may not be making proper contact with the document glass Place a stack of white paper on top of the document to bring it into proper contact with the document g...

Page 179: ...ore copying The document has shifted out of position Place the document correctly Reference z Refer to Placing Document P 84 The document feeder s document guides are misaligned Place the document correctly moving the document guides into contact with the edges of the document Reference z Refer to Placing Document P 84 The document is creased Smooth out the document and place it again correctly Re...

Page 180: ... take the required action There is a problem in the network connecting the computer and machine Contact your Network Administrator The port is not activated Activate the port to use Reference z Refer to Activating the Communication Port To Use P 25 The machine is connected to multiple computers Wait a while and then try printing again Data has been sent to the machine No paper has been loaded Load...

Page 181: ...en mounted Check the options mounted in the machine and then reselect the items in Items under Options in the print driver The computer is not using the print driver supplied with the machine is using another company s print driver Confirm whether the print driver on the computer is the one supplied with the machine On the computer select the print driver supplied with the machine If the print dri...

Page 182: ...ments business cards transparencies thin documents or documents with attached stick on notes paper clips or tape Reference z Refer to Paper Types P 68 The document guides are misaligned Align the document guides properly to match the document size Reference z Refer to Placing the Document P 108 There are document shreds stuck in the document feeder Open the document feeder cover and remove the doc...

Page 183: ...rency or highly translucent medium When scanning highly translucent documents dirt on the document cover shows up in the output Place a sheet of white paper over the document before scanning The document is on colored or rough paper or is a blueprint Adjust the scan density or image quality before scanning The scanned document is printed on glossy printing paper Glossy printing paper easily sticks...

Page 184: ... out of position Place the document correctly Reference z Refer to Placing the Document P 108 The document feeder s document guides are misaligned Place the document correctly moving the document guides into contact with the edges of the document Reference z Refer to Placing the Document P 108 The document is creased Smooth out the document and place it again correctly The image is not in color Co...

Page 185: ...n the machine s power OFF wait until the display becomes blank and then turn the power ON again The selected protocol is not compatible with the computer Check the selected protocol Select a protocol compatible with the computer Symptom Remedy Unable to connect to CentreWare Internet Services Is the machine operating normally Check whether the machine s power is ON Is Internet Services running Pri...

Page 186: ... Power Saver mode Cancel the Power Saver mode and then try again When you click Apply a message such as The server has returned ineffective or unrecognizable response or No data is displayed on the browser Is the password correct The password you re entered for confirmation does not match Enter the password correctly Restart the machine Possible Cause Remedy The IP address has not been set correct...

Page 187: ...lts Unable to connect due to an access restriction set in the proxy server firewall or web server Types of access restrictions are listed below Check the set access restriction z Address port restriction z SSL restriction z User access or access authority level restriction z Content block z Scheme restriction such as restriction on use of HTTP z Forwarded data size restriction z Method restriction...

Page 188: ...g fe80 203 baff fe48 9010 append the Windows Ethernet adapter local area connection number such as 8 as the scope ID for example enter fe80 203 baff fe48 9010 8 Unable to communicate with a Windows operating system supporting IPv6 Set fixed addresses in Windows operating systems supporting IPv6 Searches for devices outside the router do not work properly When going outside the router in an SMB sea...

Page 189: ...code is displayed any print data remaining in the machine and information stored in the machine s memory is not secured If an error code is displayed that is not listed in the following table or if you cannot resolve an error despite following the instructions described in the table contact our Customer Support Center The contact number is printed on the label or card attached to the machine Note ...

Page 190: ...nd then press the Start button Reference z Refer to Placing Document P 84 The document feeder cover is open Close the cover Reference z Refer to Machine Components P 42 The document for the ID Card Copy feature cannot be detected Reset the document on the document glass and then press the Start button To cancel a job press the Stop button Reference z Refer to ID Card Copy P 98 Either there is no t...

Page 191: ...e and orientation of paper loaded in Tray 2 do not match the settings specified in the machine Confirm that the size and orientation of paper loaded in Tray 2 match the settings displayed in the paper size display area and reload paper adjusting with the paper guides Reference z Refer to Loading Paper in Trays 1 and 2 Optional P 72 When changing the setting of paper size and orientation cancel the...

Page 192: ... in Tray 2 or the machine s one tray module cover Remove the jammed paper Reference z Refer to Paper Jams P 201 Papers jammed in the Bypass trayor the machine s left cover Remove the jammed paper Reference z Refer to Paper Jams P 201 The machine s left cover is open Close the cover Reference z Refer to Machine Components P 42 The machine s front cover is open Close the cover Reference z Refer to M...

Page 193: ...fer to Replacing the Drum Cartridge P 153 The drum cartridge is defective Replace the drum cartridge immediately Otherwise the machine will be damaged Reference z Refer to Replacing the Drum Cartridge P 153 Reached the maximum copy limit while the limit is set Also the user who reached the copy job limit has logged in Press the Stop button and contact your system administrator A job is canceled du...

Page 194: ...of the following measures z Reduce the magnification with Reduce Enlarge z Change the orientation of paper or document 004 345 Cause An error occurred Remedy Switch off the machine power make sure that the display is blank and then switch on the machine power If the same message is displayed again contact our Customer Support Center 005 122 005 123 005 125 005 131 005 132 005 134 005 135 005 136 0...

Page 195: ...the machine cools down Wait for a while and try again 016 372 Cause An error occurred Remedy Switch off the machine power make sure that the display is blank and then switch on the machine power If the same message is displayed again contact our Customer Support Center 016 500 016 501 016 502 Cause An error occurred Remedy Switch off the machine power make sure that the display is blank and then s...

Page 196: ...e not the same Remedy Press the control panel s Stop button to cancel the job or change the paper to the specified paper size 024 950 Cause There is no paper in Tray 1 and another tray cannot be selected Remedy Load more paper or press the control panel s Stop button to cancel the job 024 951 Cause There is no paper in Tray 2 and another tray cannot be selected Remedy Load more paper or press the ...

Page 197: ...occurred Remedy Switch off the machine power make sure that the display is blank and then switch on the machine power 045 310 Cause An error occurred Remedy Remove the jammed paper Reference z Refer to Paper Jams P 201 045 313 061 321 061 325 Cause An error occurred Remedy Switch off the machine power make sure that the display is blank and then switch on the machine power If the same message is d...

Page 198: ...ypass tray Remedy Remove the jammed paper Reference z Refer to Paper Jams P 201 077 101 077 103 077 104 077 106 Cause A paper jam occurred in the left cover A Remedy Remove the jammed paper Reference z Refer to Paper Jams P 201 077 129 Cause A paper jam occurred in the left cover A Remedy Remove the jammed paper Reference z Refer to Paper Jams P 201 077 212 Cause An error occurred in the One Tray ...

Page 199: ...n switch on the machine power If the same message is displayed again contact our Customer Support Center Reference z Refer to Replacing the Drum Cartridge P 153 092 660 Cause A drum cartridge error occurred Remedy Switch off the machine power make sure that the display is blank and then switch on the machine power 092 661 Cause Temperature SNR in CRU value is out of range Remedy Exchange the Senso...

Page 200: ... again contact our Customer Support Center 116 324 Cause An error occurred Remedy The machine will automatically recover Wait for a while and try again 116 334 116 343 116 377 116 390 Cause An error occurred Remedy Switch off the machine power make sure that the display is blank and then switch on the machine power If the same message is displayed again contact our Customer Support Center 116 747 ...

Page 201: ...ocuments one sheet at a time if a paper jam occurs on the machine the machine resumes to make a copy of the already scanned document automatically after removing the jammed paper However as for the remaining document you must press the Start button again to allow the document feeder to feed and scan the rest of the loaded documents Important z Pulling out a tray after a paper jam without checking ...

Page 202: ... or the Transfer Belt may be damaged and need replacement z E 1 appears if you start copying or printing with the paper tray slightly open Make sure that the paper tray is completely closed when loading paper or clearing a paper jam 1 Open the Bypass tray 1 and then while lifting up the release lever 2 gently open the left cover 3 If the paper is jammed around the fusing unit 1 Pull down the latch...

Page 203: ... the paper is jammed in the location as shown in the figure remove the jammed paper pulling upwards 2 If the paper is jammed in the location as shown in the figure remove the jammed paper pulling upwards 2 Push on the center of the left cover close it slowly and raise the Bypass tray ...

Page 204: ... tray module cover 1 Pull the release lever and slowly open the one tray module cover 2 Remove the jammed paper Note z The paper may be jammed in the upper part where it is difficult to see Check thoroughly for jammed paper z If the paper tears check to make sure there are no remaining shreds in the machine 3 Close the one tray module cover gently ...

Page 205: ...referring to E 1 Paper Jam in Left Cover A P 202 2 If the jammed paper cannot be removed pull out the tray Important z Pulling out a tray after a paper jam without checking where the jam is located may cause the paper to tear and leave shreds inside the machine To prevent equipment failure check the location of paper jams on the display before attempting to clear them 3 Remove the jammed paper Not...

Page 206: ...oved pull out the tray Important z Pulling out a tray after a paper jam without checking where the jam is located may cause the paper to tear and leave shreds inside the machine To prevent equipment failure check the location of paper jams on the display before attempting to clear them 3 Remove the jammed paper Note z If the paper tears check to make sure there are no remaining shreds in the machi...

Page 207: ...eets of paper were loaded remove all the paper while you clear the jam Note z If the paper tears check to make sure there are no remaining shreds in the machine 2 If multiple sheets of paper were loaded align the corners of the removed paper 3 Insert the paper with the side to print on facing down aligning it so that its leading edge lightly contacts the paper feed entrance 4 Remove the jammed pap...

Page 208: ...describes how to remove the jammed documents in the document feeder Follow the steps below to remove the jammed document Note z When the machine cannot detect the document size correctly the document may be ejected before being scanned 1 Pull up the front handle of the document feeder cover and open the document feeder cover completely Note z The cover will remain fixed in position when fully open...

Page 209: ...ver 5 Turn the knob to feed the document to the top then remove it Note z If the document has been fed into the feeder do not pull it out directly The document may tear 6 Close the document feeder s inner cover 7 Close the document feeder cover until it clicks into place and confirm that there is no space between the near or far side of the cover and the document feeder 8 If you cannot find the do...

Page 210: ...wrinkled or folded and then reload the documents to complete the job After removing the jammed document Copy Place the unscanned document again including the jammed pages Scan TWAIN WIA Windows Image Acquisition Place the unscanned document again including the jammed pages Note z Torn wrinkled or folded document pages can cause document jams or damage Always copy torn wrinkled or folded documents ...

Page 211: ...12 12Appendix ...

Page 212: ... scales Warm up Time 18 seconds or less Important z At room temperature 23 C Original Size The maximum size is 297 x 432 mm A3 11 x 17 for both sheets and books Paper Size Maximum A3 11 x 17 Minimum A5 Image loss width 5 5 mm max at top right and left 6 0 mm max at bottom Paper Weight Tray 1 standard 60 90 gsm Tray 2 optional 60 216 gsm Bypass tray 60 216 gsm Important z Use paper recommended by F...

Page 213: ... minute A3 7 2 pages minute Important z The speed may be reduced due to image quality adjustment z These are the speeds used for Bond Plain and Recycled paper Print performance can be varied depending on the type of paper used z When using 80 gsm paper Paper Tray Capacity Standard 350 sheets Tray 1 250 sheets Bypass tray 100 sheets Optional 500 sheets One Tray Module Maximum 850 sheets Standard Op...

Page 214: ...epth 580 mm with platen cover Width 973 x Depth 580 mm with document feeder and duplex output unit Important z When the Bypass tray is fully extended Print Functions Type Built in Paper Size Same as the Basic Functions Copy Functions Continuous Print Speed Same as the Basic Functions Copy Functions Important z The speed may be reduced due to image quality adjustment Print speed may also drop depen...

Page 215: ...ation about the latest supported OS refer to the Fuji Xerox Web site Interface USB 2 0 Ethernet 100BASE TX 10BASE T Scan Functions Type Color scanner Original Size Same as the Basic Functions Copy Functions Scan Resolution Monochrome 600 x 600 dpi 400 x 400 dpi 300 x 300 dpi 200 x 200 dpi 150 x 150 dpi Color 400 x 400 dpi 300 x 300 dpi 200 x 200 dpi 150 x 150 dpi Scanning Speed Monochrome 23 sheet...

Page 216: ...rver 2012 x64 Microsoft Windows Server 2008 R2 x64 Microsoft Windows Server 2008 Microsoft Windows Server 2008 x64 Important z For information about the latest supported OS refer to the Fuji Xerox Web site z File Format Depends on the application software used for scanning Duplex Automatic Document Feeder Type Duplex automatic document feeder Original Size Paper Weight z Maximum A3 11 x 17 z Minim...

Page 217: ... Paper Weight 60 110 gsm Note z Use the bypass tray when using 91 110 gsm paper One Tray Module Optional Paper Size Maximum A3 11 x 17 Minimum A5 Paper Weight 60 216 gsm Capacity 500 sheets x 1 tray Note z When using 80 gsm paper Dimensions Weight Width 540 x Depth 540 x Height 111 mm 11 kg ...

Page 218: ...page within 5 5 mm from the top left and right edges and 6 0 mm from the bottom edge of the paper The actual printable area may vary depending on the printer plotter and control language 5 5 mm 5 5 mm 6 0 mm 5 5 mm Printable area Guaranteed print area Paper feed direction Unprintable area ...

Page 219: ...test information contact our Customer Support Center Product Name Description One Tray Module A tray that can load 500 sheets of paper when using 80 gsm paper Stand A special stand used to mount the machine on the floor Contains storage space for paper This stand is available when the One Tray Module is installed Tray Lock Locks the trays on the machine Localize Kit for TH A control panel with Tha...

Page 220: ...file names these characters may not be displayed correctly Only ASCII characters can be used Hard Disk You cannot install a hard disk into this product Printing Results z Depending on the type of used media rubber roller marks may be left behind along the scanning direction or toner wax components adhere to the paper during 2 Sided printing or when the output destination is changed during continuo...

Page 221: ... collated feature it outputs only the document data which is being scanned Notes and Restrictions on the Use of the Print Feature Important z You cannot operate the Scan and Print features simultaneously If you start a print job while a scan job is running the scan job may fail Output of Long Feed Documents The output of long feed documents is not supported Print Jobs while the Control Panel is be...

Page 222: ...Image Acquisition WIA driver may abort scanning In this case scan with the TWAIN driver Notes and Restrictions when Connecting to Internet or Intranet Internet Intranet Connections Depending on the web server server application proxy server and firewall you may not be able to connect to the Internet or intranet To connect to the Internet or intranet using a third party server application proxy or ...

Page 223: ...your NIS administrator While Printing When you change a computer s IP address or a computer name queries and cancel processes submitted from the machine are no longer executed correctly Thus turn the machine off and on when there is no print data in the receiving buffer Note z You can use the machine s control panel to cancel printing of the current print data in the machine s receiving buffer but...

Page 224: ...her the IPv4 address or IPv6 address may not be displayed or a different IPv6 address may be displayed z In the following cases the machine may not be able to identify whether addresses are for the same device so may not be able to execute status check lpq or cancel lprm commands for user print jobs executed by LPD When simultaneously operating IPv4 and IPv6 addresses with the same host When simul...

Page 225: ...143 Checking the status of consumables 149 Checking the Total Number of Impressions Copied 145 Cleaning Document Feeder Rollers 163 Cleaning the Document Cover and the Document Glass 161 Cleaning the Document Presser and the Constant Velocity Transport Glass 162 Cleaning the Exterior 160 Cleaning the Machine 160 Clock Settings 125 Collated 94 Comment 30 Configuration 35 Connection 35 Connection Ti...

Page 226: ... 31 IPv6 Filtering 36 K Keep Alive Timeout 35 L Lighten 1 96 Lighten 2 96 Lighten Darken 96 Loading Paper 67 72 Loading Paper in Bypass Tray 74 Loading Paper in Trays 1 and 2 Optional 72 Loading Scan Data Using the PC Based Application113 Location 30 Logging in the Machine in Multiple Account Mode 60 Logging in the Machine in Single Account Mode 57 Low Power Mode 48 LPD Connectivity Protocols 33 L...

Page 227: ... R Rated Speed 31 Reduce Enlarge 97 Reorder 144 Replace Now 144 Replace Soon 144 Replacing Consumables 148 Replacing the Drum Cartridge 153 Replacing the Toner Cartridge 149 Retype Administrator s Passcode 37 Right Side Rear 43 S Scan 107 Scan Driver 222 Scan Problems 182 Scanning Procedure 108 Selectable document sizes in the scan driver 108 110 Semi Standard Paper 69 Serial Number 30 Setting Ite...

Page 228: ... Tools 121 Troubleshooting 166 U Unable to Connect to an IPv4 Address 188 Unable to Connect to an IPv6 Address 188 Unable to Copy 177 Unable to Load Scan Data to a Computer 182 Unable to Print 180 Unable to Print in an IPv6 Environment 188 Unusable Paper 70 URL 38 Usable Paper 70 Usage Counters General Setup 30 Use as a Local Printer 18 Use as a Network Printer 18 Using CentreWare Internet Service...

Page 229: ...DocuCentre S2110 User Guide ME7949E2 1 Edition 1 May 2017 Fuji Xerox Co Ltd Copyright 2017 by Fuji Xerox Co Ltd ...

Reviews: