3-43
DX380LC-7
2.
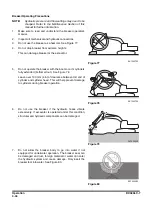
Remove double nut from bolt for arm pin (A, Figure 71) and
link pin (B, Figure 71), remove bolt, pull out arm pin (A) and
link pin (B, Figure 71), and then remove bucket.
3.
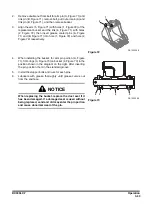
Align the arm (5, Figure 71) with holes (1, Figure 72) of the
replacement bucket and the link (6, Figure 71) with holes
(2, Figure 72), then insert grease coated pins (A, Figure
71) and (B, Figure 71) into hole (1, Figure 72) and hole (2,
Figure 72) respectively.
4.
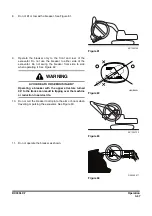
When installing the bucket, for arm pin portion (A, Figure
71), fit O-rings (3, Figure 73) on bucket (4, Figure 73) in the
position shown in the diagram on the right. After inserting
the pin, position them in the standard groove.
5.
Install the stopper bolts and nuts for each pins.
6.
Lubricate with grease thoroughly until grease comes out
from the end face.
DS1900968
2
1
Figure 72
DS1900969
4
3
5
3
Figure 73
NOTICE
When replacing the bucket, replace the dust seal if it
has been damaged. If a damaged seal is used without
being replaced, sand and dirt may enter the pin portion
and cause abnormal wear of the pin.


