background image


Chapter 5    Web GUI Setup and Monitoring  


202 


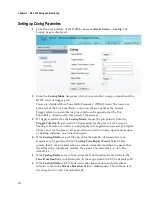
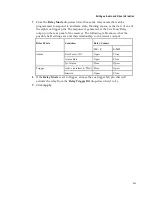
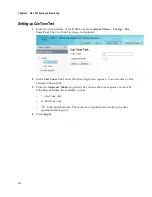
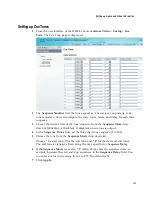
Setting up Cueing Parameters 

1


From the user interface  of the D9824, choose 

Audio & Video

 > 

Cueing

. The 

Cueing  page is displayed. 


2


From the 

Cueing Mode

 drop-down  list, choose  whether  cueing  output should be 

DTMF tones or trigger  pins. 
Tones are standard Dual-Tone Multi-Frequency  (DTMF) tones. The tones are 
generated  at the Cue Tone/Relay  output on the rear panel of the receiver. 
Trigger  refers  to open-collector  pins which  can be generated  at the Cue 
Tone/Relay  output on the rear panel of the receiver. 

3


If Trigger  is selected as the 

Cueing Mode

, choose the pin polarity from the 

Trigger Polarity

 drop-down  list. Choose High  for the pins to act as open  or 

floating collectors  on an active cueing signal and as ground  on an inactive signal. 
Choose Low for the pins to act as ground on an active cueing  signal and as open 
or floating collectors  on an inactive signal. 

4


If the 

Cueing Mode

 was set to Tone,  enter the number  of consecutive  tone 

sequences  to be generated  in the 

Cueing Tone Repeat Count

 field. Values 

greater  than 1 are provided when  a scenario  demands repetition  to ensure  that 
the ad insertion  equipment  receives  the signal. You can enter  1, 2, or 3. The 
default is 3. 

5


If the 

Cueing Mode

 is set to Tone, enter the tone duration for each tone in the 

Tone Duration

 field, in milliseconds,  in the range from 0 to 80. The default is 40. 

6


If the 

Cueing Mode

 is set to Tone, enter the silence  duration of each silence 

between  tones in the 

Silence Duration

 field, in milliseconds.  The duration is in 

the range from 0 to 80. The default is 40. 

Summary of Contents for D9824

Page 1: ...Cisco D9824 Advanced Multi Decryption Receiver Software Version 4 50 Installation and Configuration Guide ...

Page 2: ...nstaller ou d utiliser ce produit Prêtez une attention particulière à toutes les règles de sécurité Zu beachten Bitte lesen Sie vor Aufstellen oder Inbetriebnahme des Gerätes dieses Handbuch in seiner Gesamtheit durch Achten Sie dabei besonders auf die Sicherheitshinw eise Importante Sírvase leer la presente guía antes de instalar o emplear este producto Preste especial atención a todos los avisos...

Page 3: ...ems Inc assumes no responsibility for errors or omissions that may appear in this publication We reserve the right to change this publication at any time without notice This document is not to be construed as conferring by implication estoppel or otherwise any license or right under any copyright or patent whether or not the use of any information in this document employs an invention claimed in a...

Page 4: ...ARD AVC VIDEO AND OR ii DECODE AVC VIDEO THAT WAS ENCODED BY A CONSUMER ENGAGED IN A PERSONAL ACTIVITY AND OR WAS OBTAINED FROM A VIDEO PROVIDER LICENSED TO PROVIDE AVC VIDEO NO LICENSE IS GRANTED OR SHALL BE IMPLIED FOR ANY OTHER USE ADDITIONAL INFORMATION MAY BE OBTAINED FROM MPEG LA L L C SEE HTTP WWW MPEGLA COM Accordingly please be advised that service providers content providers and broadcas...

Page 5: ...hat is meant for uninterrupted service and that for some specific reason such as the possibility of the loss of an authorization code for a CATV converter is not intended to be unplugged by the user for cleaning or any other purpose may exclude the reference to unplugging the product in the cleaning description above 6 Attachments Do not use attachments not recommended by the product manufacturer ...

Page 6: ...ower supply to your home consult your product dealer or local power company For products intended to operate from battery power or other sources refer to the operating instructions 12 Grounding or Polarization This product may be equipped with a polarized alternating current line plug a plug having one blade wider than the other This plug will fit into the power outlet only one way This is a safet...

Page 7: ...n to grounding electrodes and requirements for the grounding electrode 16 Lightning For added protection for this product during a lightning storm or when it is left unattended and unused for long periods of time unplug it from the wall outlet and disconnect the antenna or cable system This will prevent damage to the product due to lightning and power line surges 17 Power Lines An outside antenna ...

Page 8: ...has used replacement parts specified by the manufacturer or have the same characteristics as the original part Unauthorized substitutions may result in fire electric shock or other hazards 23 Safety Check Upon completion of any service or repairs to this product ask the service technician to perform safety checks to determine that the product is in proper operating condition 24 Wall or Ceiling Mou...

Page 9: ...s may have to be disconnected before servicing This product plugs into a socket outlet The socket outlet must be near this product and must be easily accessible Connect this product only to the power source that is indicated on the rear panel of this product If this product does not have a mains power switch the power cord serves this purpose Enclosure Do not allow moisture to enter this product D...

Page 10: ...oduit Il indique une borne sous tension la direction indique la borne Ce symbole peut être attaché à ce produit Il indique une borne de terre de protection Ce symbole peut être attaché à ce produit Il indique une température excessive ou dangereuse Alimentation Important Ce produit fait partie de la classe I Vous devez le mettre à la terre Ce produit se branche dans une prise murale Cette dernière...

Page 11: ...voll verstanden haben Dieses Symbol erscheint auf dem Gerät und oder in der ihm beiliegenden Literatur Es bedeutet wichtige zu beachtende Betriebs oder Wartungsanweisungen Wenn dieses Zeichen am Gerät angebracht ist warnt es vor einer spannungsführenden Stelle Dieses Symbol kennzeichnet auf dem Gerät die Anschlußstelle der Sicherheitserde Wenn dieses Zeichen am Gerät angebracht ist warnt es vor he...

Page 12: ...ite dañar el producto No avance más allá de cualquier símbolo hasta comprender completamente las condiciones indicadas Encontrará este símbolo en el impreso que acompaña a este producto Este símbolo indica instrucciones importantes de funcionamiento o mantenimiento Es posible que este símbolo esté pegado al producto Este símbolo indica un terminal vivo la flecha apunta hacia el aparato terminal Po...

Page 13: ...licati al prodotto Se circostanze avverse compromettono la sicurezza d uso di questo prodotto interrompetene l uso e assicuratevi che il prodotto non venga più utilizzato Evitare infortuni alla persona e danni al prodotto Non procedere oltre a qualunque simbolo fino a quando non si siano comprese pienamente le condizioni indicate Questo simbolo che appare nella letteratura di accompagnamento del p...

Page 14: ... aprire la chiusura di questo prodotto a meno che non sia specificato diversamente Non inserire oggetti attraverso le fessure della chiusura Cavi Staccare sempre tutti i cavi di alimentazione prima di svolgere l assistenza tecnica al prodotto Per scollegare un cavo tirate la spina o il connettore non tirare mai il cavo stesso Non calpestare o sottoporre a sollecitazioni i cavi o le prese Riparazio...

Page 15: ...Output 5 MPE Output 5 MPEGoIP Input 6 Disaster Recovery 7 Local Settings 7 Uplink Profile Settings 9 NIT Retune Recovery 10 Chapter 2 Quick Setup Read Me First 11 Connecting the Receiver to Other Equipment 12 Maintenance of EMC Compliance 12 Setting up for Network Connection 13 Quick Setup Instructions for RF Acquisition 14 Assigning a Program Channel to a PE Program Entry 15 Setting up the ASI Ou...

Page 16: ...ges via a Telnet SSH Connection 31 Administrator User Privileges 31 Starting a Telnet SSH Session 31 Adding a New User 32 Deleting a User 32 Changing a Username 32 Changing a Password allowed by all Users 33 Printing the List of Users 33 Resetting the Login Credentials 33 Common Interface Modules 34 Chapter 4 Front Panel Operation 35 About the Front Panel 36 LCD 36 Keypad 36 CI Slots 36 Front Pane...

Page 17: ...gs 138 PSI Frequency Plan 139 PSI Channels 139 PSI Tables 140 Power On 140 Health Monitor 141 Chapter 5 Web GUI Setup and Monitoring 143 Logging On to the Web Interface 144 D9824 Summary Overview 145 Shortcuts 145 Modules 146 Alarms Warnings 146 D9824 Menus 148 D9824 Web GUI Environment 150 Window Buttons 150 Setting up Input Information 151 Setting up the RF Input 151 Setting up the ASI Input 156...

Page 18: ...e DPM ASI Details 213 Viewing the ASI Output Transport Status 220 Configuring the MPEGoIP Output 221 Configuring the DPM MPEGoIP Output Details 233 Viewing the MPEG Output Transport Status 241 Typical set up for Digital Program Mapping DPM 241 Configuring System Settings 244 Viewing the System Identification 244 Viewing Hardware Features and Software License Information 245 Setting up IP Informati...

Page 19: ...LNB LO Stability 350 LNB Power and Control 351 DVB S DVB S2 351 Video Inputs Outputs and Processing 354 General 354 Video Outputs 354 Audio Outputs 357 Conditional Access 357 Transport Stream Inputs Outputs 359 ASI Output 359 MPEGoIP Output 359 MPE Output 360 MPEGoIP Input D9824 with FEC only 360 ASI Input 360 Control Management and Data Interfaces 362 Ethernet Management Interface 362 Ethernet Da...

Page 20: ...3 VBI 374 Subtitles 374 Decode 374 CI 375 Cueing 375 TS Out ASI 375 TS Out MOIP 376 DPM ASI MOIP 377 Options 378 Alarm Warning 379 Noise Cutoff 379 DPM Default Settings for Different Output Modes 381 Appendix C Compliance 385 Applicable Standards and Notices 386 Safety 386 ESD 386 Electromagnetic Compatibility Regulatory Requirements 386 FCC Notices 387 Industry Canada Notice 387 Unauthorized Modi...

Page 21: ...includes users operators and service personnel who are responsible for the installation configuration operation monitoring and service of the D9824 receiver RequiredKnowledge To use this documentation the user should have a basic knowledge of the technology used in relation to this product Service personnel should have additional skills and be familiar with cabling electronic circuitry and wiring ...

Page 22: ......

Page 23: ... Advanced Multi Decryption Receiver It describes the most common applications and interfaces of the receiver 1 Chapter 1 Introduction In This Chapter D9824 Advanced Multi Decryption Receiver 2 Transport Stream Inputs Outputs 5 Disaster Recovery 7 NIT Retune Recovery 10 ...

Page 24: ... video programs are efficiently distributed to households equipped with digital set top boxes Digital Program Mapping Digital program mapping allows programmers to transparently substitute programs at the uplink It maintains predictable and compliant transport output during service replacement network information table NIT retuning and channel changes including forced tunings This feature remaps t...

Page 25: ...iding either two stereo pairs or four mono channels of balanced audio each with the ability to use part of the output for applications such as second audio program SAP cue tones etc Uplink addressable decoder output control including vertical blanking interval VBI data audio routing DPI and ASI output Fingerprint trigger for the decoded program Field upgradeable software and security Simple Networ...

Page 26: ...Chapter 1 Introduction 4 On Screen Display support on baseband output NIT Retune Recovery ...

Page 27: ...fficiently distributed to households equipped with digital set top boxes Digital Program Insertion DPI information will also be available along with the video and audio PIDs Packet Identifiers for external ad insertion in compressed digital format The diagram below shows an example of the D9824 receiver used in an MPEGoIP application MPEOutput The Multiprotocol Encapsulation MPE output provides a ...

Page 28: ... allows a decoder to process User Datagram Protocol UDP or Real time Transport Protocol RTP encapsulated MPEG transport streams protected streams from the IP Ethernet network The incoming stream is either MPTS or Single Program Transport Stream SPTS The diagram below shows an example of the D9824 receiver receiving MPEGoIP transport streams ...

Page 29: ...after the configured signal loss timeout it will initiate a disaster recovery search based on the search pathdetermined by the disaster recovery configuration A DR symbol is displayed on the front panel and the D9824 web GUI displays a D R in progress status During a disaster the receiver will attempt to tune to a different backup transport based on the search path configured The origin transport ...

Page 30: ...l set PE1 to channel 101 but leave PE2 to channel 2 because PE2 is not specified for Backup 2 transport If the acquisition fails or there is no signal lock on the backup 2 transport it will continue the search path and set PE1 to channel 801 and PE2 to channel 1005 if the acquisition is successful on the backup 3 transport However if the acquisition fails or there is no signal lock on the backup 3...

Page 31: ...If the unit is not connected to the PNC uplink an error message is triggered and it will use the local disaster recovery settings if enabled During a disaster recovery the PNC sends the Disaster Recovery Table DRT to the receiver along with the backup locations The DRT is a table of data structures sent from the PNC to the unit through the satellite uplink For more information on the uplink disast...

Page 32: ...nate between the new signal and the original signal for up to one hour If the unit does not lock to a signal after one hour it will trigger a disaster recovery The unit must stay locked to the new signal NIT for a minimum of ten minutes If another NIT is received before the ten minute timer the ten minute timer is canceled the initial engagement delay period for the next NIT retune resets back to ...

Page 33: ...gs to use contact your local service provider for assistance 2 Chapter 2 Quick Setup Read Me First In This Chapter Connecting the Receiver to Other Equipment 12 Setting up for Network Connection 13 Quick Setup Instructions for RF Acquisition 14 Assigning a Program Channel to a PE Program Entry 15 Setting up the ASI Output 16 Setting the DPM Mode 17 ...

Page 34: ...e unit to initialize When ready the front panel display shows the startup screen 6 The Ethernet Management port supports the following network protocols Telnet SSHv2 HTTP HTTPS SNMPv2 Syslog DTX SNTP FTP client side and TFTP 7 Connect the ASI output ASI OUT to signal processing equipment or monitoring equipment if applicable MaintenanceofEMCCompliance The power cord consisting of appliance coupler...

Page 35: ... twice to go to the IP menu 3 Use the arrow keys to navigate up and down the IP menu and the arrow keys to move across the IP menu to set the IP Address Mask and Gateway parameters Use the number keys to directly enter numbers in the fields For more information on keypad operation see Keypad Convention 4 Press SELECT each time to save the changes Press MENU four times to return to the startup scre...

Page 36: ...e to the Sym Rate menu Press SELECT Enter the symbol rate Press SELECT If DVB S2 is used proceed to Step 9 If DVB S is used press to set up the FEC Press SELECT Use to select AUTO Press SELECT 9 Press twice to move to the Net ID menu Press to choose Net ID Press SELECT Enter the value Press SELECT 10 Press Press SELECT Use to change the LNB power if needed Only the RF1 port is capable of providing...

Page 37: ...2 You can assign up to 32 program entries by pressing the ADV key to select PE1 3 Use the keys to scroll through the available program entries 4 Press ADV again to select the channel number 5 Use the keys to scroll through the available program channels or directly enter the channel number using the 0 to 9 keys press SELECT to save the channel selection ...

Page 38: ...s Press SELECT Use to select the output mode The factory default is No Output It is recommended to set the Output Mode to MAP Svc Chans Only 6 Press SELECT Press to select Yes if requested to RESYNC ALL Press SELECT 7 Press to move to Descramble Mode menu Press SELECT Use to select the scrambling mode Press SELECT 8 Press to move to Insert Null Packet Press SELECT Use to change the mode to Yes Pre...

Page 39: ...for a PE including those not currently on transmission 1 Press MENU to display the Main Menu 2 Press to move to the Setup menu Press SELECT 3 Press five times to move to the Outputs menu Press SELECT 4 Press to move to the TS Out menu Press SELECT 5 Press to move to the DPM menu Press SELECT 6 Press SELECT to access the Global menu 7 Press SELECT to choose ASI for Resync All Press and then press S...

Page 40: ......

Page 41: ...ain the D9824 receiver WARNING Allow only authorized and qualified service personnel to install operate maintain and service this product Otherwise personal injury or equipment damage may occur 3 Chapter 3 Installation In This Chapter Power Connection 20 Installing the D9824 Receiver 21 D9824 Receiver Rear Connector Panel 23 Connecting the Input Output Signals 25 Setting Admin User Privileges via ...

Page 42: ...ome products do not have a power switch In this case the mains cord and or DC power supply cable serve s as the mains disconnect device WARNING Make sure that at least one end of the power cable s remains easily accessible for unplugging if you need to switch off the unit For example Ensure that the socket outlet is installed near the product WARNING To avoid electrical shock connect the three pro...

Page 43: ...exceed 50 C 122 F at any time Grounding You must ensure that the unit is properly connected to ground to meet safety and EMC requirements Before any other connection is made the unit must be connected to a protected ground terminal as described below Via the three wire power cord of the AC power supply This connection is mandatory In addition via the protective ground terminal on the rear panel of...

Page 44: ...200 to 240 V AC power outlet 2 Make sure that the power cable is connected to protective ground See Grounding on page 21 for more information The D9824 receiver is equipped with one power supply located in the rear of the chassis Note the location of the power supply in the event of alarms warnings resulting in replacement of a power supply Alarm messages appear in the Message Log ...

Page 45: ... ASI Output One Asynchronous Serial Interface Output BNC Management Supports the following network protocols Telnet SSHv2 HTTP HTTPS SNMPv2 Syslog DTX SNTP FTP client side and TFTP RJ 45 TS Inputs Outputs 2 These are for the MPEGoIP Inputs and MPEGoIP and MPE outputs The MPEGoIP output transmits the decrypted transport stream encapsulated in IP packets to a groomer for distribution The MPE output ...

Page 46: ...ideo outputs for monitoring applications BNC Component Video Outputs SD to HD upconverted component video output for HD monitoring applications BNC Balanced Audio Outputs Audio 1 and Audio 2 provide two stereo pairs or four mono channels Terminal Blocks Ground Screw Grounding point for the receiver Power AC power IEC 60320 Sheet 14 ...

Page 47: ...for distribution The MPE output receives IP packets from the transport stream The MPEGoIP input receives transport streams from the IP network Note For reliable Ethernet operation to run over a maximum segment length of 100 m and up to 100BASE T the cable has to comply with the EIA TIA Category 5 or higher wire specifications and for 1000BASE T Category 6 is required Connect a crossed RJ 45 cable ...

Page 48: ...UDIO 1 and AUDIO 2 Left and Right terminals to your equipment as shown in the following illustration Connector Connector type Terminal Block 2 Feed the stripped ends of the positive negative and ground wires into the appropriate terminals as labeled and then screw the terminal screws located on the top of the terminal block finger tight to each wire ConnectingtheEthernet ManagementInterface The RJ...

Page 49: ...eiver and Alarm relay functionality See Connecting the Cue Tone Cue Trigger Interface on page 29 for more information on Cue Tone and Cue Trigger equipment connections These outputs are user configurable via the Setup Menu on the front panel The Alarm output connector is a 15 pin sub D female connector The following diagram shows the connector and the pin allocation table for the Alarm output pins...

Page 50: ... closed pin Common pin Normally open pin Relay Mode 11 10 15 Trigger 15 10 11 Alarm default Note A normally closed state implies the state when power is applied to the relay in a normal operating state without a trigger or alarm condition present ...

Page 51: ... table for Cue Tone Cue Trigger and Alarm relay connections Connector Pin Pin allocation 1 Cue Trig 1 2 Cue Trig 2 3 Cue Trig 3 4 Cue Trig 4 5 Cue Trig 5 6 Cue Trig 6 7 Cue Trig 7 8 Cue Trig 8 9 Not connected 10 Alarm Ground 11 Alarm Normally open 12 Chassis ground 13 Cue Tone 14 Cue Tone 15 Alarm Normally closed Connecting the Cue Tone Interface Connect the Cue Tone pins 13 and 14 to a device to ...

Page 52: ...sets the open collector contacts according to the content of the DTMF descriptor in the Cisco D9054 HDTV Encoder and the Cisco D9036 Modular Encoding Platform For information on the open collector output settings see the Cisco D9054 HDTV Encoder Installation and Operation Guide and Cisco D9036 Modular Encoding Platform Installation and Configuration Guide ...

Page 53: ...tart a communication session with the receiver use a utility such as Tera Term Pro or PuTTY Proceed as follows to log into a new connection using Tera Term 1 In the New Connection window enter the IP address in the Host field 2 If you want to start a telnet session select Telnet and enter 23 in the TCP Port field 3 If you want to start an SSH session select SSH and enter 22 in the TCP Port field 4...

Page 54: ...the CONFIRM NEW PASSWORD prompt type the new password again and press Enter Note The New Password and Confirm New Password should be identical 5 At the NEW USER PRIVILEGES prompt enter the type of account you want to assign the user The following table illustrates the different login types Account Type Enter Access Guest 3 View settings only User 2 View and edit settings Admin 1 View edit settings...

Page 55: ...and the confirm new password should be identical Each user including the admin user can modify only his own password Printing theListof Users At the admin prompt type pwd list_users and press Enter Note Only usernames will be printed Passwords will not be visible Resetting theLoginCredentials At any time the user authentication table can be reset from the front panel This option is under the Setup...

Page 56: ...004004052 and 1004004051 SMiT Professional Irdeto Hardware Version 2 2 1 Application Version IRD STD 3 7 0m 8 Serial Number 1103000494 and 1103000276 Conax Aston Hardware Version 1 0100 Application Version 2 2300B Serial Number 1900 237064 Conax Professional SMiT Hardware Version 2 2 1 and 4 0 3 Application Version CNX STD 2 5 9m8 and CNX SECPLUSGRC 2 8 0m8 Serial Number 1104000101 and 1204069309 ...

Page 57: ...t panel keys and display This information is primarily applicable for standalone operation 4 Chapter 4 Front Panel Operation In This Chapter About the Front Panel 36 Locking Unlocking the Front Panel 40 Startup Screen 41 Main Menu 45 Status Menu 46 Setup Menu 60 About Menu 133 Versions Menu 135 Diagnostics Menu 138 ...

Page 58: ...uning operations The bottom line will show selections or parameter values available using the navigation selection keypad The items are selected by pressing the SELECT center key or DOWN Arrow key on the navigation selection keypad Keypad The numeric keypad is used to enter alphanumeric values The MENU key sets the software to the initial menu and returns to the previous menu The MENU key can also...

Page 59: ...not muted all outputs are operating without an error Green Flashing indicates one of the following conditions difficulty with an input route or output one or more of the inputs are not synchronized one or more outputs are routed but muted by a fault condition no RF signal is present or detected or it is muted receiver is not authorized to receive the program Off Off indicates all of the following ...

Page 60: ...e current item Pressing the SELECT key stores any entered values The following is the Navigation Selection keypad which changes its function depending on the current state of the menu The following table shows which parts of this integral interface are being referenced by which term Button Function LEFT Arrow key When moving through menus highlights the menu item to the left When entering data mov...

Page 61: ...k out of menus and data entry fields Alphanumeric Entry Pressing the numeric keys 2 9 once will enter the respective digit into a data entry field Pressing these buttons again will enter the first of the letters displayed beside the number Repeatedly pressing the button will toggle through all of the key s possible choices When entering text the 1 button can be used to insert spaces press twice To...

Page 62: ... Menu Likewise you can toggle the keypad lock state back using SELECT and INFO at any time provided the KB Lock state on the Admin Menu is Enabled For more information on front panel keypad buttons see Navigation Selection Keypad on page 38 Note If the lock level is 3 or 4 you must enter a password to unlock the front panel For more information on lock level password see Setup Menu Admin on page 6...

Page 63: ...us Description Y Indicates the channel is authorized N Indicates the channel is not authorized LCD Panel The LCD panel displays basic signal and program information in the LCD display as described in the following illustration LCD Setting Description PE Program Entry PE The receiver supports up to 32 program entries All 32 PEs support PowerVu descrambling All 32 PEs can use the Conditional Access ...

Page 64: ... user actions are currently acceptable The following displays the location of the symbol The following table describes the various symbols LCD Symbol Description The Hourglass indicates that parameters are being saved in the background You can continue to perform any operation desired Note If a power cycle interruption occurs while the hourglass is displayed some parameters may not be saved Refrai...

Page 65: ...before it will be downloaded Note Service interruption occurs during a reboot which is always required when the receiver s software is updated The Download symbol indicates that a software download for a version of software already in memory has been detected The Disaster Recovery DR symbol indicates that a disaster is declared on the current receiver The NIT Retune NR symbol indicates that a NIT ...

Page 66: ...hannel number or press to scroll through the available channels Deleting aProgram from theProgram Entry 1 Press MENU until the startup screen appears The PE channel is displayed Note PE1 is the default 2 Press the ADV key to select PE1 3 Press the UP or DOWN arrow key to scroll through the available program entries 4 Press ADV again to select the channel number 5 Enter the channel number 0 with th...

Page 67: ...n menu Select the desired function by moving the cursor left or right by pressing the LEFT or RIGHT arrow key Once a selection is made by pressing the SELECT key the LCD presents the second menu level for the selected function Succeeding levels for each function include all the hierarchical levels for the function in the front panel LCD ...

Page 68: ...utput signals the video and audio services and allows you to browse and or configure the alarms and warnings The Status menu is split into four parts General Services TS Input and TS Output Each parameter is described in this section For instructions on how to select and store settings see About the Front Panel on page 36 The Status menu has the following structure ...

Page 69: ...he program is scrambled Unkn DES DVB BISS1 BISS2 or BISS3 Auth Indicates whether the receiver is authorized to receive the program Yes or No Enc Indicates whether the received program is encrypted Yes or No Scr Indicates whether the received program is scrambled Yes or No CA System Indicates the type of Conditional Access CA system used by the program SA BISS or FTA Free To Air Video Indicates the...

Page 70: ...Time and Date Table date and time received from the DVB stream Note This is displayed as local time Current SNTP Date and Time Displays the current SNTP Simple Networking Time Protocol date and time if IRD receives a valid reply from the NTP server Note This is displayed as local time Status Menu Services Video Menu Item Description Parameters Video Indicates the video encoding format and resoluti...

Page 71: ...udio channels Format Indicates the format of the audio input stream None Sine Pink Beep MPEG1L1 MPEG1L2 MPEG2L1 MPEG2L2 AC3 LOAS AAC ADTS AAC LOAS HEAAC ADTS HEAAC or DDP BR Kbps Indicates the bit rate of the audio input stream in kbps Buffer Indicates the buffer level of the input audio stream in bytes SFR kHz Indicates the sample rate of the input audio stream in kHz 32 0 44 1 or 48 0 kHz DDP IN...

Page 72: ...symbols second FEC Indicates the FEC Forward Error Correction rate of the received signal N A 1 2 3 5 2 3 3 4 4 5 5 6 7 8 8 9 or 9 10 Modulation Indicates the modulation type for the received signal N A QPSK 8PSK DVB S DVB S2 or 16QAM Pol Indicates the signal polarization setting This setting is only applicable when LNB Power is set to H NIT or V NIT The selected setting must match the polarizatio...

Page 73: ...2 PVBER Indicates the PV Post Viterbi BER for the received signal DVB S LDPCBER Indicates the LDPC Low Density Parity Check error rate for the received signal DVB S2 AFC MHz Indicates the current Automatic Frequency Control count in MHz UEC Indicates the current Uncorrected Error Count for the received signal CEC Indicates the current Corrected Error Count for the received signal DVB S Clear Count...

Page 74: ... or 18V LO Select Indicates whether a 22 kHz tone is available on input port RF1 This is applicable for dual band applications On or Off Program PIDs Menu Item Description Parameters PE Select the Program Entry to view PE1 to PE32 Stream Indicates the name assigned to the Program Entry Up to 4 alphanumeric characters Detail Indicates any detail associated with the program PID e g MPG2 PID MPG1 VID...

Page 75: ...active and that the receiver has tuned to and is displaying the alternate program event as it is not authorized to view the scheduled event SR Event Type Indicates the type of service replacement event None Indicates that no service replacement event is scheduled Scheduled Indicates that all receivers will tune to the alternate program at the scheduled time This status is applicable to PE1 to PE32...

Page 76: ...0 00 Status Menu TSOutput Menu Item Description Parameters Output Indicates the output type ASI or MPEGoIP Rate Mbps Indicates the current output bit rate 0 to 206 Mbps Free Mbps Indicates the available bandwidth in Mbps without stuffing Status Menu IP To view the IP menu from the Status menu press the RIGHT arrow key four times The IP menu provides Link Redundancy and MOIP status information The ...

Page 77: ...tion Parameters Engine Error Indicates a critical hardware error that may require a unit reboot Yes or No Stream Overflow Indicates the MPEG over IP transport stream s overflow status Yes or No Combined User Rate Displays the combined output bit rate for all the configured streams including FEC Actual Rate Port 1 2 Displays the current output bit rates for Data1 and Data2 ports including FEC 0 to ...

Page 78: ... MM DD HH MM SS MOIP In IP Source Status Menu Item Description Parameters Data1 Data2 Source Host When locked this displays the source host IP address of the originator If the signal is not locked it will display N A Data1 Data2 MOIP Type Displays the encapsulation type of transport stream received from the DATA1 or DATA2 port UDP or RTP MOIP In FEC Status Menu Item Description Parameters FEC Rate...

Page 79: ...ate in percentage Latency ms Displays the delay that is introduced by the FEC decoder in milliseconds Status Menu DR To view the DR Disaster Recovery menu from the Status menu press the RIGHT arrow key five times The DR menu provides the current disaster recovery status information For more information on disaster recovery see Disaster Recovery on page 7 The DR menu has the following structure ...

Page 80: ...etune Recovery in progress Goto RF n OK FAIL No Action Goto Backup n OK FAIL No Action Goto Origin OK FAIL No Action Goto Preferred RF OK FAIL No Action Configured By Displays the current disaster recovery setting User The unit is using the disaster recovery settings configured locally Uplink The unit is using the PNC disaster recovery profile User or Uplink Signal Loss Timer Indicates the time in...

Page 81: ...plays the time set by the local unit If the Profile is set to Uplink it displays the time set by the PNC uplink But if the unit is not connected to the uplink the default value of the unit is displayed 10 to 255 Backup Channel Status Menu Item Description Parameters PE Displays the program entry PE1 to PE32 Backup Channel Displays the channel number assigned to the selected backup transport Transp...

Page 82: ... keypad lock download mode and date and time TS Input frequency parameters for acquiring and locking on to an RF signal or receiving an ASI input IP parameters for setting up the Ethernet ports Services audio video captions and VBI CI parameters to decrypt programming available from service provider programmers via CAM Smart Cards Outputs alarm relays cue tone cue trigger setup parameters for sett...

Page 83: ...on how to select and store settings see About the Front Panel on page 36 The Admin menu has the following structure Menu Item Description Parameters Lock Level Sets the front panel interface lock level For information on each of the lock levels see Factory Default Settings and Lock Levels on page 368 0 1 2 3 or 4 ...

Page 84: ...eceiver settings back to the factory set default values A warning message prompts you to confirm the operation Reboots Unit you are prompted to verify the operation Abort or Continue Clear FWD tables Select to clear settings that are only used in older applications Reverting back to an older application will revet to the default values of the cleared settings A warning message prompts you to confi...

Page 85: ...tion will occur Limit Version Indicates the oldest version of the application that can be installed on the current unit Older applications will not be installed Read only alphanumeric value DL Status Indicates the current download state Init Download component is being initialized You cannot perform a download while in this state Ready Download component is ready to receive downloads Buffer Downlo...

Page 86: ...Indicates the total number of expected code tables in the current download Read only numeric value Recv Displays the number of code tables received since the last completed or aborted download or power cycle Read only numeric value Reject Displays the number of code tables rejected Tables are rejected whenever validation fails due to things like CRC failure or incorrect code or receiver type Read ...

Page 87: ...ing this setting will allow the unit to correctly display the local time 13 00 12 00 11 00 10 00 09 30 09 00 08 00 07 00 06 30 06 00 05 45 05 30 05 00 04 30 04 00 03 30 03 00 02 00 01 00 GMT 01 00 02 00 03 30 04 00 05 00 06 00 07 00 08 00 09 00 10 00 11 00 12 00 Setup Menu TSInput To view the TS Transport Stream Input menu from the Main menu press the RIGHT arrow key once and then the SELECT key t...

Page 88: ...ing a new input to be active will deactivate the currently active input Act or No Tune Mode Select the tables required for the service list creation and signal acquisition Basic Requires NIT to be present Auto Uses all the service list tables and it will acquire if any service list tables are present Custom Uses the Custom Tuning parameters specified by the user The default is Basic ...

Page 89: ...he program s CA systems are validated by the CAM The channel is always authorized RF1 RF2 RF3 RF4 RFx Input Menu Item Description Parameters RFx Active RF1 RF2 RF3 RF4 Select the input to be active Note Setting a new input to be active will deactivate the currently active input Act or No Tune Mode Select which tables are required for the service list creation and signal acquisition Note When editi...

Page 90: ...hannel is always authorized Select Sets the method used by the RF tuner to determine which input to use when switching transports UserCfg User configuration will only use the active RF input SW Map Software map uses the orbital position settings from each input and map it to those in the NIT LO1 GHz Sets the lower oscillator frequency in GHz of the LNB In a single band oscillator set its frequency...

Page 91: ... configuration simply enter the location of the satellite using the numerical keypad The receiver will not recognize the satellite name and identify it as Unknown This setting is required to resolve any ambiguity between RF inputs during automatic disaster recovery Degrees E W Denotes the satellite position the dish connected to the current RF Input should point to This is used when the satellite ...

Page 92: ...r NoLock Modulation Sets the modulation type for the received signal DVB S or DVB S2 Rolloff Sets the rolloff factor of the incoming signal 20 25 35 Use 20 or 35 when DVB S modulation is used and either of the three when DVB S2 is used Use a small number to reject or filter carriers close to the same frequency InputIQ Select the Input signal spectrum inversion setting which allows the operator to ...

Page 93: ...iption Parameters IP1 Active Select the input to be active Note Setting a new input to be active will deactivate the currently active input Act or No Tune Mode Select which tables are required for the service list creation and signal acquisition Note When editing the tuning the device is in a transient state while acquiring tuning information and channel lists and so on The receiver reverts to the...

Page 94: ...pported by the CAM the channel is not authorized Open In open mode all the program s CA systems are validated by the CAM The channel is always authorized Select Sets the method to determine which available MPEG over IP stream for each data port to use as a transport input UserCfg User can select one of the available MPEG over IP streams for Data1 and or Data2 ports SW Map Pre defined software algo...

Page 95: ...ms received from the host servers that are not defined on the list Black List The unit will reject the streams received from the defined list of hosts servers Idx and IP Address TS UDP The transport stream UDP port number For RTP port enter an even port number For UDP port you can enter an even or odd port number Note FEC is only supported for RTP transport streams 1 to 65534 FEC1 UDP If FEC is se...

Page 96: ...t 2 as the primary data port If an issue occurs it will failover to port 2 or port 1 the backup port Type If Backup Primary Data1 Data2 is set as the Redundancy mode select the redundancy direction Revertive Attempt to revert back to the primary port when using the backup port and the primary port is active again Non revertive Use the backup port if active when the primary port fails without rever...

Page 97: ... from the trusted IP addresses listed If Black List is selected as the Src Filter the unit will receive all streams except from the IP addresses of hosts listed Press ADV to enter an address Valid host IP address Tune Mode Custom This menu is where you set up your custom properties Select the channel to set up and then edit it Menu Item Description Parameters Services List Mode If using custom tun...

Page 98: ... to use the user selected tuning parameters Status Menu Item Description Parameters Service List Mode Indicates if all the expected service list tables are present Rigorous or only some of the service list tables are present Degraded Degraded or Rigorous BAT This is not supported in the current release No NIT Indicates whether the Network Information Table NIT is being used to create the service l...

Page 99: ...ain menu press the RIGHT arrow key once and then the SELECT key to reach the Setup menu Then press the RIGHT arrow key twice and the SELECT key to view the IP menu The IP menu allows you to set the parameters for communicating with other equipment via the TS Output and Management ports for MPEGoIP and MPE applications and upgrading application software For instructions on how to select and store s...

Page 100: ...mple as a group The following table shows the most commonly used Subnet mask values to enter for a chosen IP address mask which will depend on the size of your network Mask Subnet Mask 8 255 0 0 0 16 255 255 0 0 24 255 255 255 0 Phy Mode Set the speed and duplex type of the interface Select Auto for PHY to negotiate speed and duplex with other devices on the network or select 10 HD half duplex 10 ...

Page 101: ...ended that this account be replaced by a login username password chosen by the administrator To change the username and password you must be an Admin user Refer to Setting Admin User Privileges via a Telnet SSH Connection on page 31 Note After this recovery procedure all existing user accounts will be lost Password Complexity Sets the password complexity for all users The complexity level changes ...

Page 102: ...chieved by full or partial capitalization of letters No letter is repeated more than three times in a row Must contain a minimum of eight characters Must contain a minimum of three of the following types of characters capital letters small letters digits and special characters Traps Menu Item Description Parameters Trap IP Address Sets the destination IP address for SNMP trap messages for system e...

Page 103: ...nable default Allow web connections Secure Encrypted access to the webserver HTTPS For more information see Protocol Control Settings on page 247 SNMP Controls SNMP access to the IRD UDP port 161 Enable default Allow SNMP connections Disable Disables the listener for the SNMP port MPE Sets whether the MPE data is forwarded to the network Note The transcoder supports up to a maximum of 10 Mbps thro...

Page 104: ... TCP or UDP port number of the server N A 1 to 65535 By enabling or disabling the protocols dynamic hardware and software firewalls are created for the D9824 receiver Accessing TCP and UDP Services The following describes the commands used to access port information for all the supported protocols The examples of TCP based services are Telnet SSH and HTTP The examples of UDP based services are SNT...

Page 105: ...ckup port Mirroring Send the same data to both port 1 and port 2 The remaining redundancy controls below are not applicable Direction If Backup Primary Data1 Data2 is set as the redundancy Mode set the direction of the redundancy switch Revertive An attempt is made to revert back to the primary port when using the backup port and the primary port is active again Non Revertive Always use the backup...

Page 106: ...nce and then the SELECT key to reach the Setup menu Then press the RIGHT arrow key three times and the SELECT key to view the Services menu The Services menu allows you to set up all the operating parameters associated with audio video and captions services Each parameter is described below The menu has the following structure ...

Page 107: ...tion Enabled or Disabled Alarm Video Cutoff Sets whether the video output is cut off if any enabled alarm is active on the receiver When video is cut off there will be no horizontal or vertical synchronization on the output This is useful for downstream redundancy switching by detecting a loss of video signal Note This same function also exists under Setup Alarm Warning Enable or Disable The defau...

Page 108: ...the receiver affects PAL WSS when it is present in the VBI line 23 Auto Create Creates WSS to output the correct aspect ratio when performing aspect ratio conversion Auto Modify If WSS is present in the input stream it is modified to output the correct aspect ratio when performing aspect ratio conversion If WSS is not present in the input no WSS will be present in the output Suppress Removes WSS o...

Page 109: ... Normal picture 4 3 4 3 4 3 CCO None Conversion is not possible Normal picture 4 3 4 3 4 3 P B None Conversion is not possible Normal picture 4 3 4 3 14 9 None Conversion is not possible Normal picture 4 3 4 3 16 9 SCALE None Conversion is not possible Normal picture 4 3 16 9 None None Picture is short and wide 4 3 16 9 Auto 4 3 P B Uses 4 3 P B 4 3 16 9 16 9 L B None Conversion is not possible Pi...

Page 110: ...l 16 9 16 9 Auto None No conversion Normal picture 16 9 16 9 16 9 L B None Conversion is not possible Normal picture 16 9 16 9 4 3 CCO None Conversion is not possible Normal picture 16 9 16 9 4 3 P B None Conversion is not possible Normal picture 16 9 16 9 14 9 None Conversion is not possible Normal picture 16 9 16 9 16 9 SCALE None Conversion is not possible Normal picture 16 9 4 3 None None Pict...

Page 111: ...ed in the transport stream In this case the receiver performs the conversion based on the TV Aspect Ratio setting combined with the program specific uplink information to provide the best fit for display of the program material on the TV This feature is primarily used in 16 9 and 14 9 wide screen applications Audio Menu Item Description Parameters Aud Sets which balanced audio output on the rear p...

Page 112: ...PMT Order default Allows you to select a PMT order Language List Allows you to select a language from the available list Language Entry Allows you to enter a language code Language List If Select Language By is set to Language List select the language for the selected audio ara Arabic btk Batak Indonesia ben Bengali bul Bulgarian chi Chinese cze Czech dan Danish dut Dutch eng English fin Finnish f...

Page 113: ...rding to ISO 639 2 Language Codes Captions Menu Item Description Parameters Preferred Mode Selects the type of closed captioning to use if there are multiple available in the stream Auto SA Custom EIA 708 Type 3 Type 4 SA DVS 053 Type 4 ATSC Reserved or DVS 157 The default is Auto Note SA Custom is not supported when telecine video coding is enabled Actual Output Indicates the actual closed captio...

Page 114: ...pect ratio conversion If WSS is not present in the input no WSS will be present in the output Suppress Removes WSS output Passthrough Passes WSS unmodified as received by the receiver The default is Passthrough WSS Stat This indicates the current output value of PAL WSS in VBI line 23 4 3 F F 16 9 L B CEN 16 9 L B TOP 16 9 L B 14 9 L B CEN 14 9 L B TOP 14 9 F F CEN 16 9 F F or UNDEFINED Note F F i...

Page 115: ...ge Entry Allows you to enter a language code PMT Order Allows you to select a PMT order The default setting is Language List Language Entry and PMT Order are more applicable for advanced applications Language List If Language List was selected in the Select Language By menu select the MPEG language to display ara Arabic btk Batak Indonesia ben Bengali bul Bulgarian chi Chinese cze Czech dan Danish...

Page 116: ... are according to ISO 639 2 Language Codes Imitext Position Sets the position of the on screen subtitle text Standard or Extended ForeGnd Sets the text color for Imitext subtitles Auto Yellow or White Auto displays text in the color transmitted by the subtitling equipment Yellow and White override the color set by the uplink and display text in the selected color BackGnd Sets the text background f...

Page 117: ...e Note By default all the decode services are enabled Video Audio1 to Audio4 VBI Vertical Blanking Interval DATA low speed data MPE1 to MPE5 Multiprotocol Encapsulation STT Subtitles or DPI Digital Program Insertion Enabled Select whether the local decoding of this service is enabled or disabled Yes or No ...

Page 118: ...CI slots are located under the door on the front panel They allow use of a CAM Conditional Access Module Smart Card to decrypt purchased programming You must be authorized to view the programming available via the Smart Card from your service provider CAMs must be purchased from Cisco For a list of the supported CAMs see Common Interface Modules on page 34 For instructions on how to select and sto...

Page 119: ...rypt must be set to ON TOP The top CAM slot is used for decryption BOTTOM The bottom CAM slot is used for decryption COMP only If any program entries have selected Comp for the Decrypt parameter you can customize the PID or stream type to decrypt the program To Add a Record press the ADV button select Insert and define the appropriate parameters To delete an existing record select Delete and confi...

Page 120: ... type set the instance of the current stream type 1 to 64 Query Set to Enable to query the CAM prior to decryption to ensure that the program can be decrypted Enabled or Disabled default Auto Reset Set to Enable to automatically reset the card Enable or Disabled default List Mgmt Select whether the Common Interface List Management should add or delete individual programs or update all the programs...

Page 121: ...ot Ready System Name Indicates the system name of the CAM Application Manufacture ID Displays the factory loaded application number of the CAM Manufacture Code Indicates the manufacture s code Supported CA System IDs Displays the CA system identification name of the CAM Some CAMs may support multiple CA system IDs Serial Number Indicates the unique serial number of the CAM Hardware Version Display...

Page 122: ...press the RIGHT arrow key five times and the SELECT key to view the Outputs menu The Outputs menu allows you to set up the rear panel control relays for alarms cue tones and cue triggers and the transport stream outputs and Digital Program Mapping DPM For instructions on how to select and store settings see About the Front Panel on page 36 The Outputs menu has the following structure ...

Page 123: ...n an inactive signal Low Pins act as ground on an active cueing signal and as open or floating collectors on an inactive signal Repeat If the Cueing Mode was set to Tone set the number of consecutive tone sequences to be generated Values greater than 1 are provided when a scenario demands repetition to ensure that the ad insertion equipment receives the signal 1 2 or 3 The default is 3 Tone ms If ...

Page 124: ...s The response is generated at the Cue Tone Relay output on the rear panel of the receiver Alarm or Trigger The following table displays the possible field settings and their relationship to the receiver output Relay Mode Condition Relay Contact NC C C No Alarm Unit Power Off Open Close Alarm State Open Close No Alarm Close Open Trigger Active selected in PNC Close Open Inactive Open Close Cue Tri...

Page 125: ...ated and in most cases it will be lower than the overall input rate User The output rate is specified by the User Rate Mbps parameter It is determined by the user setting regardless of the input source Null packets are always inserted when the configured output bit rate is higher than the payload rate of the transport stream to be encapsulated User Rate Mbps If the Rate Control is set to User set ...

Page 126: ...tically set to Map Otherwise the PEs are automatically set to Drop When selecting MAP Passthrough the option to re sync will be provided If you select Yes it will set the DPM mapping to the last valid or saved configuration If you select No it will use the existing DPM maps If the PE is mapped it uses the last saved output MAP configuration The output map for example output channel PMT does not ch...

Page 127: ... the PE is authorized and can descramble the channel Descrambled Descrambles the output channel and passes in the clear channels The default is Descrambled Insert Null Packet Select whether to insert null packets into the output to maintain output at a constant bit rate Yes or No Auto Map Sets whether the DPM resolves the channel and PID collisions automatically on the transport outputs New values...

Page 128: ...ll packets If Insert Null Packet is set to No and the Output Mode is set to one of the MPTS modes the output rate is equal to the payload rate of the transport stream to be encapsulated and in most cases it will be lower than the overall input rate User The output rate is specified by the User Rate Mbps parameter It is determined by the user setting regardless of the input source Null packets are ...

Page 129: ...alid or saved configuration If you select No it will use the existing DPM maps If the PE is mapped it uses the last saved output MAP configuration The output map for example output channel PMT does not change automatically if the input or channel number is changed MAP Svc Chans Only This is similar to MAP Passthrough except that only channels applied to program entries are available on the output ...

Page 130: ...l Packet This parameter selects whether to insert null packets in the output stream Null packets are always inserted if the Rate Control is set to User Yes or No FEC Scheme Select the FEC packet sending arrangement They are defined in the pro MPEG FEC and the SMPTE FEC standards If the FEC for a specific MOIP Stream is set to None all FEC related settings for that stream are ignored For more infor...

Page 131: ...if the payload bit rate of the transport to be encapsulated is higher than the user defined output bit rate 0 to 206 Mbps TS IP This selects the maximum number of transport packets per IP packet 1 to 7 MOIP Selects the transport protocol to be used for the output stream RTP or UDP Min IP s This selects the minimum number of IP packets per second 0 3 to 99999 TOS Type Of Service This sets the quali...

Page 132: ...ments are sent if required 1 to 65534 Note It is not recommended that you change the default SAP port 9875 SAP ID Describes the SAP output stream name source User String or SDT Channel SAP User Str Provides the SAP user string Up to 31 characters FEC Select the error protection profile For more information see Configuring Forward Error Correction Settings on page 230 1D Requires generation of one ...

Page 133: ...a program basis where individual service PID modifications are provided on a limited scale Use the digital program mapping features to configure the transport output bit rate configure the output mode for a program entry configure the service and PID output settings in a program entry Note Any changes made to the ASI MOIP DPM values will automatically change the Config Type to Edited by User The D...

Page 134: ...ded Only regenerate the tables if the content has changed Copy This copies all DPM data from either the ASI output to the MOIP output MPEG over IP or from the MOIP output to the ASI output depending on your selection ASI MOIP or MOIP ASI DPM ASI MOIP Menu Item Description Parameters PE Select the Program Entry to configure 1 to 32 InCh Displays the channel number to which the PE is tuned This is r...

Page 135: ...hannel PMT does not change automatically if the input or channel number is changed Drop The current channel is not sent to the output and its PMT is removed from the output The OutCh PMT and PID map entries are ignored OutCh If mapping the current PE Act was set to Map set the output channel number for the current program 1 to 65535 PMT If mapping the current PE Act is set to Map set the output PI...

Page 136: ...the action to use for unreferenced content Unreferenced content is the remainder of the transport stream that is not filtered by the program entries Drop Pass or Mode i Drop All unreferenced content is dropped Pass All unreferenced content is passed to the output unchanged Mode i This is a customer specific mode only to be used if directed by Cisco For more information contact Cisco customer suppo...

Page 137: ...e input stream All Ch is only valid if the PAT NIT SDT and PMT are set to Regenerate PAT CAT PMT TSDT NIT NITO SDT SDTO BAT EIT TDT RST TOT DIT SIT ECM EMM DRT CDT Selects the tables which will be passed dropped regenerated or passed with rate control PwRC from the output For more information see PSI Table Settings on page 117 Note The table settings are only available if you selected Ctl by Table...

Page 138: ...the desired Action If the action is Map select the output PID value as well Then press APPLY and save the settings to see the selected input service that will follow that mapping Menu Item Description Parameters ITyp Displays the input service that will be mapped by the current entry This value is read only and for reference purposes PID Displays the input PID that will be mapped by the current en...

Page 139: ...able settings are only available if you selected Ctl by Table in the PSI Options menu Setting Mode Options Description Default PAT Pass Drop Regen Program Association Table Pass CAT Pass Drop Regen Conditional Access Table Pass PMT Pass Drop Regen Program Map Table Pass TSDT Pass Drop Transport Stream Description Table Pass NIT Pass Drop Regen PwRC Network Information Table Pass NITO Pass Drop PwR...

Page 140: ...ap configuration for CDT PIDs and to always drop all CDTs Setting Up Digital Program Mapping DPM 1 Verify that you are receiving a valid signal and that you have set up the channels that you want to pass drop or map 2 Go to the Setup Outputs TS Out DPM Global menu and select Resync All for the selected ASI output This copies the input services PIDs to the remapped output service PIDs 3 Go to Setup...

Page 141: ...ge such as Bad configuration data will be displayed and you will need to change the parameters to obtain the correct output 7 Go to Setup Outputs TS Out ASI and set the Output Mode to Full DPM Control Also if necessary set the Descramble Mode according to whether the program is to be Scrambled or Descrambled for downstream viewing monitoring 8 On the same menu set the following parameters Paramete...

Page 142: ...ervices are mapped correctly 1 On the DPM menu map the output services as desired 2 Select PE Resync Svcs The receiver will synchronize the PE output according to the available input services only and ignore the input to output service PID mapping To synchronize the output to the input PIDs only This operation synchronizes the inputs to the outputs according to the PID assignments only This is use...

Page 143: ...preset template This is helpful in pre configuring any number of PEs for future use TS Out Options To view the Options menu from the TS Out menu press the RIGHT arrow key four times The Options menu allows you to configure auto synchronization and fixed output options for the MPEG over IP and ASI outputs The Options menu has the following structure Menu Item Description Parameters Output Select 1 ...

Page 144: ...el Step assigned below Yes or No Start First PE channel to use if the Use Inp Chan PMT PIDs is set to No 1 to 65535 for Use Inp Chan 1 to 8192 for Use Inp PMT PIDs Step Offset of the subsequent PE channel PE PMT PID or first ES PID of subsequent channel numbers 1 to 65535 for Use Inp Chan 1 to 8192 for Use Inp PMT PIDs Use Inp Ord Set to Yes to assign the ES PID according to the incoming PMT order...

Page 145: ...and allows you to set the BISS mode and session words available from your service provider The CA menu has the following structure Menu Item Description Parameters Id Select the ISE to configure 1 to 32 User Address Indicates the ISE User Address 11 digit address in the following format ISE Version Indicates the ISE version number 7 characters ADP Enc Pass Indicates the number of encrypted Address...

Page 146: ...ect to clear the Addressable Data Packet counters ADP Enc Pass ADP Enc Total ADP Non Enc Pass and ADP Non Enc Total These values are also reset whenever the receiver is turned on reset or power cycled BISS Mode Sets the Basic Interoperable Scrambling System BISS mode for the receiver All channels assigned to a PE identified as BISS CA controlled in the PMT will be decrypted Mode 1 or Mode E BISS 1...

Page 147: ...ow key once and then the SELECT key to reach the Setup menu Then press the RIGHT arrow key seven times and the SELECT key to view the Alarm Warning menu The Alarm Warning menu allows you to browse the active alarms and warnings and set whether the output will be disabled in the event of an alarm This menu has the following structure Menu Item Description Parameters FP Alarm Reminder Select whether...

Page 148: ...er the current alarm is enabled or disabled If the alarm is disabled the Rly and Trp settings are ignored Yes or No Rly If the current alarm or warning is enabled Enb is set to Yes select whether it will trigger the rear panel relay when the alarm is set or cleared Yes or No Note No is a read only value that indicates the setting is Yes but is currently being suppressed because the alarm or warnin...

Page 149: ...ow the transport outputs that will be muted The receiver uses these thresholds to determine when to mute the transport in the event of a noisy signal poor or loss of signal condition 30 0 to 30 0 This setting must be below the respective Restore value The default is 0 0 Note Muting Control must be set to Enable for these settings to be active Trnsprt DVBS Marg Restore Trnsprt DVBS2 Marg Restore Se...

Page 150: ...0 This setting must be below the respective Restore value The default is 0 0 Note Muting Control must be set to Enable for these settings to be active Audio DVBS Marg Restore Audio DVBS2 Marg Restore Sets the DVB S and DVB S2 Carrier to Noise margins in dB above the audio outputs that will be restored The receiver uses these thresholds to determine when to restore the audio after it has been muted...

Page 151: ...efault is Enable Setup Menu DR To view the DR Disaster Recovery menu from the Main menu press the RIGHT arrow key once and then the SELECT key to reach the Setup menu Then press the LEFT arrow key once and the SELECT key to view the DR menu The DR menu allows you to set up the disaster recovery parameters For more information on disaster recovery see Disaster Recovery on page 7 Each parameter is d...

Page 152: ...r recovery search path Note Although the default is set to Yes the disaster recovery is not operational until the search path is configured Yes or No D R Profile Select the disaster recovery setting to use Choose Local to use the disaster recovery settings configured on the receiver if the PNC uplink is configured to allow local disaster recovery Choose Uplink to use the PNC disaster recovery prof...

Page 153: ... backup channel 1 2 or 3 Backup Channel The backup channel number for the selected backup transport Note We recommend that you configure a minimum of one backup transport If no backup transport is configured an alarm is triggered but the unit will not be able to switch to a backup transport Backup Transport Menu Item Description Parameters Backup The backup number 1 2 or 3 Active Indicates whether...

Page 154: ...Description Parameters Input NetId Freq GHz SymRate FEC Backup Modulation Rolloff For information on the tuning parameters see RF1 RF2 RF3 RF4 RFx Input on page 67 Note The RF input must be configured to match the bandwidth of the backup parameters ...

Page 155: ...e that appears on the Web Interface title to identify the receiver Tracking ID Displays the unique Tracking ID number that identifies the product version This is read only Model Indicates the model number and name of the receiver This is read only Master UA Indicates the Master User Address UA which is required to request program authorization from the uplink This is read only Ver Indicates the ve...

Page 156: ...4 Advanced Multi Decryption Receiver Press up and down to scroll through the list of features HD Decode H 264 Decode DVB S2 or MPEGoIP Out Enb Indicates whether the selected software feature is licensed and enabled Yes or No Features Menu Item Description Parameters Feature Displays a list of hardware options for the D9824 Advanced Multi Decryption Receiver Press up and down to scroll through the ...

Page 157: ...w the Versions menu from the Main menu press the RIGHT arrow key three times and then the SELECT key The Versions menu provides basic software information that is useful when requesting customer support The menu has the following structure ...

Page 158: ...Indicates the version of the factory loaded safe FEC FPGA code FEC FPGA Cur Indicates the version of the current loaded safe FEC FPGA code Ver Register This is not supported in the current release CPLD Primary CPLD Secondary Indicates the versions of the current primary and secondary Complex Programmable Logic Device CPLD Application Select Erase Application Select between all versions of the appl...

Page 159: ...ou must stop the download first For more information on aborting the download see Setup Menu Admin on page 61 FEC FPGA Ver FEC FPGA Ver Select between all the versions of the FEC FPGA code loaded on the current unit Select Select and then scroll to Yes to reboot the unit and load the selected FEC FPGA code You will be prompted to continue or abort this operation Note Selecting an FEC FPGA code wil...

Page 160: ...m event messages Press the UP and DOWN arrow keys to scroll through the list of alarms and warnings Press the LEFT and RIGHT arrow keys to view the set and reset times Press the INFO key to view the detailed message Clear History Select to clear any existing history information Logs Menu Item Description View Logs Select to view the system log messages Press the UP and DOWN arrow keys to scroll th...

Page 161: ...3 5 2 3 3 4 4 5 5 6 7 8 8 9 or 9 10 Pol Polarity of the received signal H V or Off Horiz Horizontal Vert Vertical Circ_l Left Circular or Circ_r Right Circular ONID Original Network ID SymRate Symbol Rate in Mbps Modulation Modulation of the signal QPSK DVB S QPSK DVB S2 8PSK DVB S2 or 16QAM DVB S2 OrbPos Orbital Position of the satellite in degrees East or West PSI Channels This is the Virtual Ch...

Page 162: ...M Even EMM MPE DPI DRT CDT MCT MIT MAT ECT or Invalid Table ID Tbl ID Unique Table ID ID MPEG DVB Table ID Ver Table Version number PID Value of the PID on which the table is present Status Reception status of the table None Partial Full Update Timeout or Lost Sections Number of sections in the table Power On Menu Item Description Creation Date and Time Displays the date and time the current unit ...

Page 163: ...e unit has been reset since the clearable reset counter was last cleared Clr Rst Select this option to clear reset the Clrbl Rst counter to 0 Reason For Last Reset Displays the reason for the last reset Health Monitor Menu Item Description Parameters Cur Temp Max Temp Avg Temp Displays the current Cur Temp maximum Max Temp and the average Avg Temp operating temperature Degrees Celsius ...

Page 164: ......

Page 165: ...eb GUI Setup and Monitoring In This Chapter Logging On to the Web Interface 144 D9824 Summary Overview 145 D9824 Menus 148 D9824 Web GUI Environment 150 Setting up Input Information 151 Setting up Audio and Video Information 193 Configuring Transport Stream Information 207 Configuring System Settings 244 Viewing Support Information 277 ...

Page 166: ... your username and password you can reset them from the front panel menu of the D9824 Advanced Multi Decryption Receiver For more information see Resetting the Login Credentials on page 33 Important The password and user name will be remembered for the whole of the web session Close the web browser if you want to prevent others from accessing the settings of the D9824 Advanced Multi Decryption Rec...

Page 167: ...m the user interface of the D9824 click Summary The Summary Dashboard page is displayed The Summary Dashboard page displays the main settings of the D9824 Advanced Multi Decryption Receiver Shortcuts The shortcuts above the modules in the Summary Dashboard page are shortcuts to the various setup pages For example click Video Setup to open the Video Setup page ...

Page 168: ...rrent Input Status Displays the current RF Tuning Status information including the downlink frequency and signal status Tuner Performance Displays the satellite dish status such as the C N Margin and Signal Level Video Status Displays the current video information Channel Status Displays the channel status information such as the type of CA used and whether the receiver is authorized to receive th...

Page 169: ...or Warnings link and a pop up window is displayed with a list of all the active alarms or active warnings The following is an example Click an alarm or warning to open the Status page for more information For more information on the Status page see Viewing the Alarm Warning Status on page 258 ...

Page 170: ...esholds View input status Configure channels Configure CI Common Interface settings View PSI Frequency and Channel tables Audio Video From this menu you can Configure video settings Set up closed caption and subtitles Configure audio settings View current audio status Set the cueing parameters Transport Stream From this menu you can Configure ASI and MPEGoIP outputs System Settings From this menu ...

Page 171: ...D9824 Menus 149 Configure lock levels Import or export settings file Manage accounts Support From this menu you can View logs View contact information View and upgrade software version ...

Page 172: ... D9824 has the following general buttons Button Description Apply Saves and applies the settings to the receiver Refresh Reads existing data from the D9824 If edits were made in a setup page then unsaved changes are discarded Reset Defaults Discards any changes made and sets data to default values Clear Counters Resets counters on the displayed page ...

Page 173: ...overy or NIT retune process The error message appears when you load refresh or apply changes to the page For more information on NIT retune see NIT Retune Recovery on page 10 For more information on disaster recovery see Disaster Recovery on page 7 1 From the user interface of the D9824 choose Input Input Setup The Input Setup page is displayed 2 In the RF Input Selection area check the Use RF Inp...

Page 174: ...35 when DVB S modulation is used and either of the three when DVB S2 is used Use a small number to reject or filter carriers close to the same frequency 10 From the IQ drop down list choose the input signal spectrum inversion setting which allows the operator to track and select inverted and non inverted digital signals This is normally used to automatically reject or filter out unwanted signals W...

Page 175: ...bital Position Orbital Posn for RF1 RF2 RF3 and or RF4 in degrees This is the location in orbit of the satellite currently being used The satellite position in degrees in combination with the direction either E East or W West denotes the satellite position the dish connected to the current RF Input should point This is used when the satellite is not available in the look up menu list For manual co...

Page 176: ...ection displays the current RF status The following table describes the Current Input Status information displayed Parameter Description Frequency GHz The current downlink frequency in GHz L band Frequency MHz The current L Band frequency in MHz Symbol Rate Msym Symbol rate of the received signal in Msymbols second FEC Rate The FEC Forward Error Correction rate of the received signal N A 1 2 3 5 2...

Page 177: ...r PSI tables have been found Orbital Validation Status Displays the status of the last user orbital validation performed It displays Passed if the last orbital validation was successful or None if a orbital validation was never performed Otherwise it will display a reason for the failed validation Orbital Validation Date Displays the last date and time that the user orbital validation was performe...

Page 178: ...e following table describes the ASI Input Status information displayed Parameter Description Active Input Indicates the currently selected input source RF1 RF2 RF3 RF4 ASI or IP Signal Status Indicates whether the input signal is locked Locked Indicates the receiver is locked to a carrier with no valid content Lock Sig Indicates the receiver is locked to a carrier with valid content No Lock Indica...

Page 179: ...s for the ASI input 188 204 or N A Acquisition State Displays Full if the ASI and PSI tables have all been found Otherwise it will display Degraded if there are missing tables or None if no ASI or PSI tables have been found TS ID The Transport ID in the range from 1 to 65535 ConfiguringtheIP Input 1 From the user interface of the D9824 choose Input Input Setup The Input Setup page is displayed ...

Page 180: ...nput check box to tune to the MPEG over IP Input Note Setting a new input to be active will deactivate the currently active input 4 Choose UserCfg from the Source IP Selection Mode drop down list to lock to the source IP input set by the user or choose SW Map to automatically detect and select which stream to tune to ...

Page 181: ...1 and Data2 ports Note If the stream is not present on the specific port it cannot be selected b Click OK 6 Click Apply Configuring MPEG over IP Flow 1 In the Input Setup page Input Input Setup click the IP tab Refer to the MOIP Flow Configuration area 2 Check the Multicast check box to use multicast streaming Otherwise uncheck the Multicast check box to listen to the unicast streams that are sent...

Page 182: ...Port 2 If the FEC Mode is set to 2D in addition to entering the FEC columns port number enter the FEC destination UDP port number of the row FEC stream in the FEC Rows Port field 2 to 65534 even only The recommended rows port number is the TS Destination Port 4 7 From the Source Filter drop down list choose the source host filtering mode None White List or Black List Note Source filtering also app...

Page 183: ...cted as the Source Filter enter the IP address of a server that is not trusted The unit is allowed to receive streams from any server except for the servers with IP addresses listed here d Click Save e Click OK You can add up to 8 IP addresses 8 Click Apply Configuring IP De Jittering The de jittering engine has the ability to de jitter two streams simultaneously from Data1 and Data2 ports based o...

Page 184: ... click the IP tab Refer to the Redundancy Configuration area 2 From the Mode drop down list choose the redundancy mode for MPEG over IP input data Choose Manual Data1 or Manual Data2 to only use Data1 or Data2 port for input data The remaining redundancy controls below are not applicable Choose Backup Primary Data1 default or Backup Primary Data2 to use DATA1 port or DATA2 port as the primary data...

Page 185: ... decoded The Link Loss and TS Loss fields are non editable By default Ethernet Link loss and transport stream loss will always trigger a redundancy switchover to the backup port Note If Revertive is selected as the Type and all the triggers are selected it will fail over to the backup port when any of the triggers occur and the backup port has valid content However it will not attempt to revert ba...

Page 186: ... the current input port in use Data1 or Data2 Transport Stream The Transport ID in the range from 1 to 65535 Locked Data1 Data2 Source When locked this displays the source host IP address of the originator If the signal is not locked it will display N A Switchover Reason Displays a description of the reason for the last redundancy switchover AV Loss Program Loss PCR Loss Link Loss TS Loss or None ...

Page 187: ...e NIT Retune Recovery on page 10 For more information on disaster recovery see Disaster Recovery on page 7 1 From the user interface of the D9824 choose Input SI Receive Setup The SI Receive Setup page is displayed 2 In the Custom Tuning Mode area from the Acquisition Mode drop down list choose the tables required for the service list creation and signal acquisition The selections are Auto Basic o...

Page 188: ...le NIT drop down list choose Yes to use the NIT when creating the service list 6 From the Service Description Table SDT drop down list choose Yes to use the SDT when creating the service list 7 From the Program Association Table PAT drop down list choose Yes to use the PAT when creating the service list Note You cannot change the Bouquet Association Table value It is not supported in the current r...

Page 189: ... streams Std In standard mode if a program s CA system is not supported by the CAM the channel is not authorized Open In open mode all the program s CA systems are validated by the CAM The channel is always authorized 11 Click Apply Viewing the SI Receive Status The SI Receive Status area displays all the current SI Receive settings It also displays the source of last tuning and the last Preset Nu...

Page 190: ...ansport in the event of a noisy poor or loss of signal condition The adjustable operating range is from 30 0 to 30 0 dB This setting must be below the respective Restore value The default setting is 0 0 Note The Enable Threshold Muting check box must be selected for these settings to be active 4 The Transport Restore for both DVB S C N Margin dB and DVB S2 C N Margin dB sets the DVB S and DVB S2 C...

Page 191: ...alue The default setting is 0 0 Note The Enable Threshold Muting check box must be selected for these settings to be active 6 The Audio Restore for both DVB S C N Margin dB and DVB S2 C N Margin dB sets the DVB S and DVB S2 Carrier to Noise margins in dB above the audio outputs that will be restored The receiver uses these thresholds to determine when to restore the audio after it has been muted T...

Page 192: ...aster Recovery Settings The disaster recovery settings allow you to configure the search path when a disaster occurs By default the disaster recovery feature is enabled For more information on disaster recovery see Disaster Recovery on page 7 Note If the unit is in a disaster recovery or NIT retune recovery mode an error message is displayed informing you that any changes made to the page will int...

Page 193: ...the disaster recovery configurations Search Pathsettings below The maintenance mode allows you to perform any maintenance operations such as IP setup without the unit declaring disaster and initiate a disaster recovery search path Note Although the default is set to Yes the disaster recovery is not operational until the Search Path is configured 3 From the Disaster Recovery Profile drop down list ...

Page 194: ...e time in seconds the unit must wait for the PAT table to verify the signal has a valid transport You can enter a value in the range from 10 to 255 seconds The default is 60 seconds 7 The Search Path area determines the search order of backup transports when a disaster occurs For a list of triggers see Disaster Recovery on page 7 During a disaster the unit will attempt to tune to the backup transp...

Page 195: ... of one backup transport If no backup transports are configured the origin channel is used The configured backup is enabled To disable a backup click the Backup 1 Backup 2 or Backup 3 radio button and click Disable 8 Click Apply If a disaster recovery is in progress a message is displayed recommending that you do not apply the setup changes during a disaster recovery Click Close If you want to sav...

Page 196: ... The Disaster Recovery Status page is displayed The State field displays the current disaster recovery status The table below lists the statuses State Description No Disaster D R Ready The unit is in a normal state and no disaster recovery is in progress It is set to use the local or uplink disaster recovery settings depending on the Configured By field ...

Page 197: ...ata for the backup plan service in the Disaster Recovery Table DRT exceeds the allowable limit from the current unit Contact your PNC uplink administrator to reduce the amount of backup plan IDs in the Uplink Configuration No Disaster D R Not Ready No Search Path The unit is in a normal state but the unit is not ready for disaster recovery due to a missing search path from the PNC uplink The follo...

Page 198: ...sible reasons Tuning descriptors in the DRT is empty As a result there is no match for the origin The tuning descriptors in the DRT consists of only one tuning parameter which matches with the origin Since other tuning descriptors are empty there are no transports for the search path Contact your PNC uplink administrator D R in progress D R Not Ready Malformed DRT The disaster recovery is in progr...

Page 199: ...to the specified backup signal on the search path Contact your PNC uplink administrator Goto Origin OK FAIL No Action The GOTO Origin command from the uplink executed successfully failed to execute or did not execute due to the following Backup with assigned origin transport is not in the search path Already tuned to origin transport The GOTO Origin command instructs the unit to tune back to the o...

Page 200: ...he unit is not connected to the uplink the default values of the unit are displayed For more information contact your PNC uplink administrator The Backup Transport area displays the tuning parameters of the current origin and backup transports configured For example if only Backup 1 and Backup 3 are configured the table will display the tuning parameters for Origin Backup 1 and Backup 3 The Config...

Page 201: ...NIT retune process The error message appears when you load refresh or apply changes to the page For more information on NIT retune see NIT Retune Recovery on page 10 For more information on disaster recovery see Disaster Recovery on page 7 1 From the user interface of the D9824 choose Input Channel Selection The Channel Selection page is displayed 2 From the PE1 to PE32 drop down lists choose a ch...

Page 202: ...isplays the input channel of the current PE The channel is displayed in a range from 1 to 65535 Channel Name Displays the channel name of the current PE Conditional Access System ID Indicates the type of Conditional Access CA system used by the program SA BISS or FTA Channel Authorised Indicates whether the receiver is authorized to receive the program Yes or No Channel Encrypted Indicates whether...

Page 203: ...hat the receiver has tuned to and is displaying the alternate program event as it is not authorized to view the scheduled event SR Type Displays the type of service replacement event scheduled None Indicates that no service replacement event is scheduled Scheduled Indicates that all receivers will tune to the alternate program at the scheduled time This status applies to PE1 to PE32 programs CA In...

Page 204: ...t the card can be decrypted The default is Disable 3 Choose Enable from the CI CAM Auto Reset drop down list to automatically reset the card The default is Disable 4 From the CA List Management Type drop down list choose whether the Common Interface List Management should add and delete AddDel individual programs or update all UpdateAll the programs when the list changes Note Updating all the prog...

Page 205: ...by the active services 8 Click Apply Setting up the Common Interface Program Description 1 From the CI Slot drop down lists choose the CAM slot to use for decryption If you set the CI Slot to AUTO for PE1 the software automatically assigns the slot capable of decrypting the stream Note If CI Slot is set to AUTO the Decryption Mode must be set to ON Choose TOP to use the top CAM slot for decryption...

Page 206: ...to Stream Stream Category to User manually enter the stream code in Stream Type Value and then the Stream Instance of the stream type If you know the PID number ensure that PID is selected under Mode and enter the appropriate PID number Click Save To enter the stream type choose Stream from the Mode drop down list choose the stream type from the Stream Category VID AUD SUBT USER or TTX and enter t...

Page 207: ...put Information 185 To delete a record select the record you want to remove and click Delete Viewing the CAM Information The System ID area displays the system name and ID number of the CAM for the top bottom slots ...

Page 208: ...cates whether it is the top slot TOP or the bottom slot BOTTOM CAM Status Status of the CAM Ready or Not Ready Sys Name System name of the CAM Comp Name Displays the company name of the CAM Manufacturer Code The manufacturer s code Manufacturer ID The factory loaded application number of the CAM Serial Number The unique serial number of the CAM Hardware Version The hardware version number of the C...

Page 209: ...encrypted Addressable Data Packets successfully processed Ideally the ADP Enc Pass and ADP Enc Total numbers should be identical Enc Data pkts recvd Indicates the number of encrypted Addressable Data Packets received Ideally the ADP Enc Pass and ADP Enc Total numbers should be identical Non Enc Data pkts passed Indicates the number of non encrypted Addressed Data Packets successfully processed Ide...

Page 210: ...ixed 12 character BISS Mode 1 session word in the BISS Mode 1 Session Word field Once entered it cannot be viewed and it is only displayed as asterisks Contact your program provider for the session word 4 If you chose BISS Mode E enter the 16 character BISS Mode E encrypted session word in the BISS Mode E Encrypted Session Word field and the 14 character BISS Mode E injected ID in the BISS Mode E ...

Page 211: ...ion Table Type Indicates the MPEG table acronym PAT CAT PMT TSDT NIT NIT Other SDT SDT Other BAT AEIT P F OEIT P F TDT RST ST TOT DIT SIT ECM Odd ECM Even EMM MPE DPI DRT CDT MCT MIT MAT ECT or Invalid Table ID Table ID Extension Displays the MPEG DVB Table ID Status Indicates the reception status of the table None Partial Full Update Timeout or Lost Version Indicates the table version number PID ...

Page 212: ...D Frequency GHz Displays the downlink frequency in GHz 0 0 to 15 0 GHz Symbol Rate MSym Displays the symbol rate in Mbps Orbital Position Displays the orbital position of the satellite in degrees East of West Polarization Displays the polarity of the received signal H V or Off Flag Displays the satellite position in degrees in combination with the direction East or West FEC Indicates the Forward E...

Page 213: ... is a list of the various columns Abbreviation Description Service ID Indicates the virtual channel number TS ID Displays the identification number of the transport on which the channel is available For more information on the transport streams see Viewing PSI Frequency Information on page 190 Program Name Indicates the name of the channel PMT PID Indicates the PID of the channel s Program Map Tab...

Page 214: ...ram Entry up to 4 alphanumeric characters Detail Displays any detail associated with the program PID e g MPG2 PID The parameters are MPG1 VID MPG2 VID 422 VID H264 VID HD VID MPG4 VID MPG AUD MPG2 AUD DVB AC3 DVB DDP AAC AUD HEAAC AUD MPG4 AUD DBE AUD DTS AUD DVB TXT DVB VBI DVB SUBT DVB ASYN DVB SYNS DVB SYND DVB MPE DVB DCAR DVB OCAR SA VBI ATSC AC3 ATSC DDP SA UTLD SCTE DPI SA HSD SA CDDL SA WB...

Page 215: ...tput drop down list choose the actual standard definition output format of the primary video if the PV Output is set to SD The options are Auto NTSC PAL N AR PAL M or PAL B G I D You must use NTSC for 525 line systems and PAL B G I D for 625 line systems 5 Choose the Standard Definition aspect ratio of your TV monitor 4 3 or 16 9 from the Standard Definition Aspect Ratio drop down list The default...

Page 216: ... warnings on the on screen display for example TV monitor 9 Click Apply Viewing the Video Status The Video Status area displays the current video settings and the encoding bit rate FPS and aspect ratio of the incoming signal The fields are read only The following table describes the video status information displayed Video Status Description Primary Video Output Indicates the actual output video f...

Page 217: ...isplayed 2 From the Preferred Closed Caption Mode drop down list choose the type of closed captioning to use if there are multiple available in the stream The default is Auto Note SA Custom is not supported when telecine video coding is enabled 3 The Closed Caption Mode field displays the actual closed caption mode in the output This is read only 4 Click Apply ...

Page 218: ...rwise no subtitles are displayed Imitext Displays only Imitext subtitles if available Otherwise no subtitles are displayed 3 Choose the position of the on screen subtitle text Standard or Extended from the Imitext Position drop down list 4 From the Imitext Foreground Color drop down list choose the color for Imitext subtitles Auto displays text in the color transmitted by the subtitling equipment ...

Page 219: ...anguage By Option Description Language List Choose the MPEG language to display from the available list The following are the available options ara Arabic btk Batak Indonesia ben Bengali bul Bulgarian chi Chinese cze Czech dan Danish dut Dutch eng English fin Finnish fre French ger German gre Greek heb Hebrew hin Hindi hun Hungarian ice Icelandic ind Indonesian ita Italian jpn Japanese kor Korean ...

Page 220: ...ting upVBI 1 From the user interface of the D9824 choose Audio Video VBI The VBI page is displayed 2 Check the Enable VITS PAL Line 17 18 330 or 331 check box to enable Vertical Interval Test Signal VITS on PAL Lines 17 18 330 or 331 3 Click Apply ...

Page 221: ...and Language List or Language Entry for the other audio For example you cannot select PMT Order for Audio 1 and Language List for Audio 2 b If Language List is selected you must choose a language from the Language List drop down list If Language Entry is selected you must enter a language code in the Manual Entry field If the languages selected are different the first PID with the matching languag...

Page 222: ...ed to both the Left and Right and Right is passed to both the Left and Right b Choose the AC3 compression mode to use if the output is compressed Dolby Digital audio from the AC3 Compression drop down list The selections are Line Mode Custom 1 Custom 0 or RF Mode RF Mode is recommended for analog cable modulators c Left Attenuation is the volume adjustment for the Left audio channel You can choose...

Page 223: ...n DDP Mode Displays the presence of Dolby Digital Plus frames within a Dolby Digital audio stream ON or OFF Dualmono Mode Indicates the presence of dual mono audio outputs in the audio stream ON or OFF Click List Audio PIDs to view a list of all the current audio PIDs ...

Page 224: ...en or floating collectors on an active cueing signal and as ground on an inactive signal Choose Low for the pins to act as ground on an active cueing signal and as open or floating collectors on an inactive signal 4 If the Cueing Mode was set to Tone enter the number of consecutive tone sequences to be generated in the Cueing Tone Repeat Count field Values greater than 1 are provided when a scenar...

Page 225: ...e rear panel of the receiver The following table shows what the possible field settings are and their relationship to the receiver output Relay Mode Condition Relay Contact NC C C NO Alarm Unit Power Off Open Close Alarm State Open Close No Alarm Close Open Trigger Active selected in PNC Close Open Inactive Open Close 8 If the Relay Mode is set to Trigger choose the cue trigger bit pin that will a...

Page 226: ... is displayed 2 In the Test Tones field enter the three digit tone sequence You can enter a value between 000 and 999 3 From the Sequence Mode drop down list choose the tone sequence mode The following describes the available options Start tone only End tone only Start and end tones The end tone is signaled after waiting the time specified in Delay sec 4 Click Apply ...

Page 227: ...e Sequence State drop down list Enabled or Disabled If disabled no cue tone is output 4 In the Sequence Tones field set the three digit tone sequence 1 to 999 5 Choose the tone from the Sequence Mode drop down list Choose for start tone for the end tone and for the start and end tones The end tone is signaled after waiting the time specified in Sequence Delay 6 If the Sequence Mode was set to Star...

Page 228: ...D9824 Receiver 1 From the user interface of the D9824 choose Audio Video Decode Enables The Decode Enables page is displayed 2 Check the services check boxes to be decoded by the receiver Check the Enable Decode Engine check box to enable all the services in the list 3 Click Apply ...

Page 229: ...r you make any changes a successfully updated session open message appears The changes are displayed but not saved You must click Apply to save and apply the changes Note Any changes made to the ASI DPM values will automatically change the Mode Status to Edited by User 2 Choose the output rate control from the Rate Control drop down list The following table describes the affect each of the setting...

Page 230: ...se either one of these basic modes or for advanced setup enter the DPM mapping before setting the Output Mode The following table describes each mode Output Mode Description No Output No ASI output will be generated and the ASI port will be disabled Passthrough All PEs will be set to Pass and other DPM settings will also be set Service Channels Only This is similar to Passthrough except that only ...

Page 231: ...bers If both PE actions are set to Map the output channel number of the higher PE is changed Otherwise the output channel number of the mapped PE is changed The new channel number selected is the next channel number that does not appear in the current PAT or belong to any other PEs For PID conflicts the system will only automatically change the duplicated output PID numbers If both PE actions are ...

Page 232: ...bit rate Otherwise choose No Note We recommend that you set the Null Packet Insertion to Yes 8 Click Apply Setting Up the ASI Auto Synchronization Options The ASI Auto Sync area allows you to configure the DPM without editing each output channel and PID separately 1 In the ASI Outputs page Transport Stream ASI Output refer to the ASI Auto Sync area 2 Choose Yes from the Enable Auto Fix for Collisi...

Page 233: ...el Number is set to 100 and the Channel Numbers Offset is set to 10 then the first channel number is 100 and the second channel number is 110 b From the Use Input PMT PID Numbers drop down list choose Yes to use the input PMT PID number Otherwise choose No default to use the first PE PID number and PID offset number assigned below i In the First Channel First ES PID Number field enter the first PE...

Page 234: ... and the second ES PID number is 201 d From the Use Input PMT ES Stream Order drop down list choose Yes to assign the ES PID according to the incoming PMT order Otherwise choose No to use the reserved PIDs defined below i In the PCR VID AUD SUBT VBI DPI MPE TTX DATA LSD CDT ETV fields enter the number of PIDs for the specified streams PCR VID AUD SUBT VBI DPI MPE TTX DATA LSD CDT ETV in one channe...

Page 235: ...ave and apply the changes 1 From the user interface of the D9824 choose Transport Stream Digital Program Mapping under ASI Output The ASI Digital Program Mapping page is displayed 2 For each DPM Program Entry it displays the input channel number Chl and channel name Name There are 32 channels PE1 to PE32 Note Any changes made to the ASI DPM values will automatically change the Mode Status to Edite...

Page 236: ...y the current entry The Input PID displays the input PID 1 to 8190 that will be mapped by the current entry This is only used if the Action is set to Map 10 From the Action drop down list choose the action to perform on the current PID The Drop action is always performed but the Map option is only applied if the PE Action is Map and the Remapping Mode is Svc ID PID in the DPM General Settings sect...

Page 237: ...ch PE output can be synchronized to its input according to one of the four output modes Select the program entry you want to synchronize and then click Resynchronize or click Resynchronize All to synchronize the inputs to the outputs according to the service assignments only The Confirm Resynchronization window is displayed 2 Select whether you want to synchronize the PE output according to the se...

Page 238: ... channel number of the mapped PE is changed The new channel number selected is the next channel number that does not appear in the current PAT or belong to any other PEs For PID conflicts the system will only automatically change the duplicated output PID numbers If both PE actions are set to Map the output PID number of the higher PE is changed Otherwise the output PID number of the mapped PE is ...

Page 239: ... Pkt Copy is recommended for most applications 4 From the Unreferenced Content drop down list choose the action to use for unreferenced content Unreferenced content is the remainder of the transport stream that is not filtered by the program entries Choose Drop default to drop all unreferenced content Choose Pass to pass all unreferenced content to the output unchanged 5 From the Service ID Output...

Page 240: ... Pass All Transmits the incoming PSI Tables as is does not modify the content and rate The SI Regeneration Option and table settings are ignored Drop All Does not transmit any PSI Tables The SI Regeneration Option and table settings are ignored Ctl By Table The operator can click Table Options to select the table specific output mode for each table 8 If Ctl By Table is selected as the PSI Table Ou...

Page 241: ... clear the Block CDT Output to permit the output of CDTs following the configured DPM PID map configuration and all other DPM constraints 9 From the PSI Regeneration Option drop down list choose whether to regenerate the PSI tables to the output You can choose Always to regenerate all the tables or As Needed to only regenerate the tables if the content has changed 10 Click OK 11 Click Apply 12 Cli...

Page 242: ... D9824 choose Transport Stream Output Transport Status under ASI Output The PID Output Status page is displayed The Program Entry Referenced PIDs table displays the specified PE ES PIDs information on the output The Output Channel and PID Conflicts table displays a list of conflicts when the DPM alarm is active ...

Page 243: ...eam MPEG over IP Output The MPEG over IP Output page is displayed Note Any changes made to the MOIP DPM values will automatically change the Mode Status to Edited by User 2 Choose the MOIP output rate control from the Rate Control drop down list The following table describes the affect each of the settings has on the output bit rate ...

Page 244: ... Output Mode drop down list choose the DPM output mode With the exception of No Output and Full DPM Control selecting a mode will configure the DPM settings to achieve the specified behavior In this way they act as DPM presets The Mode Status is changed from Unmodified to Edited by User It is highly recommended to use either one of these basic modes or for advanced setup enter the DPM mapping befo...

Page 245: ...PTS Full DPM Control The output will be generated according to the DPM settings on the MPEG over IP Digital Program Mapping page This is a manual control setting A message appears to confirm that you want to resynchronize the output changes and PIDs to match the selected input programs Click Yes If a conflict occurs and Enable Auto Map for Collision is set to No a detailed list of all the conflict...

Page 246: ...utput even if it is authorized to receive the channel The default is Descrambled Descramble Mode Description Scrambled Scrambles the output channel even if the PE is authorized and can descramble the channel Descrambled Descrambles the output channel and passes in the clear channels 7 Choose Yes to insert null packets in the output stream from the Null Packet Insertion drop down list Otherwise cho...

Page 247: ... channel and PID separately 1 In the MPEG over IP Output page Transport Stream MPEG over IP Output refer to the MoIP Auto Sync section 2 From the Enable Auto Fix for Collision drop down list choose Yes for the DPM to resolve channel and PID collisions automatically on the transport outputs New values are assigned to the parameters that caused the conflict The new assigned values are not used by an...

Page 248: ...s Offset is set to 10 then the first channel number is 100 and the second channel number is 110 b From the Use Input PMT PID Numbers drop down list choose Yes to use the input PMT PID number Otherwise choose No default to use the first PE PID number and PID offset number assigned below i In the First Channel First ES PID Number field enter the first PE PMT PID number The default is 1701 ii In the ...

Page 249: ...e reserved PIDs defined below i In the PCR VID AUD SUBT VBI DPI MPE TTX DATA LSD CDT ETV fields enter the number of PIDs for the specified streams PCR VID AUD SUBT VBI DPI MPE TTX DATA LSD CDT ETV in one channel e Click OK 4 Click Apply Setting the Maximum and Minimum Transport Packets The maximum and minimum transport packets are set in the Limits section of the MPEG over IP Output page 1 In the ...

Page 250: ...ssthrough Service Channels Only MAP Passthrough MAP Service Channels Only or Full DPM Control is selected as the Output Mode you can configure the Multi Program Transport Stream MPTS PE2 to PE32 are not applicable If SPTS Service Channels Only SPTS MAP Service Channels Only or SPTS Full DPM Control is selected as the Output Mode you can configure PE1 to PE32 streams Each PE creates its own transpo...

Page 251: ...settings click the radio button of a stream and click Advanced The following table describes the advanced settings Advanced Settings Description Traffic Class Sets the quality of service 0 to 255 Time to Live Max hops This sets the hop limit of the packet s lifespan 0 to 255 Source UDP Port This sets the source UDP port number 0 to 65535 Note Set the Source UDP Port to 0 to use the default UDP por...

Page 252: ...hnology to enhance the robustness of video traffic over IP networks The D9824 supports Pro MPEG FEC Code of Practice COP 3 release2 and SMPTE 2022 which is based on the exclusive or XOR boolean operator applied to a number of data packets When a FEC packet is created by performing the XOR boolean operation on a number of RTP packets a missing RTP packet can always be reconstructed by performing th...

Page 253: ...umns matrix of data packets The following is an example Choose 2D to use the 2D FEC profile The 2D FEC profile maps the RTP packet stream across both the column packets and row packets In the following example an FEC packet is created for each row and each column Choose None to disable the error protection for the selected MPEGoIP stream ...

Page 254: ...ly Note We recommend that you set the FEC Columns UDP Port number to TS UDP port 2 If the FEC Mode is set to 2D enter the destination UDP port number for the FEC Rows stream in the FEC Rows UDP Port field 2 to 65534 even number only Note We recommend that you set the FEC Rows UDP Port number to TS UDP port 4 6 Click OK Viewing Stream Details To view the stream details click Stream Details in the M...

Page 255: ...eams including FEC MPEG over IP TS overflow status and whether there are critical MPEG over IP engine errors ConfiguringtheDPM MPEGoIP OutputDetails The following procedure defines all the available fields For a typical setup of the DPM see Typical set up for Digital Program Mapping DPM on page 241 Note After you make any changes a successfully updated session open message appears The changes are ...

Page 256: ...yed 2 For each DPM Program Entry it displays the input channel number Chl and channel name Name whether the PE is passed dropped or mapped Action the output channel Output Ch and the PMT PID PMT PID Note Any changes made to the MOIP DPM values automatically changes the Mode Status to Edited by User in the MPEG over IP Output page 3 Click the PE1 to PE32 program entry radio button you want to edit ...

Page 257: ...icates the input service that will be mapped by the current entry The Input PID displays the input PID 1 to 8190 that will be mapped by the current entry This is only used if the Action is set to Map 9 From the Action drop down list choose the action to perform on the current PID The Drop action is always performed but the Map option is only applied if the PE Action is Map and the Remapping Mode i...

Page 258: ...le each PE output can be synchronized to its input according to one of the four output modes Select the program entry you want to synchronize and then click Resynchronize or click Resynchronize All to synchronize the inputs to the outputs according to the service assignments only The Confirm Resynchronization window is displayed 2 Click the radio button of a resynchronization mode that determines ...

Page 259: ...rwise the output channel number of the mapped PE is changed The new channel number selected is the next channel number that does not appear in the current PAT or belong to any other PEs For PID conflicts the system will only automatically change the duplicated output PID numbers If both PE actions are set to Map the output PID number of the higher PE is changed Otherwise the output PID number of t...

Page 260: ...PID can be mapped to multiple output PIDs The PID will be duplicated as many times as needed up to a certain hardware limitation Pkt Copy is recommended for most applications 4 From the Unreferenced Content drop down list choose the action to use for unreferenced content Unreferenced content is the remainder of the transport that is not filtered by the program entries Choose Drop default to drop a...

Page 261: ...enerated PSI tables on the longest intervals that are allowed by MPEG standard SA Std Transmits the generated PSI tables based on PowerVu standard intervals 7 The PSI Table Output Option drop down list allows the operator to specify which PSI tables to include in the program output stream The following table describes each option PSI Options Description Pass All Transmits the incoming PSI Tables a...

Page 262: ...ions see PSI Table Settings on page 117 The CDT is different from the other tables listed because the CDT is referred to within the PMT rather than outside the PMT Check the Block CDT Output check box to override the DPM PID map configuration for CDT PIDs and to always drop all CDTs Otherwise uncheck the Block CDT Output check box to permit the output of CDTs following the configured DPM PID map c...

Page 263: ...D Conflicts table displays a list of conflicts when the DPM alarm is active Typical setupfor Digital Program Mapping DPM 1 Verify that you are receiving a valid signal and that you have set up the channels that you want to pass drop or map 2 From the user interface of the D9824 choose Transport Stream ASI Output or MPEG over IP Output 3 From the Output Mode drop down list choose Full DPM Control 4...

Page 264: ...10 From the Action drop down list choose Pass Drop or Map 11 Choose the input to output channel mapping from the Category drop down list Video and PCR can be output on the same PID or different PIDs If output on the same PID they will appear identical to the input 12 Click Save 13 Click OK 14 In the DPM General Setting area choose the following parameters Setting Parameter Remapping Mode Svc ID PI...

Page 265: ...Configuring Transport Stream Information 243 Parameter Description EIT Drop TDT Pass RST Pass TOT Pass DIT Pass SIT Pass ECM Drop EMM Drop DRT Drop 17 Select Block CDT Output 18 Click OK 19 Click Apply ...

Page 266: ...rom the user interface of the D9824 choose System Settings Identification The Identification page is displayed 2 The System page displays the parameters associated with the D9824 system such as serial number model number and user addresses 3 You may optionally change the Hostname device name and click Apply ...

Page 267: ...Features Licenses The Features Licenses page is displayed The Hardware Features area displays the hardware options installed in the current D9824 Advanced Multi Decryption Receiver The Feature License Summary area displays a list of software licenses for the D9824 Advanced Multi Decryption Receiver and whether each of the software licenses are enabled or disabled ...

Page 268: ...displayed 2 In the IP Settings table you can set the parameters for communicating with other equipment via the Ethernet Data and Management ports for IP applications and upgrading application software 3 Click the control data1 or data2 row to edit the parameters in the row a In the Destination IP Address field enter the IPv4 destination IP address for the interface ...

Page 269: ...ull duplex 100 HD 100 FD or 1000 FD to lock into a fixed mode Otherwise choose N A The default is Auto e Click Save Protocol Control Settings The Protocol Control area allows you to control remote access protocols to the IRD Telnet SSH HTTP HTTPS via HTTP secure setting and SNMP 1 From the Telnet SSH HTTP and SNMP drop down list choose Enable default to allow Telnet Secure Shell HTTP and or SNMP c...

Page 270: ...mple 2 From the IGMP drop down list choose the Internet Group Management Protocol standard IGMPv3 or IGMPv2 This is used by the host for the multicast input to send join leave requests to the IGMP server and to establish multicast group memberships Choose Disable to disable IGMP Note If configured the source filtering in MPEGoIP Flow Configuration applies to IGMPv3 For more information see Configu...

Page 271: ...alabit com network security syslog ng opensource logging system Syslog Watcher SnmpSoft for Windows http www snmpsoft com downloads html The following is an example of a syslog Setting Up Redundancy Controls The Redundancy Control area allows you to configure redundancy for MPEG over IP and MPE outputs when an active port fails due to a physical connectivity loss The data port 1 is labeled as TS 2...

Page 272: ... of the condition of the primary port 4 In the Delay Forward field set the time to switch the data port after the system detects a failure in a range from 0 to 10000 milliseconds 5 In the Delay Back field set the time to wait when reverting back to the primary port once the primary link is active again in a range from 1 to 120 seconds Note If Non Revertive is selected as the Direction this field d...

Page 273: ...ing information is displayed in the Installed Unicast Routes table 3 Click Apply 4 In the Static Unicast Routing table you can set the static unicast routing information used to by MPEGoIP and MPE outputs to send data packets It can also be used to find hosts behind a router for example an FTP server a syslog server or an NTP server To add a unicast route a Click Add Row b In the Destination IP Ad...

Page 274: ...address mask which will depend on the size of your network Mask Subnet Mask 8 255 0 0 0 16 255 255 0 0 24 255 255 255 0 e Check the Port 1 or Port 2 check box The management port is port 1 and the data port is port 2 5 Click Save The routing information is displayed in the Installed Unicast Routes table If the configured routing information has an inactive port then the routing information is not ...

Page 275: ...l or Forward Filtered Choose Forward None to not forward MPE data to the network Choose Forward All to forward all the MPE data to the network Choose Forward Filtered to only forward the MPE data from the defined Static Multicast Filtering table below to the network For more information on configuring the Static Multicast Filtering table see To Add a Static Multicast Filtering on page 254 Note The...

Page 276: ...from 224 0 0 0 to 239 0 0 0 Note If MPE Data Filter Mode is set to Forward All or Forward Filtered all the unicast MPE data will be forwarded regardless of the Static Multicast Filtering table 3 Click Save To edit delete an existing multicast filter address select the address entry by clicking on the radio button Click Edit and make the necessary changes or click Delete to remove the address from ...

Page 277: ...traps alarms This is used when communicating with a device within an SNMP environment To set a custom community string enter an alphanumeric character string up to 31 alphanumeric characters in length identifying the password for the device Note The community string is case sensitive 3 In the System Name System Location and System Contact fields enter the system name location and contact informati...

Page 278: ... fault messages 3 In the Community String field enter the community string for the trap destination IP address entered above Enter public or custom string The default is public You can enter a string up to 35 characters 4 Click Apply To edit delete an existing trap destination select the trap destination entry by clicking on the radio button Click Edit and make the necessary changes or click Delet...

Page 279: ...set drop down list choose the GMT offset The local time is displayed using a time zone GMT offset If your local time is not GMT you must set this time setting in the range from 12 0 to 12 0 hours in 0 5 hour increments 5 The Current TDT Time Date field displays the current TDT Time and Date Table date and time received from the DVB stream This is displayed as local time 6 Check the Enable NTP Time...

Page 280: ... warning and the number of alarms and warnings that have an active status Number Active The following table shows the Alarm Warning Status table information Status Description Type Shows whether it is an alarm or a warning message Name Name of the alarm or warning For more information on alarm messages refer to D9824 Alarm Messages on page 286 Text Content of the message Set Since Date and time of...

Page 281: ...s either cleared or the Enable Alarm Warning Front Panel Reminder check box is unchecked 3 Check the Enable Video Cutoff on Alarm Condition check box to cut off the video output if any enabled alarm is active on the receiver When video is cut off there will be no horizontal or vertical synchronization on the output This is useful for downstream redundancy switching by detecting a loss of video sig...

Page 282: ...Yes to trigger the rear panel alarm when the alarm is set or cleared Note No is a read only value that indicates the setting is Yes but is currently being suppressed because the alarm is disabled Enb is set to No 9 Click Apply To Set Up Warnings 1 From the Alarm Setup page click the Warning Setup link at the bottom left hand corner of the page The Warning Setup page is displayed 2 Check the Enable...

Page 283: ...red Note No is a read only value that indicates the setting is Yes but is currently being suppressed because the warning is disabled Enb is set to No 6 If current warning is enabled from the Relay drop down list choose Yes to trigger the rear panel alarm relay when the warning is set or cleared Note No is a read only value that indicates the setting is Yes but is currently being suppressed because...

Page 284: ...ed The Alarm and Warning History page displays all the past system event messages and their set and cleared dates and times For more information on the alarm messages refer to D9824 Alarm Messages on page 286 Click Clear Alarms Warnings History to clear all existing history information Click Export to save the history information to your local hard drive as a csv file ...

Page 285: ...ersion drop down list you can choose a different application version number to load From the FPGA drop down list you can choose a different FPGA version number to load The Selected Version window is displayed Click Select Reboot to load the selected application and reboot the receiver Click Erase to remove the selected application version You will be prompted to continue or not Click OK to continu...

Page 286: ...t is the Safe SW Version If this is greater than zero the shown value or older and the Safe SW Version is the limit Older applications will not be installed The HW Board Versions table displays the revisions option bits and serial numbers of the HRD2 main board In the APP FPGA Downloads area click Browse to select the new version of FPGA or the D9824 Advanced Multi Decryption Receiver software app...

Page 287: ...running on the D9824 receiver The current and official Cisco D9824 receiver hash values are published in the D9824 release note For more information see Cisco D9824 Advanced Multi Decryption Receiver Release Note If the generated hash digest values do not match the official list contact Cisco customer support To start a communication session with the receiver use a utility such as Tera Term Pro or...

Page 288: ...min prompt type hash and press Enter The hash digest for the D9824 is listed The following is an example 2 Verify the hash digest values with the values listed in the appropriate D9824 release note If the values do not match contact Cisco customer support ...

Page 289: ... download device settings and transport network information as a file to the designated file folder 3 Click the Export User Device Settings only radio button and click Export to download user settings as a file to the designated file folder 4 In the Settings File area click Browse The Choose File dialog opens Navigate to the appropriate folder and select the file with a bkp file extension and clic...

Page 290: ...ss Pass or Fail Detailed Operation Status Detailed processing step for tracking backup progress Percentage Complete Percentage of backup function completed Setting upImport Export FTPInformation 1 From the user interface of the D9824 choose System Settings Import Export FTP The Import Export FTP page is displayed 2 The Configure Offline FTP Settings File Transfer area has backup and restore contro...

Page 291: ...ting the backup or restore operation 6 In the FTP Port Number field enter the port number of the FTP server used to store the backup restore file You can enter a port number in the range from 1 to 65535 7 Click the Export Device Settings Transport Network Information radio button to save user settings and tuning information to the backup file Click the Export User Device Settings Only radio button...

Page 292: ...on Admin privileges for example User and Guest are only allowed to modify their own passwords To Change the User Login Passwords 1 From the user interface of the D9824 choose System Settings Account Management The Account Management page is displayed To configure the password complexity for all users Note This feature is only available to a user with Admin privileges only 2 From the Password Compl...

Page 293: ...repeated more than three times in a row Must contain a minimum of eight characters Must contain a minimum of three of the following types of characters capital letters small letters digits and special characters Note The complexity level changes will only affect the new user accounts and password changes It will not affect existing passwords Any changes take effect immediately and do not require t...

Page 294: ...their own password 5 Click Apply To Add a User Account Note This feature is available to a user with Admin privileges only 1 From the Account Management page click the Manage User Logins link The Login Accounts page is displayed 2 Click Add Account Login to create a new login account Note You can create a maximum of 10 user accounts The Add Login Account window is displayed ...

Page 295: ... your Administrator password used to log on to the D9824 web GUI 7 From the Account Type drop down list choose User Admin or Guest The following table illustrates the different login types Account Type Access Guest View settings only User View and edit settings Admin View edit settings and add delete user accounts 8 Click OK To Delete a User Account Note This feature is available to a user with Ad...

Page 296: ...evel which restricts access and prevents unauthorized changes to the receiver settings 0 1 2 or 3 The default setting is 0 Note For details on the four lock levels see D9824 Receiver Lock Levels 4 In the Enter Password to change the lock level field enter the password to change the lock level Depending on the unit the default password is 1234 For more information on the default password contact Ci...

Page 297: ...ion when changing the password as this operation cannot be undone If the password is lost or is unavailable contact Cisco customer support 1 In the Lock Level Settings page click Change Lock Level Password The Change Lock Level Password dialog box is displayed 2 In the Enter Current Password field enter the current lock level password 3 In the Enter New Password field enter the new password any nu...

Page 298: ... check box to enable the front panel keypad lock state 3 In the Keyboard Lock Timeout field set the keypad lock timeout period The lock timeout period takes effect when the keypad has not been touched i e a key has not been pressed when on the Main Menu for the set period Avoid setting the period to a short duration when the keypad is used often Enter a value in the range from 5 to 1800 seconds Th...

Page 299: ...Support Information Viewing ContactInformation From the user interface of the D9824 choose Support Contact Information The Contact Information page is displayed The Contact Information page displays all the Cisco customer support information ...

Page 300: ...page is displayed The Diagnostic Logs page displays all the system log messages with their dates and times Click the arrow next to Set Date and Time column to sort by date and time Click Export to export the log history to a csv file The File Download dialog is displayed Click Save to save the file to your local drive Click Clear to clear the log history ...

Page 301: ...d Displays the number of hours since the last power on Lifetime Reset Counter Displays the total number of times the receiver has been restarted Clearable Reset Counter Displays the number of restarts since the last time the restart counter was cleared To clear or reset the Clearable Reset Count click Clear Reset Counter Hours Since Last Powered On Reset Displays the total number of hours that the...

Page 302: ...s displayed The Current column displays the current operating temperature The Maximum column displays the maximum operating temperature that has been reached The Average column displays the average operating temperature The values are displayed in Degrees Celsius The FAN1 FAN2 FAN5 and FAN6 columns display the current speed of the four fans in the D9824 receiver ...

Page 303: ...ys all the past system event messages and their set and cleared dates and times For more information on the alarm messages refer to D9824 Alarm Messages on page 286 Click Clear Alarms Warnings History to clear all the messages in the Fault History table Click Export to export the alarm history to a csv file The File Download dialog is displayed Click Save to save the file to your local drive ...

Page 304: ...own list allows you to choose and load a different application version to your receiver Click Select Reboot to load the selected application version and reboot the receiver Click Erase to remove the selected application version You will be prompted to continue or not Press OK to continue the deletion Click Factory Reset to perform a reset of receiver settings back to the factory set default values...

Page 305: ...inues It is not recommended to interrupt the upgrade during the application download Click Download Status Toggle to toggle the download data update between the web GUI and an external device Note For application downloads once the download is complete the D9824 receiver will reboot automatically For FPGA downloads you must click Reboot Receiver to manually reboot the D9824 receiver and complete t...

Page 306: ......

Page 307: ...ist you in upgrading firmware to the Cisco D9824 Advanced Multi Decryption Receiver It also describes how the status of the D9824 receiver is communicated via front panel LEDs 6 Chapter 6 Service and Maintenance In This Chapter D9824 Alarm Messages 286 ...

Page 308: ...d in the Warning History when the messages are set or cleared respectively Note Only alarm conditions can be used to trigger rear panel relays to control external alarm equipment Warnings are not associated with relay operation It is recommended that you collect the debug support data prior to contacting Cisco customer support for any D9824 issues Alarms Alarm Message Type Message Cause Remedy Des...

Page 309: ... FLASH driver operation s one of ERASE WRITE BLANK_CHECK or READ_WRITE failed on Secondary 7109 FLASH offset d Remedy Contact Cisco Services The FLASH device hardware failed Major 920 Settings Lost Set Stored configuration incomplete Contact Customer Service Cause Corrupted database record was found while populating the DBR partition Remedy Contact Cisco Services The settings database detects corr...

Page 310: ...is lost Cause Loss of ASI RF lock Loss of Transport data Invalid frequency parameters External to IRD Remedy Check tuning parameters and ASI RF cables Loss of signal Minor 1000 Signal Status Set Tuning Parameters Invalid Cause Loss of ASI RF lock Loss of Transport data Invalid frequency parameters External to IRD Remedy Check tuning parameters and ASI RF cables One of the tuning parameters is inva...

Page 311: ...Cause The channel is unauthorized for the current program Remedy Contact your uplink service provider to determine whether you are authorized to receive the current program Program is unauthorized because the unit does not have an authorization key Minor 3000 4000 5000 6000 7000 8000 9000 10000 10009 10032 PE n ISE Not Auth Set Channel is blacked out Cause The channel is unauthorized for the curre...

Page 312: ...ider to determine whether you are authorized to receive the current program at this time There is mismatch in the Conditional access Minor 3000 4000 5000 6000 7000 8000 9000 10000 10009 10032 PE n ISE Not Auth Set Channel requires an IRD with CA support Cause Conditional access not supported Remedy Contact your uplink service provider to determine whether you are authorized to receive the current ...

Page 313: ... 3000 4000 5000 6000 7000 8000 9000 10000 10009 10032 PE n ISE Not Auth Clear Fault Reset Minor 3000 4000 5000 6000 7000 8000 9000 10000 10009 10032 PE n ISE Not Auth Clear Channel is authorized Minor 3000 4000 5000 6000 7000 8000 9000 10000 10009 10032 CI Top Slot Status Set Initialization Fail Cause CAM is damaged or not fully inserted hardware issue CAM software crash or you don t have subscrip...

Page 314: ...itialization Fail Cause CAM is damaged or not fully inserted hardware issue CAM software crash or you don t have subscription rights for the smart card Remedy Re insert the CAM and or check your rights for the smart card Initialization of CAM in bottom slot failed Major 10200 CI Bottom Slot Status Set No Descrambling Cause CAM is damaged or not fully inserted hardware issue CAM software crash or y...

Page 315: ...hts for the smart card Remedy Reinsert the CAM and or check your rights for the smart card All elementary streams for this service selected for descrambling were not descrambled by the CAM Major 10510 10520 10530 10540 10550 10560 10570 10580 10590 10600 10610 10620 10630 10640 10650 10660 10670 10680 10690 10700 10710 10720 10730 10740 10750 10760 10770 10780 10790 10800 10810 10820 ...

Page 316: ...ion rights for the smart card Remedy Reinsert the CAM and or check your rights for the smart card At least 1 elementary stream is not descrambled but the CAM is still descrambling other elementary streams for this service Major 10510 10520 10530 10540 10550 10560 10570 10580 10590 10600 10610 10620 10630 10640 10650 10660 10670 10680 10690 10700 10710 10720 10730 10740 10750 10760 10770 10780 1079...

Page 317: ...560 10570 10580 10590 10600 10610 10620 10630 10640 10650 10660 10670 10680 10690 10700 10710 10720 10730 10740 10750 10760 10770 10780 10790 10800 10810 10820 PE n Loss of Input Set Loss of input detected Cause Loss of input Remedy Ensure input has a valid stream Loss of input Minor 11000 12000 13000 14000 15000 16000 17000 18000 18009 18032 ...

Page 318: ... will cause data corruption in the stream Minor 19000 Digital Program Mapping Set Program Collision Cause Uplink settings may have changed since setting up the unit Please check your DPM settings Remedy Correct the DPM settings Check the uplink to find the appropriate system settings Two source channel numbers are being mapped passed to the same channel number in the output Minor 19000 Digital Pro...

Page 319: ... requires reboot Major 20000 Shutdown Event Set User requested FPGA change Cause User request requires reboot or internal system error Remedy If it is an internal system error fault clear alarms reset the unit notify Cisco Services if the problem persists Runnable FPGA change requires reboot Major 20000 Shutdown Event Set User requested APP change Cause User request requires reboot or internal sys...

Page 320: ... an internal system error fault clear alarms reset the unit notify Cisco Services if the problem persists User reboot request Major 20000 Shutdown Event Set User requested service restore Cause User request requires reboot or internal system error Remedy If it is an internal system error fault clear alarms reset the unit notify Cisco Services if the problem persists Restore operation required rest...

Page 321: ...sts FPGA has not been loaded Major 20000 Shutdown Event Set osal_SetDataForAl lTasks Cause Possible software issue Remedy Clear alarms reset unit notify Cisco Services if the problem persists Application initialization error Major 20000 Shutdown Event Set aw_LoadFaultList Cause Possible software issue Remedy Clear alarms reset unit notify Cisco Services if the problem persists Application initiali...

Page 322: ...t Cause Possible software issue Remedy Clear alarms reset unit notify Cisco Services if the problem persists Application initialization error Major 20000 Shutdown Event Set dprm startup Cause Possible software issue Remedy Clear alarms reset unit notify Cisco Services if the problem persists Application initialization error Major 20000 Shutdown Event Set dprm clear startup Cause Possible software ...

Page 323: ... Remedy Clear alarms reset unit notify Cisco Services if the problem persists Application initialization error Major 20000 Shutdown Event Set Memory allocation error on DB table construction Cause Possible software issue Remedy Clear alarms reset unit notify Cisco Services if the problem persists Application initialization error Major 20000 Shutdown Event Set DB_Table_Cl add Table failed Cause Pos...

Page 324: ...ssible software issue Remedy Clear alarms reset unit notify Cisco Services if the problem persists Application initialization error Major 20000 Shutdown Event Set Memory Error AAA Phase X Cause Possible software issue Remedy Clear alarms reset unit notify Cisco Services if the problem persists Application initialization error Major 20000 Shutdown Event Set Time Control object creation failed Cause...

Page 325: ...larms reset unit notify Cisco Services if the problem persists Application initialization error Major 20000 Shutdown Event Set http_init4 FAILED to allocate scratch buffer Cause Possible software issue Remedy Clear alarms reset unit notify Cisco Services if the problem persists Application initialization error Major 20000 Shutdown Event Set HTTP http_init4 FAILED to allocate memory from AVMEM Part...

Page 326: ...ajor 20000 Shutdown Event Set VBI DB creation failed Cause Possible software issue Remedy Clear alarms reset unit notify Cisco Services if the problem persists Application initialization error Major 20000 Shutdown Event Set VBI DB allocation failed Cause Possible software issue Remedy Clear alarms reset unit notify Cisco Services if the problem persists Application initialization error Major 20000...

Page 327: ...wn Event Set Framework Registration Error Cause Possible software issue Remedy Clear alarms reset unit notify Cisco Services if the problem persists Internal system error Major 20000 Shutdown Event Set Watchdog AAA has expired Cause Possible software issue Remedy Clear alarms reset unit notify Cisco Services if the problem persists Software detected an error in operation Major 20000 System Startup...

Page 328: ...t working Major 21000 SMI Setup Clear SMI SDRAM setup successful SDRAM on SMI Bus OK Major 21000 SMI Setup Clear SMI SDRAM exhaust test passed SDRAM on SMI Bus OK Major 21000 LMI setup Set LMI SDRAM exhaust test failed Cause Hardware issue Remedy Clear alarms reset the unit and notify Cisco Services if the problem persists DDR RAM on LMI bus not working Major 22000 LMI setup Clear LMI Video SDRAM ...

Page 329: ...on in progress Major 23000 Param Storage Set DB Total Reset in progress Cause Standard operation Remedy Clear alarms reset the unit and notify Cisco Services if the problem persists Non volatile storage system operation in progress Major 23000 Param Storage Set DB NVS flush in progress Cause Standard operation Remedy Clear alarms reset the unit and notify Cisco Services if the problem persists Non...

Page 330: ...ajor 23000 Param Storage Set DB Populate failed Cause Hardware issue Remedy Clear alarms reset the unit and notify Cisco Services if the problem persists Non volatile storage system failed during operation Major 23000 Param Storage Set DB NVS flush failed Cause Hardware issue Remedy Clear alarms reset the unit and notify Cisco Services if the problem persists Non volatile storage system failed dur...

Page 331: ...24000 Flash STORAGE Set RECORD MANAGER Record contents check error erasing all Cause Hardware issue Remedy Clear alarms reset the unit and notify Cisco Services if the problem persists NVS Corruption and loss of configuration data Major 24000 Flash STORAGE Set RECORD sector setup check error erasing sector Cause Hardware issue Remedy Clear alarms reset the unit and notify Cisco Services if the pro...

Page 332: ...B PS Set LNBPS Over Loaded Cause Possible wiring or hardware issue Remedy Clear alarms reset the unit and notify Cisco Services if the problem persists LNB power overload Minor 25000 LNB PS Set LNBPS Short Circuit Cause Possible wiring or hardware issue Remedy Clear alarms reset the unit and notify Cisco Services if the problem persists LNB power overload Minor 25000 LNB PS Clear LNBPS Normal LNB ...

Page 333: ...ion is running and if the settings are valid FLASH recovered after unexpected corruption Minor 25500 Signal Quality Set Audio Muted due to RF noise Cause RF Signal quality is poor due to interference or signal level issues Remedy Check RF settings re aim dish and add signal amplifier Signal is locked but BER is beyond Audio muting threshold Minor 26000 Signal Quality Set Unstable RF Signal Cause R...

Page 334: ...software issue Remedy Clear alarms reset unit and notify Cisco Services if the problem persists Programmable transport input module stopped processing any data packet Minor 27000 Transport Processing Clear PTI running Minor 27000 Version Mismatch Set Version Mismatch between 5514 7109 Cause The App5514 version does not match App7109 version Remedy Download code with identical App5514 and App7109 v...

Page 335: ... notify Cisco Services if the problem persists Failed to read or write flash memory Major 27600 Temperature Alarm Set Temperature over Alarm threshold Cause Room temperature too high or air flow is blocked Remedy Check openings on front and rear panels for blockage Lower room temperature or improve air flow to device Temperature is above safe operating range Major 28000 Temperature Alarm Clear Tem...

Page 336: ...ure Alarm Clear Temperature normal Major 30000 ASI Out Status Set ASI Overflow Output Muted Reduce content Cause Uplink settings may have changed since setup of the unit Variable Bit Rate Statmuxed streams may be in use Remedy Increase the output rate drop unreferenced content in DPM Options and or drop programs not needed for downstream devices Contact your uplink service provider to verify the e...

Page 337: ... rate for MPEG over IP output Output has been muted to protect downstream devices Minor 35000 MPoIP Status Clear MPEGoIP Output Restored Minor 35000 Boot Host Set KB not accessible Cause Hardware issue Remedy Clear alarms reset unit and notify Cisco Services if the problem persists KB is not detected by Boot code Major 36000 Boot Host Set LCD not connected Cause Hardware issue Remedy Clear alarms ...

Page 338: ...ry correctly Major 36000 Boot Host Set APP Invalid Cause Hardware issue Remedy Clear alarms reset unit and notify Cisco Services if the problem persists Application SW cannot be read from memory correctly Major 36000 Boot Host Clear BOOT passed Major 36000 Boot Secondary Set BOOT Invalid Cause Hardware issue Remedy Clear alarms reset the unit and notify Cisco Services if the problem persists Boot ...

Page 339: ...rs to secondary processor failed Major 38000 Decoder Processor Start Set App Transfer Fail Cause Hardware issue Remedy Clear alarms reset the unit and notify Cisco Services if the problem persists Transfer of Application software to second processor was not correctly completed Major 38000 Decoder Processor Start Set No Response Cause Hardware issue Remedy Clear alarms reset the unit and notify Cis...

Page 340: ...atus Set FPGA Init failed to go high Cause Hardware issue Remedy Clear alarms reset the unit notify Cisco Services if the problem persists FPGA setup failure or the FPGA binary identity does not match the FPGA registers Major 39000 FPGA status Set FPGA Init and Done failed to go low Cause Hardware issue Remedy Clear alarms reset the unit notify Cisco Services if the problem persists FPGA setup fai...

Page 341: ...NATION Cause Hardware issue Remedy Clear alarms reset the unit notify Cisco Services if the problem persists FPGA setup failure or the FPGA binary identity does not match the FPGA registers Major 39000 FPGA status Set FPGA ID does not match HW FPGA ID Cause Hardware issue Remedy Clear alarms reset the unit notify Cisco Services if the problem persists FPGA setup failure or the FPGA binary identity...

Page 342: ...at the FEC USB connector and FLASH module are installed FEC USB FLASH mount failed Major 92300 FEC USB Flash Clear FEC USB Flash OK Major 92300 FEC FPGA Status Set Failed to find or load FEC FPGA binary Cause Cannot find the FEC FPGA file in the USB FLASH or it failed to open read or load the file to the FEC FPGA Remedy Ensure that the USB FLASH is installed formatted and the image is loaded Also ...

Page 343: ...h is installed formatted and the image is loaded Also ensure that the FEC FPGA is installed and the CPLD is properly programmed FEC FPGA is loaded and started but attempt to read configuration registers failed Major 92400 FEC FPGA Status Set FEC FPGA initialization failed Cause Hardware issue Remedy Ensure that the USB Flash is installed formatted and the image is loaded Also ensure that the FEC F...

Page 344: ...hing CAM Minor 93000 93031 PE n CA System Error Clear Fault cleared Minor 93000 93031 IP FEC Failure Set FEC Encoder Failure FEC bypassed Cause FEC FPGA malfunction Remedy Reboot the system if FEC is needed otherwise the system will continue to operate bypassing FEC This fault is raised when the FEC Encoder or the FEC Decoder Lockup is detected Major 95000 IP FEC Failure Set FEC Decoder Failure FE...

Page 345: ...tack Filters hardware detects an internal error Major 97000 ETH Stack Filters Clear Fault Cleared The fault is cleared when the detected hardware error is resolved Major 97000 D R in Progress Set Disaster declared Cause One or more of the following is detected RF lock loss unstable RF signal and or transport loss RF locked but no transport stream packet received Remedy A valid signal A disaster is...

Page 346: ...ink administrator to correct the invalid NIT on the uplink so that the signal can be locked and acquired The administrator should also ensure that the uplink configuration matches the NIT An invalid NIT is received and the unit fails to lock acquire the NIT signal Major 980 NIT Retune Recovery Clear Alarm cleared The error is cleared when another valid NIT is received and the signal is locked and ...

Page 347: ...IP TS Overflow Set MPEGoIP Output Overflow Cause Uplink settings may have changed since setup of the unit Variable Bit Rate Statmuxed streams may be in use Remedy Increase output rate drop unreferenced content in DPM Options and drop programs not needed for downstream devices Contact the uplink service provider to verify the expected bit rate settings The output rate is higher than level set by th...

Page 348: ...d as errored upstream of the decoder 42000 Transport Error Set Transport Rate Error FPGA Overflow Cause Uplink settings may have changed since setting up the unit Remedy Increase the output rate drop unreferenced content in DPM Options and or drop programs not needed for downstream devices Contact your uplink service provider to verify the expected bit rate settings The output rate is higher than ...

Page 349: ... the room temperature or improve air flow to the device Temperature is above normal operating range 44000 Temperature Warning Clear Temperature normal Temperature is within the normal operating range 44000 FPGA Temperature Warning Set Temperature over Warning threshold Cause Room temperature is too high or air flow is blocked Remedy Check the openings on front and rear panels for blockage Lower th...

Page 350: ... information table Disable the warning if not using the table No longer receiving Time Date 50000 TDT timeout Clear TDT fault cleared 50000 SDT timeout Set SDT timed out Cause Uplink is not sending or is sending intermittently Remedy Clear warning If the problem persists determine if uplink is sending the current SI information table Disable the warning if not using the table Service Description T...

Page 351: ...g if not using the table Program Mapping Table was never received 59000 60000 61000 62000 63000 64000 65000 66000 66009 66032 PMT timeout Set PMT is lost Cause Uplink is not sending or is sending intermittently Remedy Clear warning If the problem persists determine if uplink is sending the current SI information table Disable the warning if not using the table No longer receiving Program Mapping T...

Page 352: ...nk is not sending or is sending intermittently Remedy Clear warning If the problem persists determine if uplink is sending the current SI information table Disable the warning if not using the table No longer receiving Program Association Table 67000 68000 69000 70000 71000 72000 73000 74000 PAT timeout Clear PAT fault cleared 67000 68000 69000 70000 71000 72000 73000 74000 NIT timeout Set NIT tim...

Page 353: ...ending the current SI information table Disable the warning if not using the table Conditional Access Table was never received 76000 CAT timeout Set CAT is lost Cause Uplink is not sending or is sending intermittently Remedy Clear warning If the problem persists determine if uplink is sending the current SI information table Disable the warning if not using the table No longer receiving Conditiona...

Page 354: ... determine if uplink is sending the current SI information table Disable the warning if not using the table Inband Control Table was never received 77100 MCT Timeout Set MCT is lost Cause Uplink is not sending or is sending intermittently Remedy Clear warning If the problem persists determine if uplink is sending the current SI information table Disable the warning if not using the table No longer...

Page 355: ...allowable memory usage 78000 Memory Usage Host Clear Normal stack partition memory usage 78000 Memory Usage Secondary Set Excessive stack partition memory usage Cause Possible software issue Remedy Clear warnings reset the unit and notify Cisco Services if the problem persists Software exceeding allowable memory usage 79000 Memory Usage Secondary Clear Normal stack partition memory usage 79000 FPG...

Page 356: ...rnal devices 81000 82000 83000 Ethernet Port n Clear Connection OK 81000 82000 83000 FW Resource Use Host Set Memory or List Near Full Cause Possible software issue Remedy Clear warnings reset the unit and notify Cisco Services if the problem persists Software exceeding allowable usage of internal constructs 86000 FW Resource Use Host Clear Normal Level 86000 FW Resource Use Second Set Memory or L...

Page 357: ...erver or transfer file 89000 Backup Failure Reason Set Internal Error Cause Possible software issue Remedy Clear warnings reset unit notify Cisco Services if the problem persists Backup ran out of memory or other internal error 89000 Restore Failure Reason Set FTP Failed Cause FTP settings or the server may not be configured correctly Remedy Verify the FTP server configuration and permissions the ...

Page 358: ...version of application software Remedy Verify that the correct import file is being used and was created by this product and that the file structure has not been corrupted If the problem persists notify Cisco Services Item in import file is not valid for this software and import did not occur 89100 SDI Aud SFR Data Set SDI Audio sampling frequency mismatch Cause The SDI audio groups are not config...

Page 359: ...onfigured line collides with VII service will be dropped Cause User selection Remedy Change offset for the DPI VANC service DPI VANC service is configured on the line overlapping with PAL or NTSC VII line 90030 SDI DPI VANC Clear Line collision with VII cleared 90030 SDI DPI VANC Clear Service disabled 90030 SDI VBI VANC Set VBI SMPTE 2031 configured line collides with VII service will be dropped ...

Page 360: ...e identical Link speed is different for two paired Eth ports In case of REDN controlled switch this might trigger overflow on port with lower link speed The condition for this fault is only monitored for auto REDN modes 91000 ETH REDN Link Speed Clear Link speeds are identical or not resolved 91000 ETH REDN Link Speed Clear Link speed is not resolved 91000 ETH REDN Link Speed Clear Links speed is ...

Page 361: ...sent UDP Stream Loss condition is detected for FEC Columns stream on port Data n 93100 93102 MoIPI Port n FEC1 Loss only available for D9824 with LX155 FPGA Clear FEC COL stream not configured 93100 93102 MoIPI Port n FEC1 Loss only available for D9824 with LX155 FPGA Clear FEC COL configured stream present 93100 93102 MoIPI Port n FEC2 Loss only available for D9824 with LX155 FPGA Set FEC ROW con...

Page 362: ...the network conditions and cannot be fixed in the decoder The de jittering block has an overflow underflow or other hardware problems 93104 MPoIPI DJ HW failure only available for D9824 with LX155 FPGA Clear Need two active TS streams for proper error detection 93104 MPoIPI DJ HW failure only available for D9824 with LX155 FPGA Clear Fault Cleared No errors 93104 Hardware Platform Set Non matching...

Page 363: ...ID in SDT 98000 Network ID Mismatch TS1 Clear Original Network ID in NIT and SDT matched The original network ID in NIT matches the original network ID in SDT 98000 D R No Search Path Set No Search Path No Backups Cause No tuning configurations found in the Disaster Recovery Table or only a single backup location is found in the Disaster Recovery Table that matches the origin Remedy Contact your P...

Page 364: ...valid 99320 D R Malformed DRT Clear DRT accepted The error is cleared before disaster recovery search path is generated 99320 D R No DRT Received Set No DRT Received Cause Did not receive the Disaster Recovery Table from the uplink Remedy Ensure that a valid Disaster Recovery Table is received from the uplink or switch to the Local profile If you switch to the local profile the warning message may...

Page 365: ...ons For more information see Loading a Software Version on page 282 99340 D R Invalid Tuning Clear warning cleared The error is cleared before re validating the tuning 99340 D R Invalid L Band Set Invalid calculated L band frequency for Backup list of affected D R Backup Transports Cause Calculation of the L Band frequency cannot be completed based on the existing RF input and Backup Transport tun...

Page 366: ...ecovery Table received from the uplink is invalid 99360 D R Value Out of Range Clear cleared The error is cleared before re validating tuning 99360 D R Rolloff Invalid Set Rolloff factor invalid for DVB for Backup list of affected DR Backup Transports Cause The selected Rolloff factor value for the identified Backup Transport is not valid for the selected DVB system Remedy Contact your PNC uplink ...

Page 367: ...s is in conflict with the calculated L Band frequency of the Backup Transport s that use that RF Input Remedy Contact your PNC uplink administrator to check the tuning parameters and RF Input LO frequencies for the identified disaster recovery backup transports The Disaster Recovery Table received from the uplink is invalid 99380 D R LO Freq Mismatch Clear cleared The error is cleared before re va...

Page 368: ......

Page 369: ...options to speak with a service engineer Access your company s extranet site to view or order additional technical publications For accessing instructions contact the representative who handles your account Check your extranet site often as the information is updated frequently 7 Chapter 7 Customer Information ...

Page 370: ......

Page 371: ...he Cisco D9824 Advanced Multi Decryption Receiver Note The technical specifications are subject to change without prior notice In This Appendix L Band Input and Processing 350 Video Inputs Outputs and Processing 354 Transport Stream Inputs Outputs 359 Control Management and Data Interfaces 362 Power and General Specifications 364 ...

Page 372: ... and 8PSK Number of RF Inputs 4 only one active at a time LNB LOStability DVB S and DVB S2 Symbol Rate Stability 1 to 4 99 MSymbols s 125 kHz 5 0 to 9 99 MSymbols s 1 0 MHz 10 0 to 45 MSymbols s 3 0 MHz Parameter Specification LNB Phase Noise Requirement 35 dBc Hz at dF 100 Hz 53 dBc Hz at dF 1 kHz 76 dBc Hz at dF 10 kHz 96 dBc Hz at dF 100 kHz 106 dBc Hz at dF 1 MHz 117 dBc Hz at dF 10 MHz ...

Page 373: ... Receiver Parameter Specification L Band Input Number of Inputs 4 one active at a time Input Connector Type F type female 75 ohms Input Impedance 75 ohms Return Loss 10 dB Isolation Between Inputs 40 dB L band Frequency 950 to 2150 MHz Tuning Step Size 1 MHz Receive Spectrum Sense Normal and Inverted L Band Power Input Power Level per Carrier 25 to 65 dBm full transponder power DVB S Modulation EN...

Page 374: ...aximum Channel Bit Rate 90 Mb s Maximum User Bit Rate 78 55 Mb s DVB S Eb No C N Ratio Convolutional FEC Rate Eb No Ratio dB in Linear Channel and IF Loop configuration C N at DVB Threshold BW Symbol Rate 1 2 4 5 4 1 2 3 5 0 5 9 3 4 5 5 6 9 5 6 6 0 7 9 7 8 6 4 8 5 C N Eb No 10 log 2 x FEC X 188 204 The D9824 receiver displays the C N Ratio DVB S2 Error Rate Performance Es No C N Ratio Mode Simulat...

Page 375: ...me length 64 800 Typical Performance dB in Linear Channel and IF Loop configuration QPSK 4 5 4 68 4 8 QPSK 5 6 5 18 5 3 QPSK 8 9 6 20 6 4 QPSK 9 10 6 42 6 6 8PSK 3 5 5 50 5 8 8PSK 2 3 6 62 6 8 8PSK 3 4 7 91 8 1 8PSK 5 6 9 35 9 6 8PSK 8 9 10 69 10 9 8PSK 9 10 10 98 11 3 ...

Page 376: ...e program One SD source program Video Decompression MPEG 2 4 2 0 MPEG 2 4 2 0 Output Impedance 75 Ω 75 Ω 525 Line Bar level NTC 7 comp 700 mV 7 mV 1 700 mV 35 mV 5 Line Time Distortion VITS17 1 1 Bar Tilt NTC 7 comp 0 5 0 5 Sync Level NTC 7 comp 40 IRE 0 5 IRE 40 IRE 2 0 IRE DC Offset NTC 7 comp 100 mV 100 mV Chrominance to Luminance Gain Inequality NTC 7 comp 100 5 100 5 Chrominance to Luminance ...

Page 377: ... 7 comp 4 4 Luminance Non linearity 5 5 Line Time Distortion NTC 7 comp 1 1 Weighted Signal Video to Noise 50 Grey Field 70 dB rms 70 dB rms Weighted Signal Video to Noise Luminanace Ramp 55 dB rms 55 dB rms Return Loss DC to 10 MHz 30 dB DC to 10 MHz 30 dB 625 Line Bar level VITS17 700 mV 7 mV 1 700 mV 35 mV 5 Line Time Distortion VITS17 1 1 Bar Tilt VITS17 0 5 0 5 Sync Level VITS17 300 mV 3 mV 3...

Page 378: ... dB rms 70 dB rms Weighted Signal Video to Noise Luminanace Ramp 55 dB rms 55 dB rms Return Loss DC to 10 MHz 30 dB DC to 10 MHz 30 dB Analog SD Video Output CVBS1 and CVBS2 for monitoring Item Specification Number of Channels One down converted source HD program Video Decompression Type MPEG 2 4 2 0 Output Level 1 0 Vpp 5 Output Impedance 75 ohms HD Component Video Output Monitoring Output Item T...

Page 379: ... 16 9 Letterbox 14 9 Letterbox Center Cutout Scale to 16 9 AudioOutputs Analog Audio Outputs Item Specification Number of Channels 2 stereo pairs 4 mono channels 5 1 channel downmix Audio decompression MPEG or Dolby Digital HE AAC single stereo pair or Dolby Digital Plus single stereo pair available as software download Frequency Response 0 5 dB 20 Hz to 20 kHz ref 100 kilohms Total Harmonic Disto...

Page 380: ...dix A Technical Specifications 358 Item Specification DVB Scrambling BISS Mode 1 BISS Mode E DVB CI Interface 2 CI slots EN 50221 For a list of all the supported CAMs see Common Interface Modules on page 34 ...

Page 381: ... 1 to 80 Mbps decoding ASI Transmission Rate 270 MBaud 100 ppm Transport stream formats According to EN 50083 9 188 bytes structure Burst or packet format MPEGoIP Output Item Specification Number of outputs 2 Type of connector RJ 45 100 1000BASE T Output modes UDP or RTP Redundancy modes Manual Auto or Mirroring IP Addressing Multicast or Unicast TS Streaming 1 MPTS or up to 32 SPTS TS Bit Rate 1 ...

Page 382: ...of inputs 2 Type of connector RJ 45 100 1000BASE T Redundancy modes Manual or Auto IP Addressing Multicast or Unicast TS Streaming 1 MPTS or SPTS TS Bit Rate 1 to 180 Mbps descrambling 1 to 80 Mbps decoding MPEGoIP bit rate Up to 206 Mbps FEC Support Yes according to pro MPEG FEC COP 3 and SMPTE 2022 ASI Input Item Specification Number of inputs 1 Type of connector 75 ohms BNC Output impedance 75 ...

Page 383: ...s 361 Item Specification Transport stream data rate 1 to 180 Mbps descrambling 1 to 80 Mbps decoding ASI Transmission Rate 270 MBaud 100 ppm Transport stream formats According to EN 50083 9 188 bytes structure Burst or packet format ...

Page 384: ...ernet DataInterface Item Specification Number of connectors 2 Type of connector Eight pin RJ 45 Ethernet type 100 1000BASE T Required setup IP address default gateway and subnet mask Alarm Interface Item Specification Number of outputs 1 with one set of contacts closed and one set open during normal operation Type of connector 15 pin sub D female Max voltage 40 V peak Max current 0 5A ContactClosu...

Page 385: ...Interfaces 363 Item Specification Minimum duration of event guaranteed to be detected 250 ms 1 frame period e g for 1080i 25 Hz 40 ms for DPI applications Max on generator impedance 100 ohms Min off generator impedance 100 kilohms ...

Page 386: ... AC input 100 to 240 VAC 50 60 Hz Power without LNB 50W typ Current without LNB 0 45A 240 VAC typical 0 7A 120 VAC typical Power Quality ANSI IEEE Std C62 41 1 2002 Power To operate the receiver you must connect it to an AC power source WARNING Make sure that at least one end of the power cable s remains easily accessible for unplugging if you need to switch off the unit For example Ensure that th...

Page 387: ... within the original packaging Humidity 5 95 non condensing Temperature 20 70 C 4 to 158 F Operation Humidity non condensing 95 humidity is valid up to 40 C 91 humidity is valid up to 45 C 70 humidity is valid up to 50 C Temperature 0 C 50 C 32 F to 122 F Note Maximum operational temperature lowers with altitude down to 45 C at 10 000 ft Altitude Operating 10 000 ft 3048 m max Non operating 30 000...

Page 388: ......

Page 389: ...k Levels Introduction This appendix lists the factory default settings and the lock levels for the Cisco D9824 Advanced Multi Decryption Receiver In This Appendix Factory Default Settings and Lock Levels 368 DPM Default Settings for Different Output Modes 381 ...

Page 390: ...xcept Factory Reset Password options and receiver parameters 2 All settings are unlocked except RF and ASI Input Tuning parameters 3 All settings locked access via password only except IP address and RF power 4 All settings locked can be changed via PNC uplink signal only If a change made to the current Lock Level setting is not saved the previously saved setting is restored Administration Paramet...

Page 391: ...SI Active No 1 Tune Mode Basic 1 CA Ctl STD 1 Select UserCfg 1 RFInput Parameter Default Setting Default Lock Level RFx Active RF1 is Act RF2 to RF4 is No 1 Tune Mode Basic 1 CA Ctl Std 1 Select UserCfg 1 LO1 GHz 5 15 1 LO2 GHz 0 0 1 Crossover GHz 0 0 1 OrbPos 0 0 1 E W NA 1 Pol H horizontal 1 Freq GHz 3 449 1 Sym Rate 28 3465 MS s 1 FEC Auto 1 LNB Type C Band 1 Modulation DVB S 1 Roll off 35 1 ...

Page 392: ...1 Tune Mode Basic 1 CA Ctl Std 1 Select SW Map 1 isMulticast Yes 1 IP Address 225 1 1 1 1 FEC None 1 Src Filter None 1 TS UDP 49152 1 FEC1 FEC2 UDP 49154 or 49156 1 Source IP Select 0 0 0 0 1 DATA1 DATA2 No 1 Algorithm VBR 1 Latency ms 110 1 Redundancy Mode Backup Primary Data1 1 Type Revertive 1 Direct Delay 0 1 Revertive Delay 1 1 A V Trigger Yes 1 PCR Trigger Yes 1 Prog Trigger Yes 1 Idx N A 1 ...

Page 393: ...es 1 SDT Yes 1 PAT Yes 1 Disaster Recovery Global Parameter Default Lock Level D R Enable Yes 1 D R Profile Local 1 Signal Loss Timer 120 1 Signal Lock Timer 30 1 Verify Timer 60 1 Backup Channel The default is 0 and the lock level is 1 Transport Parameter Default Lock Level Active No 1 Input RF1 1 NetId 1 1 Freq GHz 3 4 1 SymRate 2 1 FEC Auto 1 Modulation DVB S 1 ...

Page 394: ... A IP Address 192 131 244 6 3 Mask 24 3 Gateway 192 131 244 254 3 Phy Mode Auto 3 MAC Address 00 00 00 00 00 00 N A SNMP Read Community String public 3 SNMP Write Community String public 3 SNTP Server 0 0 0 0 3 SNTP Enable No 3 Password Complexity Full Complexity Checking N A Reset Credentials N A 0 TrapDestinations Parameter Default Setting Default Lock Level Trap IP Address 0 0 0 0 2 Trap Commun...

Page 395: ...log Disable 3 Syslog Server 0 0 0 0 3 Port 514 3 Video Parameter Default Setting Default Lock Level PV Format SD 2 SD Format Auto 2 Tri Synch Front Panel only Disabled 2 Alarm Video Cutoff Disable 2 OSD Messages Enable 2 TV A R 4 3 2 Convert None 2 WSS Mode Passthrough 2 Audio Parameter Default Setting Default Lock Level Stereo Mono Stereo 2 AC3 Compression RF Mode 2 Left dB 0 2 Right dB 0 2 ...

Page 396: ...meter Default Setting Default Lock Level WSS Mode Passthrough 2 WSS Stat Undefined N A VITS PAL Line 17 18 330 331 Disable 2 Subtitles Parameter Default Setting Default Lock Level Op Mode Off 2 Select Language By Language Entry 2 Language List eng 2 PMT Order First 2 Entry eng 2 Imitext Position Standard 2 ForeGnd Auto 2 BackGnd Auto 2 Decode Parameter Default Setting Default Lock Level Decoder N ...

Page 397: ... List Mgmt AddDel 2 TS_ON_ID Disable 2 Cueing Parameter Default Setting Default Lock Level Cueing Mode Trigger 4 Trigger Polarity High 4 Repeat 3 4 Tone ms 40 4 Silence ms 40 4 Seq 1 4 State Disable 4 Tones 0 4 Mode 4 Delay sec 1 4 Relay Mode Alarm 4 Cue Trigger Bit 1 4 TS Out ASI Parameter Default Setting Default Lock Level Name ASI N A Rate Control User 2 ...

Page 398: ...MOIP Parameter Default Setting Default Lock Level Name MOIP N A Rate Control User 2 Output Mode No Output 2 Config Type Unmodified 2 Descramble Mode Descrambled 2 Insert Null Packet Yes 2 FEC Scheme Non Block Aligned 2 Auto Map Yes N A MOIP Streams Parameter Default Setting Default Lock Level User Rate 68 5 Mbps for Stream 1 10 Mbps for Streams 2 to 32 2 TS IP 7 2 MOIP UDP 2 Min IP s 0 2 TOS 0 2 T...

Page 399: ...fault SAP1 2 FEC None 2 FEC1 FEC2 UDP 49154 or 49156 1 FEC Columns L 4 2 FEC Rows D 10 2 FEC Scheme Non Block Aligned 2 DPM ASI MOIP Parameter Default Setting Default Lock Level PE PE1 N A Act Drop 2 StType N A 2 OutCh 0 2 PMT 8191 2 OType UNKN 2 In N A 2 PID 0 2 Map Mode SVC ID PID 2 Duplic Mode Pkt Copy 2 Unref Drop 2 PSI Options Drop All 2 PSI Rate SA Std 2 Service ID Valid Ch 2 PAT Pass 2 CAT ...

Page 400: ...ass 2 SDTO Pass 2 BAT Pass 2 EIT Pass 2 TDT Pass 2 RST Pass 2 TOT Pass 2 DIT Pass 2 SIT Pass 2 ECM Pass 2 EMM Pass 2 DRT Pass 2 CDT Pass 2 Options Parameter Default Setting Default Lock Level Output 1 N A Fixed Output No N A Use Inp Chan No N A Start 1 N A Step 1 N A Use Inp PMT No N A Start 1701 N A Step 1 N A Use Inp PIDs No N A Start 101 N A ...

Page 401: ... N A DATA 1 N A LSD 1 N A CDT 4 N A ETV 4 N A Alarm Warning Parameter Default Setting Default Lock Level FP Alarm Reminder Enable 2 Alarm Vid Cutoff Disable 2 Enb N A 2 Rly N A 2 Trp N A 2 Noise Cutoff Parameter Default Setting Default Lock Level Trnsprt DVB S DVB S2 Marg Cutoff 0 0 2 Trnsprt DVB S DVB S2 Marg Restore 0 1 2 Audio DVB S DVB S2 Marg Cutoff 0 0 2 Audio DVB S DVB S2 Marg Restore 0 1 2...

Page 402: ...Appendix B Default Settings and Lock Levels 380 Parameter Default Setting Default Lock Level Muting Control Enable 2 Restore Defaults N A 2 ...

Page 403: ...e No Output Passthrough Service Chans Only MAP Passthrough MAP Svc Chans Only Full DPM Control Rate Control Any unchanged Any unchanged Any unchanged Any unchanged Any unchanged Any unchanged User Rate Any unchanged Any unchanged Any unchanged Any unchanged Any unchanged Any unchanged Descramble Mode Any unchanged Any unchanged Any unchanged Any unchanged Any unchanged Any unchanged Regenerate Any...

Page 404: ...Descrambled it is set to Regen otherwise it is set to Pass If Descramble Mode is set to Descrambled it is set to Regen otherwise it is set to Pass Regen Regen Actual Value TSDT Not Displayed Pass Pass Pass Pass Actual Value NIT Not Displayed Pass Regen Regen Regen Actual Value NITO Not Displayed Pass PwRc PwRc PwRc Actual Value SDT Not Displayed If Descramble Mode is set to Descrambled it is set t...

Page 405: ...s Actual Value DRT Not Displayed Pass Pass Pass Pass Actual Value CDT Not Displayed Pass Pass Pass Pass Actual Value PE Action all PEs Drop Pass Pass Map Map Actual Value The following table contains values passed to the DPM for the D9824 MOIP only Output Mode SPTS Service Chans Only SPTS MAP Svc Chans Only SPTS Full DPM Control Map Mode Svc ID PID Svc ID PID Actual Value Duplic Mode Pkt Copy Pkt ...

Page 406: ...ctual Value TDT Pass Drop Actual Value RST Drop Drop Actual Value TOT Pass Pass Actual Value DIT Drop Drop Actual Value SIT Drop Drop Actual Value ECM If Descramble Mode is set to Descrambled it is set to Drop otherwise it is set to Pass If Descramble Mode is set to Descrambled it is set to Drop otherwise it is set to Pass Actual Value EMM Drop Drop Actual Value DRT Drop Drop Actual Value CDT Drop...

Page 407: ...endi xC Compliance Introduction This appendix contains the compliance information for the Cisco D9824 Advanced Multi Decryption Receiver A ppe In This Appendix Applicable Standards and Notices 386 Declaration of Conformity 388 ...

Page 408: ...A CH CS DE DK ES FI FR GB GR HU IE IL IT MY NL NO PL PO SE SG SI SK UA US YU and Group Differences In addition JP KR CN National Differences of CB Bulletin ESD Electrostatic Discharge ESD results from the static electricity buildup on the human body and other objects This static discharge can degrade components and cause failures Take the following precautions against electrostatic discharge Use a...

Page 409: ...nected 4 Contact your dealer reseller or an experienced radio TV technician for help The user may find the booklet Interference handbook prepared by the Federal Communications Commission helpful This booklet is available from the U S Government Printing Office Washington DC 20402 stock no 004 000 00450 7 Shielded cables should be used to interconnect this device with any other peripheral equipment...

Page 410: ...Appendix C Compliance 388 Declarationof Conformity ...

Page 411: ...uring DPM General Settings 216 237 Configuring Forward Error Correction Settings 230 Configuring IP De Jittering 161 Configuring MPEG over IP Flow 159 Configuring MPEG over IP Streams 228 Configuring Open collector Outputs 30 Configuring System Settings 244 Configuring the ASI Output 207 Configuring the CI Component 183 Configuring the Disaster Recovery Settings 170 Configuring the DPM MPEGoIP Out...

Page 412: ...ront Panel LEDs 37 Front Panel Operation 35 G General 133 350 354 364 Global 130 Global Status 58 Grounding 21 H HD Component Video Output Monitoring Output 356 Health Monitor 141 I Installation 19 Installing the D9824 Receiver 21 Introduction 1 IP 78 372 IP Input 71 370 K Key Features 2 Keypad 36 L L Band Input and Processing 350 LCD 36 LCD Panel 41 LCD Symbol 42 Licenses 134 Link Status 55 LNB L...

Page 413: ...ols 249 Setting Up Redundancy Controls for MPEG over IP Input 162 Setting Up the ASI Auto Synchronization Options 210 Setting up the ASI Output 16 Setting up the Common Interface Program Description 183 Setting Up the MPEG over IP Auto Synchronization Options 225 Setting up the RF Input 151 Setting up the Video Parameters 193 Setup Menu 60 Alarm Warning 125 DR 129 IP 77 Noise Cutoffs 127 Starting ...

Page 414: ...ackup Restore Status 267 Viewing the CAM Information 185 Viewing the Current Input Status 154 Viewing the Current IP Input Status 163 Viewing the Disaster Recovery Status 174 Viewing the Link Status 250 Viewing the MPEG Output Transport Status 241 Viewing the MPEG over IP Output Status 233 Viewing the Redundancy Status 250 Viewing the System Identification 244 VITC 92 VITS 92 W Warnings 325 Web GU...

Page 415: ......

Page 416: ...87 Fax 408 527 0883 This document includes various trademarks of Cisco Systems Inc Please see the Notices section of this document for a list of the Cisco Systems Inc trademarks used in this document Product and service availability are subject to change without notice 2014 Cisco and or its affiliates All rights reserved November 2014 ...

Reviews: