Section 3: Operation
3-60
User’s Manual
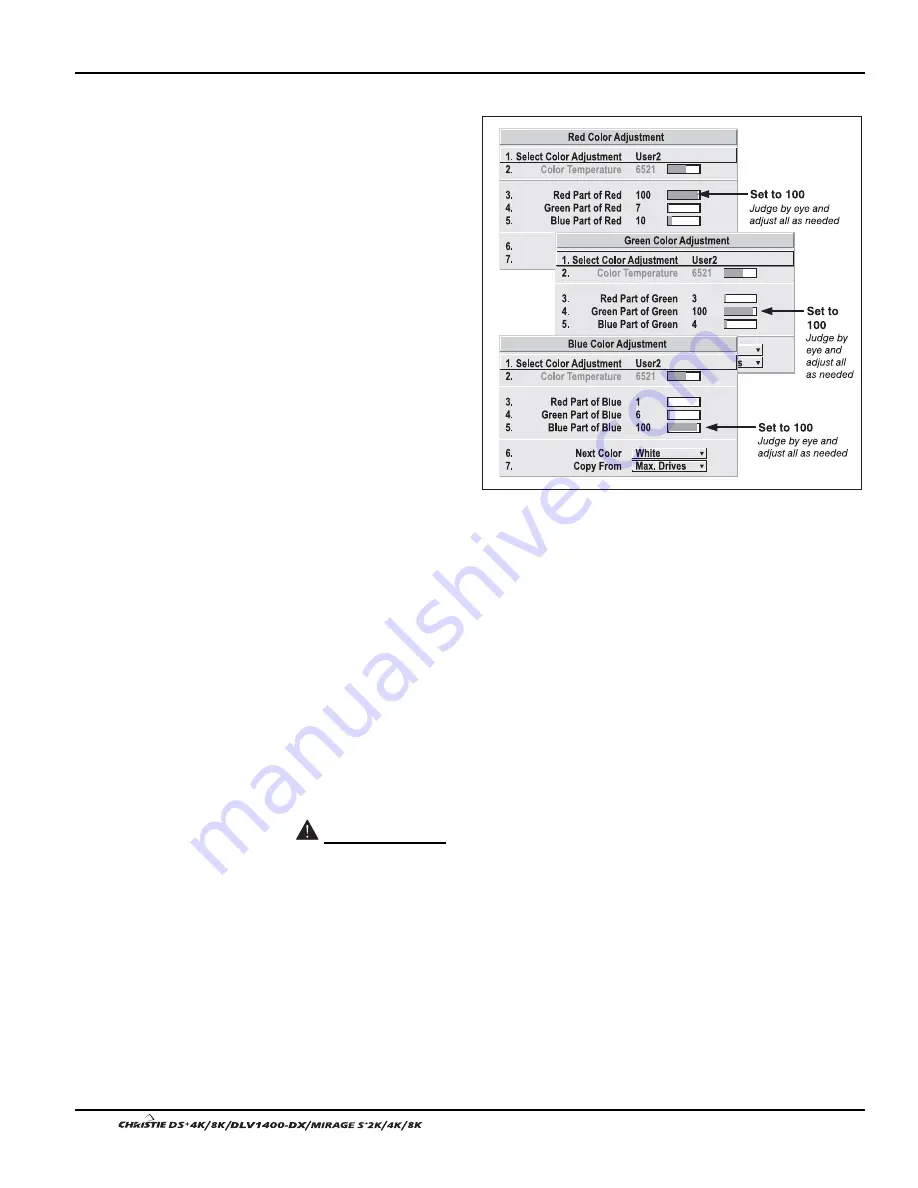
Using the Color Saturation Menu for Color Matching
You may prefer to use the
Color Saturation menu to
match colors across
multiple screens. In the
three Color Adjustment
submenus (Red, Green,
Blue—see right), set all
main values to 100 and
the secondary values to 0.
Then judge by eye and
adjust the slidebars as
needed. Note that
adjustments here define
new x/y coordinates in the
Color Adjustments by X,Y
menu.
WHAT IS BRIGHTNESS UNIFORMITY?
When used to refine screens already matched for
their primary colors (see Matching Colors in Multiple Screens, above) and overall
light output, proper adjustment of Brightness Uniformity can create an exceptionally
smooth screen in which:
•
no area of the screen appears more red, green or blue than another
•
no area of the screen appears brighter than another
•
color and light output from one screen closely matches adjacent screens
Although the Brightness Uniformity control can be used for a stand-alone projector, it
is particularly useful for setting up and maintaining tiled images that form a cohesive
display wall in which the color “cast” and light output appear uniform throughout
each image as well as throughout the entire wall. The procedure provided here
assumes a multiple-screen application.
Before You Begin
Read through the entire procedure before attempting to adjust Brightness Uniformity
controls, and keep in mind the following checklist of prerequisites and guidelines:
ADJUST COLORS FIRST—
Always adjust the primary colors as described in the
“Matching Colors in Multiple Screens” procedure (above) before attempting to
work with Brightness Uniformity. This ensures that primary colors, color
temperature, and maximized light output are all well-matched from one screen
to another. These matches are needed before you can achieve good Brightness
Uniformity results.
RUN LAMP FOR 100 HOURS—
Light output and Brightness Uniformity can vary
significantly during the first 100 hours of lamp use. For best results with new
lamps, either set up Brightness Uniformity after this period, or do an initial
setup and re-check at 100 hours.
Figure 3.33. Color Matching Using
Color Saturation Menu
Achieving Brightness
'
Uniformity
Summary of Contents for DS+4K
Page 2: ......
Page 11: ...Section 2 Installation and Setup User s Manual 2 7 Figure 2 2 Vertical Offset Examples...
Page 12: ...Section 2 Installation and Setup 2 8 User s Manual Figure 2 3 Lens Vertical Offsets...
Page 14: ...Section 2 Installation and Setup 2 10 User s Manual Figure 2 5 Lens Horizontal Offsets...
Page 22: ......
Page 75: ...Section 3 Operation User s Manual 3 53 Figure 3 29 Customizing the Input Signal...
Page 92: ......
Page 102: ...Section 4 Maintenance 4 10 User s Manual Figure 4 8...
Page 106: ......
Page 120: ......
Page 122: ......
Page 124: ...Appendix C Serial Communication Cables C 2 User s Manual...
Page 126: ...Appendix D Throw Distance D 2 User s Manual...
Page 127: ...Appendix D Throw Distance User s Manual D 3...
Page 128: ...Appendix D Throw Distance D 4 User s Manual...
Page 129: ...Appendix D Throw Distance User s Manual D 5...
Page 130: ...Appendix D Throw Distance D 6 User s Manual...
Page 131: ...Appendix D Throw Distance User s Manual D 7...
Page 132: ...Appendix D Throw Distance D 8 User s Manual...
Page 133: ...Appendix D Throw Distance User s Manual D 9...
Page 134: ...Appendix D Throw Distance D 10 User s Manual...


