E N G IN E -E LE C TR IC A L 6 Y -2 6
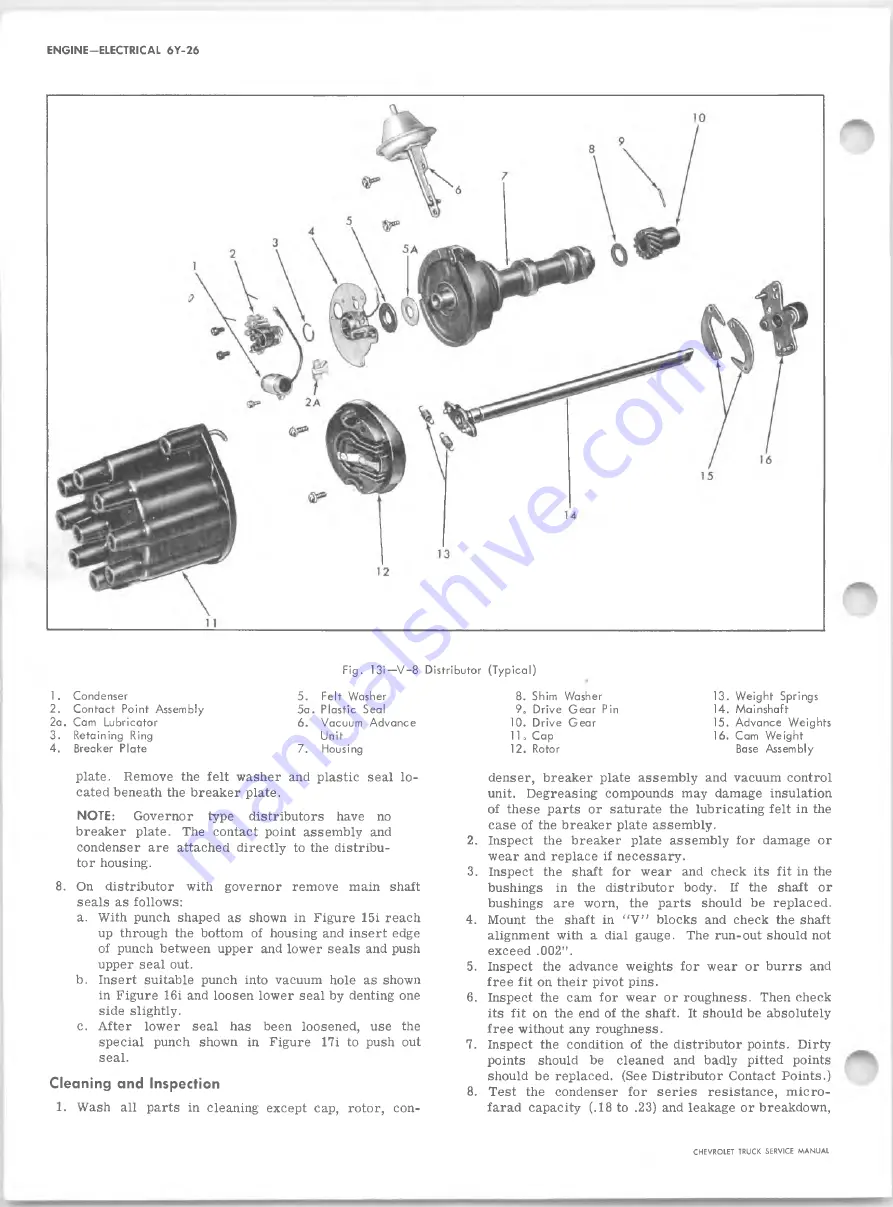
F ig . 13i—V - 8 Distributor (T yp ica l)
1. Condenser
2. Contact Point Assembly
2a. Cam Lubricator
3.
Retaining Ring
4.
Breaker Plate
5.
5a
6
.
7.
Felt Washer
P lastic Seal
Vacuum Advance
Unit
Housing
plate. Remove the felt washer and plastic seal lo
cated beneath the breaker plate.
NOTE:
Governor type distributors have no
breaker plate. The contact point assembly and
condenser are attached directly to the distribu
tor housing.
8
. On distributor with governor remove main shaft
seals as follows:
a. With punch shaped as shown in Figure 15i reach
up through the bottom of housing and insert edge
of punch between upper and lower seals and push
upper seal out.
b. Insert suitable punch into vacuum hole as shown
in Figure 16i and loosen lower seal by denting one
side slightly.
c. A fter lower seal has been loosened, use the
special punch shown in Figure 17i to push out
seal.
Cleaning and Inspection
1. Wash all parts in cleaning except cap, rotor, con
8. Shim Washer
9o Drive G e a r Pin
10. D rive G e a r
11» C a p
12. Rotor
13. W eight Springs
14. M ainshaft
15. Advance Weights
16. Cam W eight
Base Assembly
denser, breaker plate assembly and vacuum control
unit. Degreasing compounds may damage insulation
of these parts or saturate the lubricating felt in the
case of the breaker plate assembly.
2. Inspect the breaker plate assembly for damage or
wear and replace if necessary.
3. Inspect the shaft for wear and check its fit in the
bushings in the distributor body. If the shaft or
bushings are worn, the parts should be replaced.
4. Mount the shaft in
“ V ”
blocks and check the shaft
alignment with a dial gauge. The run-out should not
exceed .
002
” .
5. Inspect the advance weights for wear or burrs and
free fit on their pivot pins.
6
. Inspect the cam for wear or roughness. Then check
its fit on the end of the shaft. It should be absolutely
free without any roughness.
7. Inspect the condition of the distributor points. Dirty
points should be cleaned and badly pitted points
should be replaced. (See Distributor Contact Points.)
8
. Test the condenser for series resistance, m icro
farad capacity (.18 to .23) and leakage or breakdown,
CHEVROLET TRUCK SERVICE MANUAL
Summary of Contents for 10 Series 1968
Page 1: ...ST 1 3 3 SB...
Page 3: ...w w...
Page 52: ...HEATER AND AIR CONDITIONING 1A 21 Fig 32 Charging Schematic CHEVROLET TRUCK SERVICE MANUAL...
Page 67: ......
Page 128: ...BODY IB 61 Fig 135 A uxiliary Seat CHEVROLET TRUCK SERVICE MANUAL...
Page 132: ...Fig 4 1 0 3 0 Series Truck Frame...
Page 133: ...Fig 5 4 0 6 0 Single A xle Truck Frame E x c Tilt Cab...
Page 135: ...Fig 7 4 0 6 0 Series Tilt Cab Truck Frames...
Page 139: ...w...
Page 169: ...fit w...
Page 233: ...I...
Page 248: ...BRAKES 5 15 TD 50 60 Fig 26 Parking Brake Cables T Models CHEVROLET TRUCK SERVICE MANUAL...
Page 347: ......
Page 389: ......
Page 393: ......
Page 411: ...ENGINE FUEL 6M 18 Fig 18A V 8 Typical CHEVROLET TRUCK SERVICE MANUAL...
Page 525: ......
Page 551: ......
Page 583: ...CHASSIS SHEET METAL 11 12 Fig 20 Designation and Name Plate CHEVROLET TRUCK SERVICE MANUAL...
Page 587: ...ELECTRICAL BODY AND CHASSIS 12 2 Fig 1 Fuse Panel CHEVROLET TRUCK SERVICE MANUAL...
Page 611: ...r ELECTRICAL BODY AND CHASSIS 12 26 9 CHEVROLET TRUCK SERVICE MANUAL...
Page 663: ......
Page 686: ...w...
Page 698: ...SPECIFICATIONS 12 ENGINE TORQUES CHEVROLET TRUCK SERVICE MANUAL...
Page 713: ...9...


