


3.2 Configuring the ISDN connections
The ISDN connections on the hybird 120 / hybird 130 can be operated as S0 NT, S0 TE
or Up0. There are two slots with a mini PCB beneath the removable faceplate and beneath
the flap underneath it, for switching between the separate operating modes:
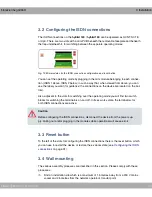
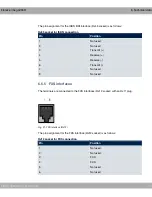
Fig. 13: Mini modules for the ISDN connection configuration and reset button
You can set the operating mode by plugging in the mini module belonging to each connec-
tion (ISDN 1 above, ISDN 2 below) in such a way that, when viewed from above, you can
see the label you want (for guidance: the connections on the device are located on the bot-
tom).
Also, adjacent to the slots for switching over the operating mode you will find two switch
blocks for switching the terminators on and off. In its ex works state, the terminators for
both ISDN connections are active.
Caution
Before configuring the ISDN connections, disconnect the device from the power sup-
ply. Pulling out and/or plugging in the modules while operational will cause errors.
3.3 Reset button
To the left of the slots for configuring the ISDN connections there is the reset button, which
you can use to restart the device or restore the ex works state (see
Configuring the ISDN
connections
on page 31).
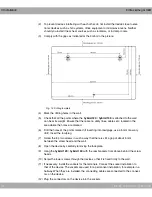
3.4 Wall mounting
The various assembly processes are described in this section. Please comply with these
processes.
(1)
Find an installation site which is a maximum of 1.5 metres away from a 230 V mains
socket and 2.5 metres from the network operator's transfer point.
bintec elmeg GmbH
3 Installation
elmeg hybird 120 / hybird 130
31


