background image

Chapter 4: Importing Data

63

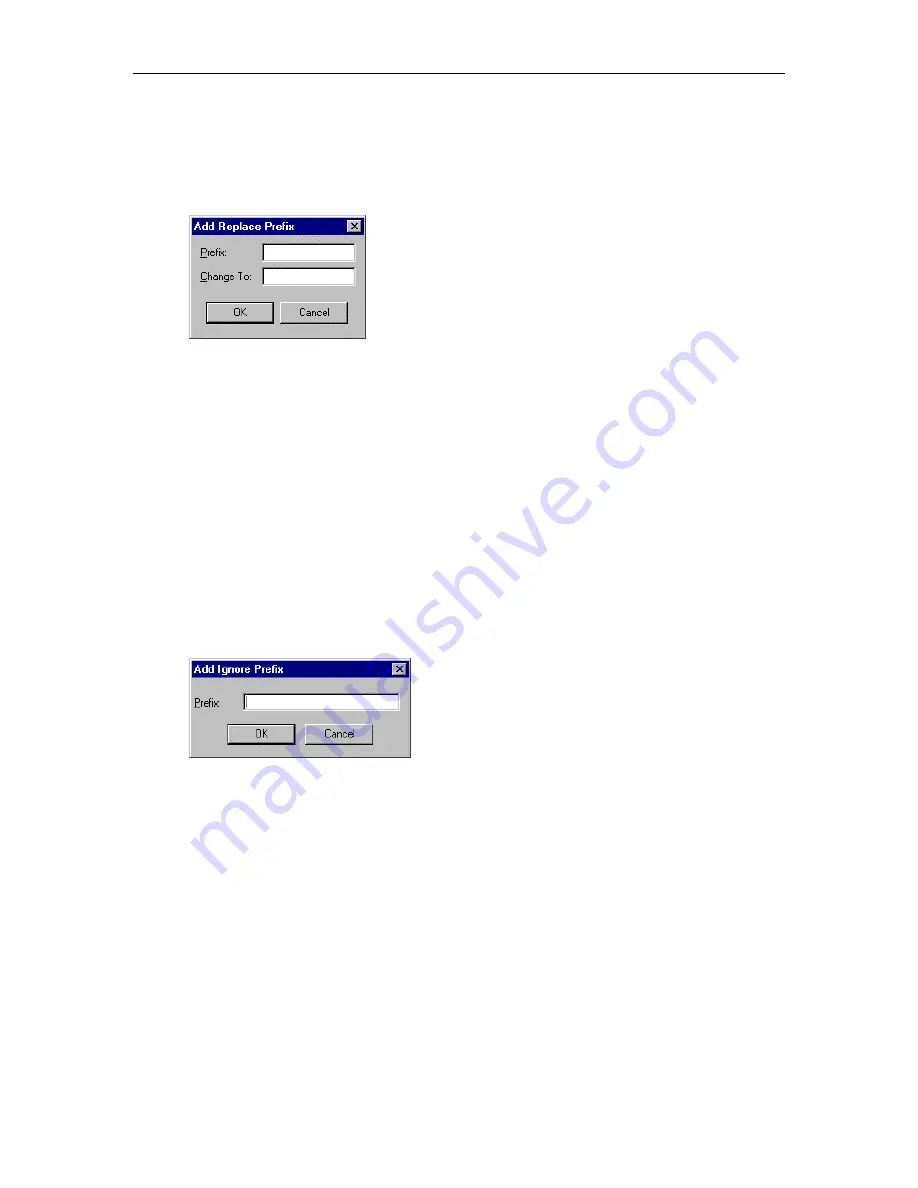
18. If you want to add information to a field in all of the database entries:

a.

In the Replace Prefixes area, select the field for which you want to modify the data and choose the

Add

 button.

The Add Replace Prefix dialog box appears.

b. In the Prefix box, enter the prefix that you want to replace.

c.

In the Change To box, enter the new prefix that you want to add to the selected field and choose
the 

OK

 button.

The Prefix box shows the prefix that will be changed and the prefix that will replace it. Also, the
Prefixes Defined column shows "YES" for the selected field, indicating that you have defined a
new prefix.

d. Repeat steps a to c for any other prefixes that you want to replace in the field(s).

When you are finished, proceed to step 19.

19. If you want to ignore specific data that appears in a specific field:

a.

In the Ignore Entries area, select the specific field from the Field box.

b. Choose the 

Add

 button.

The Add Ignore Prefix dialog box appears.

c.

Enter the prefix you want to ignore and choose the 

OK

 button.

The prefix you want to ignore is displayed.

d. Repeat steps b and c for other prefixes you want to ignore for the selected field.

When you are finished, proceed to step 20.

20. If you want to change the format of the data in the field that contains names:

a.

In the Field box of the Name Format area, select the field that contains the names.

b. In the Format box, select the format of the names in the source file. The default choices are:


LastName FirstName (with a space between LastName and FirstName)


LastName FirstName,Middle (with a space between LastName and FirstName)


LastName,FirstName


LastName,FirstName,Middle

Summary of Contents for MasterDirectory

Page 1: ...MasterDirectory Data Manager Version 4 3 User s Guide March 2002...

Page 2: ...tted in any form or by any means electronic or mechanical including photocopying and recording for any purpose without the expressed written permission of Avaya Inc Copyright 2002 Avaya Inc All rights...

Page 3: ...g with Directories 9 Overview 9 Managing Directories 10 Creating a New Directory 10 Opening an Existing Directory 15 Viewing the Log of a Directory 16 Viewing an Entry in a Directory 17 Viewing Simila...

Page 4: ...Fields in a Directory 42 Creating Indexes 44 Setting the Display Sort Order 46 Setting the Fields Displayed in the MasterDirectory Window 46 Managing the Directory Bar 48 Viewing Directory Shortcuts 4...

Page 5: ...e 116 Chapter 5 Exporting Data to Directories 119 Overview 119 Creating Export Maps 120 Creating an Export Map for a PhoneLine File 121 Creating an Export Map for a dBASE File 125 Creating an Export M...

Page 6: ...Setting the Transfer Maps 164 Running a Transfer Map 165 Chapter 7 Performing Builds and Scheduling 167 Overview 167 Performing Builds 168 Scheduling 169 Chapter 8 Configuring SMTP 173 Overview 173 Co...

Page 7: ...Operator 189 Overview 189 Configuring the PhoneticOperator Settings 189 Appendix A Troubleshooting 191 Overview 191 Using the Scheduler 192 Working with Directories 193 Setting the Fields Displayed in...

Page 8: ......

Page 9: ...ow may fields the directory will contain the name of each field and the length of each field 2 Set the fields you want to use as indexes Chapter 3 The index fields are used for sorting and searching i...

Page 10: ...nation file that will receive the data from the directory the format of the destination file the data that will be exported from the directory and the fields that will contain the data you want to exp...

Page 11: ...les Chapter 7 Performing Builds and Scheduling Chapter 7 describes how to perform builds of directories and schedule MasterDirectory to import export or build a directory automatically at a specific t...

Page 12: ...s Be sure to review the Readme file to find out about any late breaking changes Conventions The following typographic conventions are used in this guide Text you must type exactly appears in this styl...

Page 13: ...Chapter 2 Getting Started 5 Overview This chapter provides the following information how to run MasterDirectory the components of the MasterDirectory window...

Page 14: ...Bar displays the shortcuts you created By clicking on a directory shortcut you can open the associated directory Search box located beneath the MasterDirectory display enables you to specify a search...

Page 15: ...ayed in the Directory Bar Delete directory from Directory Bar Allows you to delete a directory shortcut from the Directory bar New Allows you to create a new master directory Open Opens an existing ma...

Page 16: ...Untag Allows you to select specific entries Once one entry or multiple entries are tagged you can modify or delete those entries Query Allows you to query the directory Toggle Query Allows you to view...

Page 17: ...create and update corporate directories Chapter 5 Each directory is associated with a configuration file md a database file dbf and an index file cdx The database and index files contain the actual d...

Page 18: ...is saved in a configuration file md Once the layout is saved you can modify the field titles but you cannot modify the field lengths Also the maximum number of fields is 128 and the maximum field len...

Page 19: ...ant the new directory to have the same structure as the directory that is currently open choose the Copy the current directory schema option button and then choose the OK button If you want the new di...

Page 20: ...ich moves the field that is currently selected in the Directory Structure dialog box up or down the list 3 Perform one of the following steps If you want add a field proceed to Step 4 If you want to c...

Page 21: ...nges 14 When you are finished modifying the selected field choose the OK button The information for the field appears in the Directory Structure Step 1 of 4 dialog box 15 Repeat Step 3 When you are fi...

Page 22: ...ars in the Selected Fields box Use the Move Up and Move Down buttons to change the location of the selected field 24 If you want another field to be displayed in the MasterDirectory window repeat Step...

Page 23: ...result in creating the database index and configuration files with the given name and the appropriate extensions The newly created directory is opened with the display including by default the first f...

Page 24: ...ct Log A submenu appears 2 Perform one of the following steps If you want to view the log of the directory that is currently open select Current The Log dialog box appears If you want to view the log...

Page 25: ...e entry that you want to view 2 On the toolbar click the View Entry button The View Directory Entry dialog box appears showing the information for the selected entry The following figure shows a sampl...

Page 26: ...ng a Simple Query To view entries that match the criteria you specify 1 On the toolbar click the Query button The Query Directory dialog box appears 2 Enter the information you want to find 3 From the...

Page 27: ...t are displayed as the result of a query are a subset of the contents of the directory Create an Advanced Query To create an advance query 1 From the Query menu choose Advanced The Advanced Query dial...

Page 28: ...s a to e to create more operations for this query When you are finished proceed to step 8 8 Choose the Save option button and then choose the OK button The Save As dialog box appears 9 Enter the path...

Page 29: ...Advanced Query dialog box Run an Advanced Query To run an advanced query 1 From the Query menu choose Advanced The Advanced Query dialog box appears displaying the advanced queries for this directory...

Page 30: ...you want to delete and then choose the Delete button The selected query is deleted 3 Choose the OK button to close the Advanced Query dialog box Adding an Entry to a Directory To add an entry to a di...

Page 31: ...Modifying Multiple Entries in a Directory Using MasterDirectory you can modify multiple entries at one time These entries do not have to be related To modify multiple entries at one time 1 Select an...

Page 32: ...ged and the prefix that will replace it Also the Changes column shows YES for the selected field indicating that you have defined a new prefix d Repeat steps a to c for any other prefixes that you wan...

Page 33: ...identify the entries you want to modify and then perform the following steps See Viewing Similar Entries in a Directory Querying earlier in this chapter for information on how to identify a specific g...

Page 34: ...However if you do not want this procedure to be case sensitive enable the Ignore prefix case option A check mark in the Ignore prefix case check box indicates that this option is enabled 4 When you ar...

Page 35: ...te all of the entries in the directory choose Tag All from the Tag menu 3 When you are finished selecting entries choose Delete Tagged from the Tag menu The following dialog box appears 4 Choose the Y...

Page 36: ...owing dialog box appears 3 Choose the Yes button A message dialog box appears displaying the number of entries that were deleted 4 Choose the OK button All of the entries are marked for deletion and a...

Page 37: ...at contains the matching information is selected if present Modifying the Database Structure of an Existing Directory At some point you may need to modify the database structure of an existing directo...

Page 38: ...rectory Structure dialog box When you are finished modifying the database structure proceed to step 6 7 Choose the Next button The Indexes Step 2 of 4 dialog box appears The Index Fields box displays...

Page 39: ...pears in the Remaining Fields box Use the Move Up and Move Down buttons to change the location of the selected field 14 If you want another field to be displayed in the MasterDirectory window repeat S...

Page 40: ...displayed when an entry is selected 25 Import the data from the original file by performing the following steps a From the Data Exchange menu choose Import The Import Maps dialog box appears b Choose...

Page 41: ...ssage box appears l Choose the OK button The data appear in the MasterDirectory window m Choose the Close button 26 Modify the existing import maps for the directory See Chapter 4 27 Modify the export...

Page 42: ...ndex a directory if you encounter either of the following problems You are unable to pack the directory that is MasterDirectory disallows the packing procedure You are unable to find a record that you...

Page 43: ...the distance from the left margin of the page Length is the space the field will occupy Within that space the field can be aligned to the left aligned to the right or centered Filler is the space betw...

Page 44: ...ppears b Select the template you want to use and then choose the Open button The settings for the template appear in the Fields area The path and file name for the template appear in the Template area...

Page 45: ...d a new field before a Choose the Insert button The Select Field dialog box appears c Select the field tat you want printed and then choose the OK button If you want to change the position length fill...

Page 46: ...her you want the pages in the phone book numbered and the number of the first page the number of columns in the phone book Each column will contain all the selected fields the line spacing between ent...

Page 47: ...rectory the fields you want displayed and their order of appearance in the MasterDirectory window Setting the Title of a Directory At any time you can change the title that appears at the top of the M...

Page 48: ...ODBC driver for Microsoft Access and Microsoft SQL Server To set the ODBC Driver Name for a directory 1 Open the directory you want to change 2 From the Settings menu choose Directory Properties The...

Page 49: ...ds were modified and who modified the records You have the option to create the Timestamp field when you create the directory You cannot add the Timestamp field to a directory after that directory is...

Page 50: ...ed option you cannot add or modify a record unless each required field contains data If you specify a field to be required an asterisk will appear after the label for the associated field in the Add E...

Page 51: ...our changes to the parameters for the selected field 6 Select the Allow Update check box if you want to allow changes to be made to the data in the associated field for the records 7 Select the Requir...

Page 52: ...this chapter NOTE Indexes should be defined and created prior to importing data from the source files To create the indexes for a directory 1 Open the directory you want to change 2 From the Settings...

Page 53: ...ed as indexes are highlighted 5 If you want to remove an index select the appropriate field in the Index Fields list box and choose the Remove button The selected field appears in the Remaining Fields...

Page 54: ...ed with the title of the current search field When a search string is entered its value is searched in the current search field To set the field that MasterDirectory uses to sort the entries in a dire...

Page 55: ...set the fields that you want displayed Add which places the field that is selected in the Remaining Fields list box after the field that is selected in the Selected Fields list box Remove which remov...

Page 56: ...rectory shortcuts Create a directory shortcut Modify a directory shortcut Set the order in which shortcuts are displayed in the Directory Bar Delete a directory shortcut Viewing Directory Shortcuts To...

Page 57: ...Directory Bar appears displaying the shortcut you created Modifying a Directory Shortcut You can change the following information for a directory shortcut label whether the shortcut is displayed in th...

Page 58: ...rtcut you want to move 3 Depending on whether you want to move the selected shortcut up or down in the Directory Bar click the Move directory up in Directory Bar button or the Move directory down in D...

Page 59: ...ually by the phone operators The system administrator can configure the import operation to include all the desired fields without the phone number field and choose an import mode that will update exi...

Page 60: ...erver via an IP connection the name of the source file the number of fields in the source file the fields you want to import from the source file the mapping of the fields in the source file to the fi...

Page 61: ...the PhoneLine INI file To create an import map for a PhoneLine source file 1 Open the MasterDirectory file in which you want to import data 2 From the Data Exchange menu choose Import The Import Maps...

Page 62: ...osition of the cursor appears in the Press ENTER to see the current position area The Field Offset Length box shows the field labels for the source file The MasterDirectory Fields box shows the fields...

Page 63: ...ce file with the database information in the current MasterDirectory file This option adds the new records and updates any existing records that have changed like the AppendUpdate option and also dele...

Page 64: ...t procedures Using this dialog box you can perform the following procedures when the data is imported replace prefixes ignore entries that match a certain criteria in a specified field change the form...

Page 65: ...for the selected field When you are finished proceed to step 20 20 If you want to change the format of the data in the field that contains names a In the Field box of the Name Format area select the...

Page 66: ...ing the import settings choose the OK button 23 Choose the Save Map button The Save As dialog box appears NOTE If you created a new map or modified an existing map MasterDirectory will not prompt you...

Page 67: ...ile 1 Open a MasterDirectory file in which you want to import data 2 From the Data Exchange menu choose Import The Import Maps dialog box appears 3 Choose the New button The Import Type Step 1 of 4 di...

Page 68: ...each record 8 Choose the Next button The Create Import Map Step 3 of 4 dialog box appears The Field Offset Length box shows the field labels for the source file The MasterDirectory Fields box shows t...

Page 69: ...d Delete which deletes a list of records ReplaceDatabase which replaces the database information in the current MasterDirectory file with the information from the source file Synchronize which compare...

Page 70: ...TE Index fields that were not mapped will not appear in the Key Field box 17 Choose the Advanced button The Advanced Settings For Import dialog box appears The Advanced Settings For Import dialog box...

Page 71: ...hen you are finished proceed to step 19 19 If you want to ignore specific data that appears in a specific field a In the Ignore Entries area select the specific field from the Field box b Choose the A...

Page 72: ...space between FirstName and Middle If none of the default choices match your requirements type the appropriate format in the Convert To box 21 If you want to populate blank fields during the import s...

Page 73: ...ce file 1 Open the MasterDirectory file in which you want to import data 2 From the Data Exchange menu choose Import The Import Maps dialog box appears 3 Choose the New button The Import Type Step 1 o...

Page 74: ...d and press the ENTER key on your PC keyboard The Additional Parameters area displays the Offset and Length for each field Field 1 is selected 8 In the Offset box enter the offset value and then press...

Page 75: ...Update which takes only the new information from the source file and places it in the current MasterDirectory file AppendUpdate which adds the new records and updates any existing records that have c...

Page 76: ...Index fields that were not mapped will not appear in the Key Field box 19 Choose the Advanced button The Advanced Settings For Import dialog box appears The Advanced Settings For Import dialog box en...

Page 77: ...hen you are finished proceed to step 21 21 If you want to ignore specific data that appears in a specific field a In the Ignore Entries area select the specific field from the Field box b Choose the A...

Page 78: ...space between FirstName and Middle If none of the default choices match your requirements type the appropriate format in the Convert To box 23 If you want to populate blank fields during the import s...

Page 79: ...Data Exchange menu choose Import The Import Maps dialog box appears 3 Choose the New button The Import Type Step 1 of 4 dialog box appears 4 Select the dBASE option button 5 Choose the Next button The...

Page 80: ...fields that you want to import from the source file 12 When you are finished mapping fields choose the Next button The Import Map Step 4 of 4 dialog box appears 13 In the Import Mode box select how y...

Page 81: ...the new and updated records between the source file and the current MasterDirectory file This report file has the title of the map with a cmp extension and is located in the directory where the map fi...

Page 82: ...Replace Prefix dialog box appears b In the Prefix box enter the prefix that you want to replace c In the Change To box enter the new prefix that you want to add to the selected field and choose the O...

Page 83: ...the Convert To box select the format that you want the data in the names field to appear in MasterDirectory The default choices are LastName FirstName with a space between LastName and FirstName Last...

Page 84: ...oose the Close button The path and filename for the map appears in the Import Maps dialog box By default a check mark does not appear next to the import map A check mark indicates that the associated...

Page 85: ...ile 1 Open the MasterDirectory file in which you want to import data 2 From the Data Exchange menu choose Import The Import Maps dialog box appears 3 Choose the New button The Import Type Step 1 of 4...

Page 86: ...file MasterDirectory compares the source file information with the information in the current MasterDirectory file to determine what information is new Update which takes only the new information from...

Page 87: ...ndex fields that were not mapped will not appear in the Key Field box 16 Choose the Advanced button The Advanced Settings For Import dialog box appears The Advanced Settings For Import dialog box enab...

Page 88: ...When you are finished proceed to step 18 18 If you want to ignore specific data that appears in a specific field a In the Ignore Entries area select the specific field from the Field box b Choose the...

Page 89: ...pace between FirstName and Middle If none of the default choices match your requirements type the appropriate format in the Convert To box 20 If you want to populate blank fields during the import sel...

Page 90: ...pen the MasterDirectory file in which you want to import data 2 From the Data Exchange menu choose Import The Import Maps dialog box appears 3 Choose the New button The Import Type Step 1 of 4 dialog...

Page 91: ...he MasterDirectory Fields box select the field in the MasterDirectory window where you want the selected field in the source file to appear 15 Choose the Map button The selected MasterDirectory field...

Page 92: ...generate a report in the comma delimited fields format which shows the new and updated records between the source file and the current MasterDirectory file This report file has the title of the map wi...

Page 93: ...d populate blank fields 21 If you want to add information to a field in all of the database entries a In the Replace Prefixes area select the field for which you want to modify the data and choose the...

Page 94: ...etween LastName and FirstName LastName FirstName LastName FirstName Middle FirstName LastName with a space between FirstName and LastName FirstName Middle LastName with a space between FirstName and M...

Page 95: ...our changes 27 Enter the name of this import map and then choose the Save button 28 Choose the Close button The path and filename for the map appears in the Import Maps dialog box By default a check m...

Page 96: ...Open the MasterDirectory file in which you want to import data 2 From the Data Exchange menu choose Import The Import Maps dialog box appears 3 Choose the New button The Import Type Step 1 of 4 dialog...

Page 97: ...of object you want to work with 13 In the Filter box enter the filter you want to use 14 In the Field For DN list box select the appropriate field 15 Choose the Next button The Create Import Map Step...

Page 98: ...changed Delete which deletes a list of records ReplaceDatabase which replaces the database information in the current MasterDirectory file with the information from the source file Synchronize which...

Page 99: ...ndex fields that were not mapped will not appear in the Key Field box 23 Choose the Advanced button The Advanced Settings For Import dialog box appears The Advanced Settings For Import dialog box enab...

Page 100: ...When you are finished proceed to step 25 25 If you want to ignore specific data that appears in a specific field a In the Ignore Entries area select the specific field from the Field box b Choose the...

Page 101: ...pace between FirstName and Middle If none of the default choices match your requirements type the appropriate format in the Convert To box 27 If you want to populate blank fields during the import sel...

Page 102: ...e file 1 Open the MasterDirectory file in which you want to import data 2 From the Data Exchange menu choose Import The Import Maps dialog box appears 3 Choose the New button The Import Type Step 1 of...

Page 103: ...able you want to use and then choose the OK button The Create Import Map Step 3 of 4 dialog box appears The Field Offset Length box shows the field labels for the source file The MasterDirectory Field...

Page 104: ...te which adds the new records and updates any existing records that have changed Delete which deletes a list of records ReplaceDatabase which replaces the database information in the current MasterDir...

Page 105: ...ndex fields that were not mapped will not appear in the Key Field box 15 Choose the Advanced button The Advanced Settings For Import dialog box appears The Advanced Settings For Import dialog box enab...

Page 106: ...When you are finished proceed to step 25 17 If you want to ignore specific data that appears in a specific field a In the Ignore Entries area select the specific field from the Field box b Choose the...

Page 107: ...pace between FirstName and Middle If none of the default choices match your requirements type the appropriate format in the Convert To box 19 If you want to populate blank fields during the import sel...

Page 108: ...port The FirstName LastName and Ext fields usually in comma separated values format are imported from the ACP server to the MasterDirectory file To create an import map for an ACP server via a DCP co...

Page 109: ...the ACP server 10 In the MasterDirectory Fields box select the field in the MasterDirectory window where you want the first name information to appear 11 Choose the Map button The selected MasterDirec...

Page 110: ...ile with the information from the source file Synchronize which compares the information in the mapped fields from the source file with the database information in the current MasterDirectory file Thi...

Page 111: ...Index fields that were not mapped will not appear in the Key Field box 19 Choose the Advanced button The Advanced Settings For Import dialog box appears The Advanced Settings For Import dialog box ena...

Page 112: ...s When you are finished proceed to step 21 21 If you want to ignore specific data that appears in a specific field a In the Ignore Entries area select the specific field from the Field box b Choose th...

Page 113: ...pace between FirstName and Middle If none of the default choices match your requirements type the appropriate format in the Convert To box 23 If you want to populate blank fields during the import sel...

Page 114: ...import information from an ACP server via an IP connection you must be able to log into the server via the Avaya iClarity IP Audio application Avaya iClarity IP Audio will start automatically and pro...

Page 115: ...the ACP server 10 In the MasterDirectory Fields box select the field in the MasterDirectory window where you want the first name information to appear 11 Choose the Map button The selected MasterDirec...

Page 116: ...ile with the information from the source file Synchronize which compares the information in the mapped fields from the source file with the database information in the current MasterDirectory file Thi...

Page 117: ...Index fields that were not mapped will not appear in the Key Field box 19 Choose the Advanced button The Advanced Settings For Import dialog box appears The Advanced Settings For Import dialog box ena...

Page 118: ...x that will replace it Also the Prefixes Defined column shows YES for the selected field indicating that you have defined a new prefix d Repeat steps a to c for any other prefixes that you want to rep...

Page 119: ...n the Convert To box select the format that you want the data in the names field to appear in MasterDirectory The default choices are LastName FirstName with a space between LastName and FirstName Las...

Page 120: ...hoose the Close button The path and filename for the map appears in the Import Maps dialog box By default a check mark does not appear next to the import map A check mark indicates that the associated...

Page 121: ...rm an import 2 Select the import map you want to modify and then choose the Edit button The Source File Description dialog box appears for the selected import map 3 Make your changes to the import map...

Page 122: ...maps that you can select for an import procedure for the current MasterDirectory file A check mark next to an import map indicates that the associated map will be run when you perform an import 2 If...

Page 123: ...that the associated map will be used 4 Choose the Save button to save the Import Maps dialog box 5 When you are finished choose the Close button to close the Import Maps dialog box The next time you a...

Page 124: ...pter 7 build which combines the manual import and manual export procedures and immediately imports the data into MasterDirectory and then immediately exports the data to the specified destination file...

Page 125: ...ew records added to the MasterDirectory file the number of records updated in the MasterDirectory file the number of records rejected the total number of records in the source file When the import is...

Page 126: ...MasterDirectory User s Guide 118...

Page 127: ...ich fields of data from the MasterDirectory file will be exported to which fields in the destination file and the type of destination file that will be created for example a PhoneLine file The definit...

Page 128: ...ort the data to that is PhoneLine dBASE Microsoft Access SQL Server or a text file the name of the file that will receive the exported data the fields you will export from the directory You can create...

Page 129: ...export map for a PhoneLine file 1 Open the MasterDirectory file that contains the data you want to export 2 From the Data Exchange menu choose Export The Export Maps dialog box appears 3 Choose the N...

Page 130: ...ted field with the first field selected in the Destination File box choose the Join button The field appears next to the other field in the Destinations File box If you want to add the selected field...

Page 131: ...o which the database information will be exported You may use the Browse button to select the file 21 In the Initialization File box enter the path and name of the PhoneLine initialization file you wa...

Page 132: ...en choose the Save button 27 Choose the Close button The path and filename for the map appears in the Export Maps dialog box By default a check mark does not appear next to the export map A check mark...

Page 133: ...r a dBASE file 1 Open a database file 2 From the Data Exchange menu choose Export The Export Maps dialog box appears 3 Choose the New button The Export Type Step 1 of 3 dialog box appears 4 Select the...

Page 134: ...xt to the other field in the Destination File box If you want to add the selected field after the field selected in the Destination File box choose the Add button The field appears after the selected...

Page 135: ...dialog box appears 16 Enter the name of this export map and then choose the Save button 17 Choose the Close button The path and filename for the map appears in the Export Maps dialog box By default a...

Page 136: ...cess file 1 Open a database file 2 From the Data Exchange menu choose Export The Export Maps dialog box appears 3 Choose the New button The Export Type Step 1 of 3 dialog box appears 4 Select the Micr...

Page 137: ...in the Destination File box choose the Join button The field appears next to the other field in the Destination File box If you want to add the selected field after the field selected in the Destinati...

Page 138: ...n the Destination box 16 In the Table Name box select the table to which you want to export the data 17 Choose the Save Map button The Save As dialog box appears 18 Enter the name of this export map a...

Page 139: ...the MasterDirectory file that contains the data you want to export 2 From the Data Exchange menu choose Export The Export Maps dialog box appears 3 Choose the New button The Export Type Step 1 of 3 di...

Page 140: ...e Destination File box choose the Join button The field appears next to the other field in the Destination File box If you want to add the selected field after the field selected in the Destination Fi...

Page 141: ...ame 17 In the Password box enter the password 18 Choose the Browse button next to the Table Name box The Choose Destination Table dialog box appears 19 In the Tables list box select the appropriate ta...

Page 142: ...hoose the Close button The path and filename for the map appears in the Export Maps dialog box By default a check mark does not appear next to the export map A check mark indicates that the associated...

Page 143: ...sterDirectory file that contains the data you want to export 2 From the Data Exchange menu choose Export The Export Maps dialog box appears 3 Choose the New button The Export Type Step 1 of 3 dialog b...

Page 144: ...ext to the other field in the Destination File box If you want to add the selected field after the field selected in the Destination File box choose the Add button The field appears after the selected...

Page 145: ...ou want to use between fields The choices are comma colon space tab none 15 In the Separator For Joint Fields box select the type of separator you want to use between merged fields in the destination...

Page 146: ...filename for the map appears in the Export Maps dialog box By default a check mark does not appear next to the export map A check mark indicates that the associated map will be run when you perform a...

Page 147: ...pen the MasterDirectory file that contains the data you want to export 2 From the Data Exchange menu choose Export The Export Maps dialog box appears 3 Choose the New button The Export Type Step 1 of...

Page 148: ...the password 10 In the Base box enter the starting point for the LDAP branch 11 In the Start box enter the node you want to use 12 In the Object Class list box select the class of object you want to w...

Page 149: ...tination File box If you want to add the selected field after the field selected in the Destination File box choose the Add button The field appears after the selected field in the Destination File bo...

Page 150: ...hen choose the Save button 25 Choose the Close button The path and filename for the map appears in the Export Maps dialog box By default a check mark does not appear next to the export map A check mar...

Page 151: ...the MasterDirectory file that contains the data you want to export 2 From the Data Exchange menu choose Export The Export Maps dialog box appears 3 Choose the New button The Export Type Step 1 of 3 di...

Page 152: ...o the other field in the Destination File box If you want to add the selected field after the field selected in the Destination File box choose the Add button The field appears after the selected fiel...

Page 153: ...ex An asterisk appears next to the selected field and a check mark appears in the Use Field as Index check box indicating that the selected field will be used as an index 18 Choose the Save Map button...

Page 154: ...ange menu choose Export The Export Maps dialog box appears 3 Choose the New button The Export Type Step 1 of 3 dialog box appears 4 Select the Gateway Reference Table option button 5 Choose the Next b...

Page 155: ...Ref Table Field box select Minor_Code 13 In the MasterDirectory Fields box select the field in the MasterDirectory window you want to export to the Minor_Code field in the Reference Table file 14 Choo...

Page 156: ...his export map and then choose the Save button 24 Choose the Close button The path and filename for the map appears in the Export Maps dialog box By default a check mark does not appear next to the ex...

Page 157: ...ure the PhoneticOperator settings in MasterDirectory Refer to Chapter 11 for more information To create an export map for a PhoneticOperator file 1 Open the MasterDirectory file that contains the data...

Page 158: ...ticOperator file 8 Choose the Map button The selected MasterDirectory field appears next to the selected field in the destination PhoneticOperator file under the Mapped To column 9 Repeat steps 6 to 8...

Page 159: ...and then choose the Save button 16 Choose the Close button The path and filename for the map appears in the Export Maps dialog box By default a check mark does not appear next to the export map A chec...

Page 160: ...when you perform an export 2 Select the export map you want to modify and then choose the Edit button A dialog box appears for the selected export map 3 Make your changes to the export map Use the Ne...

Page 161: ...If you want to use an export map that you created for another MasterDirectory file perform the following steps a Choose the Add To List button The Open dialog box appears b Select the export map that...

Page 162: ...h combines the manual import and manual export procedures and immediately imports the data into MasterDirectory and then immediately exports the data to the specified destination file s Builds can als...

Page 163: ...Chapter 5 Exporting Data to Directories 155 When the export is complete the following message box appears 4 Choose the OK button 5 Choose the Close button...

Page 164: ...MasterDirectory User s Guide 156...

Page 165: ...ansfer maps FTP SMTP File Copy Creating Transfer Maps Before you can transfer data you must create a transfer map The transfer map determines the type of transfer that will be performed that is FTP SM...

Page 166: ...Directory file for which you want to create a transfer map 2 From the Data Exchange menu choose Transfer The Transfer Maps dialog box appears 3 Choose the New button The Transfer Map Type dialog box a...

Page 167: ...for the FTP site 10 In the Password box enter the password for the FTP site 11 In the File Name box enter the name of the file on your system If you are sending a file enter the name of the file that...

Page 168: ...Directory file for which you want to create a transfer map 2 From the Data Exchange menu choose Transfer The Transfer Maps dialog box appears 3 Choose the New button The Transfer Map Type dialog box a...

Page 169: ...you are finished choose the Save button The Save As dialog box appears 10 Enter the file name for the transfer map and choose the Save button The path and filename for the map appears in the Transfer...

Page 170: ...rDirectory file for which you want to create a transfer map 2 From the Data Exchange menu choose Transfer The Transfer Maps dialog box appears 3 Choose the New button The Transfer Map Type dialog box...

Page 171: ...are finished choose the Save button The Save As dialog box appears 9 Enter the file name for the transfer map and choose the Save button The path and filename for the map appears in the Transfer Maps...

Page 172: ...iated map will be run when you perform a transfer 2 If you want to use a transfer map that you created for another MasterDirectory file perform the following steps a Choose the Add To List button The...

Page 173: ...copy the file s and the transfer map s you want to use When the specified time of day arrives MasterDirectory automatically transfers receives or copies the file s This procedure is described in Chapt...

Page 174: ...tton This dialog box shows the export maps that you can use The files displayed in this dialog box were specified using the Export option in the Data Exchange menu By default all of the export maps di...

Page 175: ...import map s and then the export map s associated with the directory the Scheduler feature which enables you to specify a time of day when you want MasterDirectory to automatically execute the import...

Page 176: ...nto the directory and then immediately exports the data to the specified destination file s You can also schedule builds to occur at specific times of the day Refer to Scheduling later in this chapter...

Page 177: ...cute a specific advanced query associated with the MasterDirectory file execute an external command execute the Build command execute the Reindex command The import maps export maps transfer maps and...

Page 178: ...e the action at a specific time choose the Unattended Operation option button If you do not enter a time MasterDirectory will display Unattended in the Time column in the Scheduler dialog box for the...

Page 179: ...Example 1 In this example MasterDirectory will run and perform all of the unattended actions that you specified in the Scheduler List for the file sample md Once these actions are performed MasterDire...

Page 180: ...line phlinemdv4 full qry c phoneline phlinemdv4 import1 imp In this batch file MasterDirectory will perform the following actions 1 Run the advanced query query1 qry 2 Run the export map export exp 3...

Page 181: ...tory will use for your directories Configuring the SMTP Settings To configure the SMTP settings that MasterDirectory will use for your directories 1 From the Settings menu choose MasterDirectory Setti...

Page 182: ...MasterDirectory User s Guide 174 3 Enter the appropriate information for your system 4 When you are finished choose the OK button...

Page 183: ...m MasterDirectory Configuring the LDAP Settings To configure the LDAP settings that MasterDirectory will use for your directories 1 From the Settings menu choose MasterDirectory Settings The MasterDir...

Page 184: ...roups Rename groups Adding a Group To add a group to the LDAP tree 1 Click the Manage LDAP button on the toolbar The Login To LDAP Server dialog box appears 2 Enter the appropriate information for you...

Page 185: ...hed choose the OK button 7 Choose the Close button to close the Manage LDAP Server dialog box Deleting a Group To delete a group from the LDAP tree 1 Click the Manage LDAP button on the toolbar The Lo...

Page 186: ...the Close button to close the Manage LDAP Server dialog box Renaming a Group To rename a group on the LDAP tree 1 Click the Manage LDAP button on the toolbar The Login To LDAP Server dialog box appear...

Page 187: ...iguring LDAP 179 4 Choose the Rename button The Rename Group dialog box appears 5 Make your changes 6 When you are finished choose the OK button 7 Choose the Close button to close the Manage LDAP Serv...

Page 188: ...MasterDirectory User s Guide 180...

Page 189: ...ectly from these other applications This chapter describes how to specify the settings for MDAccess which displays directory information in the other software applications You can specify the followin...

Page 190: ...lt when you press the ENTER key in an application such as Avaya Softconsole Email field which is the field that MDAccess will use for email addresses when you use the email command in an application s...

Page 191: ...s for last name and first name that is the last name and first name appear in the same field select the directory field that will be used for the name in the First Name Last Name box 4 In the Dial box...

Page 192: ...ing Avaya Softconsole the fields you specify will be displayed in the Directory display area for each directory entry To set the fields you want displayed in MDAccess 1 Open the directory you want to...

Page 193: ...displayed in MDAccess Add which places the field that is selected in the left list box after the last field in the right list box The selected field will be displayed in MDAccess Delete which removes...

Page 194: ...directory entry and each of these fields will have a corresponding Speed Dial button If you specify fields that contain telephone numbers you will be able to dial those numbers from Avaya Softconsole...

Page 195: ...ields that you want displayed in MDAccess Add which places the field that is selected in the left list box after the last field in the right list box The selected field will be displayed in MDAccess D...

Page 196: ...MasterDirectory User s Guide 188...

Page 197: ...ator files If you do not configure the PhoneticOperator settings you will be unable to create export maps for PhoneticOperator Configuring the PhoneticOperator Settings Configuring the PhoneticOperato...

Page 198: ...ry User s Guide 190 2 Select the folder that contains PhoneticOperator and then choose the OK button The following dialog box appears 3 Choose the OK button The following message box appears 4 Choose...

Page 199: ...1 Overview This appendix describes the error messages you might encounter while using MasterDirectory This appendix is divided into the following sections Using the Scheduler Working with Directories...

Page 200: ...not specify a time for the action Solution Set a correct time for the action in one of the following forms hh mm am pm or hh mm like 2 00 pm or 14 00 Message Cannot find scheduled action xxxxxx Cause...

Page 201: ...the messages you might encounter while editing entries in a directory Message Invalid value XXXXX in field XXXXX Field has format XXXXX Cause When you edited the fields you entered information that wa...

Page 202: ...es you might encounter when opening an existing directory Message Cannot open file No master index found Cause You opened a directory that does not have a master index production index The file may no...

Page 203: ...not match number of fields specified in the configuration file Cause The database file does not correspond to the description in the configuration file file corruption Solution Check the dbf file and...

Page 204: ...he range 1 to 50 Cause You tried to open a directory that is not a MasterDirectory file at least configuration file Solution Check the INI files Message DisplayFields Must Be Within The Range 1 To Num...

Page 205: ...ts greater than or equal to 0 Cause Some of the offsets or lengths of the import fields have not been set Solution Edit the import map file and check the type of map file Perhaps the file is not text...

Page 206: ...estination file name Solution Change the destination file name Message Cannot import Import settings are incorrect Cause Some of the settings in the import map file are incorrect Solution Edit the imp...

Page 207: ...rent directory Continue anyway Cause You opened an export or import map file that was created for a different directory Solution Make sure that the export or import map can be used with the current di...

Page 208: ...Insufficient memory to proceed Operation aborted Cause There is not enough memory to perform the export operation Solution Exit some applications and then repeat the export operation Message Extensio...

Page 209: ...ubleshooting 201 Message Export aborted See log file for details Cause An unattended export was aborted Solution See the log file which states the reason the export was aborted make your changes and t...

Page 210: ...MasterDirectory User s Guide 202...

Page 211: ...20 21 22 Advanced Settings For Import dialog box 56 62 68 73 79 85 91 97 103 109 AppendAll option 55 61 67 72 78 83 90 96 102 108 AppendNew option 55 61 67 72 78 83 90 96 102 108 AppendUpdate option 5...

Page 212: ...e layout saving 10 Databases modifying the structure 29 DataExchange menu 149 dBASE files 52 export map for 125 import map 71 Default index 46 Delete directory from Directory Bar button 7 Delete Entry...

Page 213: ...cas 119 Directory settings modifying 39 Directory title modifying 39 setting 39 Display fields setting in MDAccess 184 Display sort order 44 setting 46 Displayed fields error messages 193 E Editing ex...

Page 214: ...ding records failure 34 Format field changing 42 FTP transfer map 158 FTP Transfer Map Settings dialog box 158 G Gateway Reference Table export map 146 General Settings dialog box 39 Getting help 4 Ge...

Page 215: ...xport To Text File dialog box 136 Maps 51 52 119 120 157 Master index error messages 194 missing 194 MasterDirectory components 6 overview 1 starting 6 toolbar 6 tooltips 6 user capabilities 1 window...

Page 216: ...9 Required field 42 Title field 42 Update field 42 Performing builds 168 Phone Book Settings dialog box 35 Phone books font size 38 font style 38 font type 38 footer 38 frames 38 grouping entries 38 h...

Page 217: ...ay 46 Sorting default index 46 Sorting field 39 Source Description dialog box 54 60 66 71 77 Source file ACP server via a DCP connection 100 ACP server via an IP connection 106 dBASE 71 LDAP 88 Micros...

Page 218: ...er options 165 Transferring data 157 Transferring files 165 Troubleshooting 191 directories 193 scheduler 192 U Untag button 8 Update field changing 42 Update option 55 61 67 72 78 83 90 96 102 108 Us...

Reviews: