


Using Internet Fax Functions
66
3
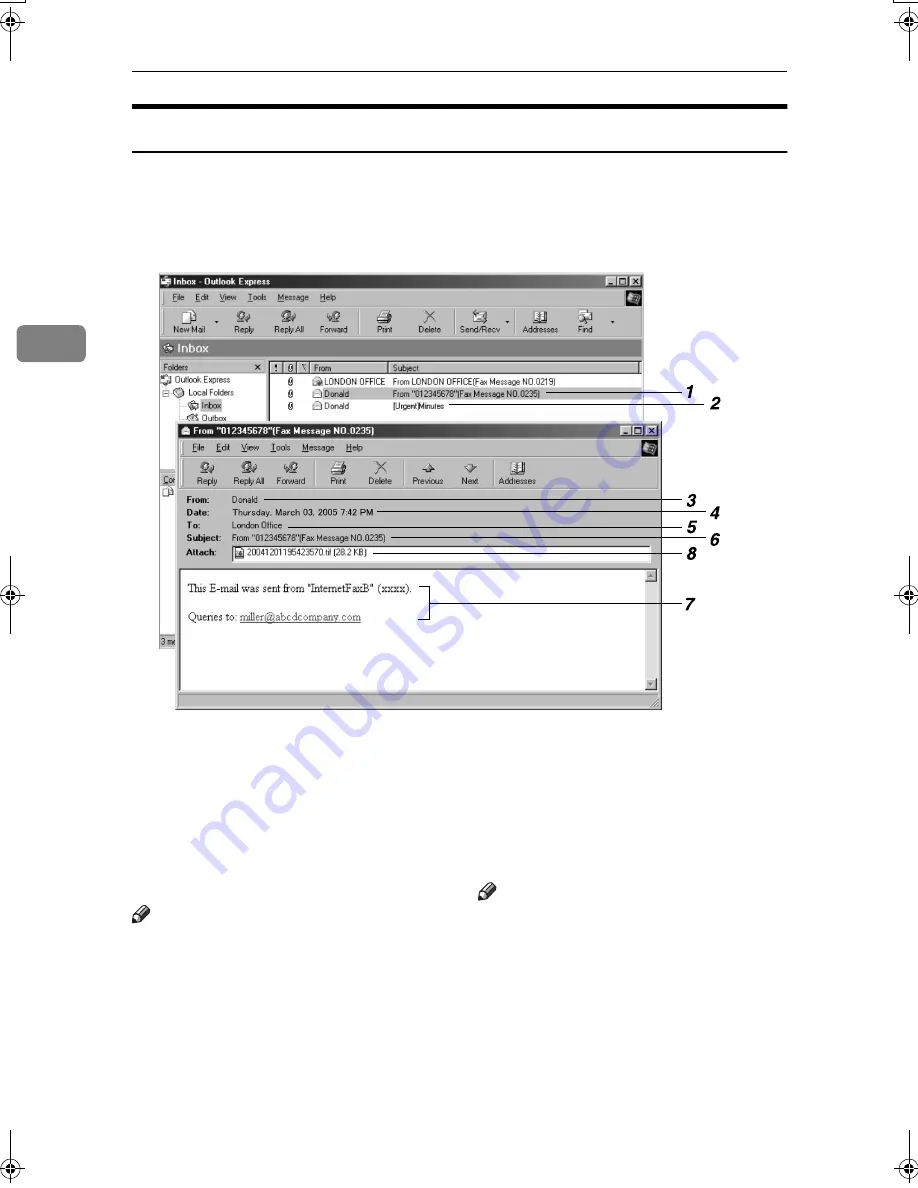
Received Images
Here is an example of an Internet Fax message sent from this machine and re-
ceived on a computer using Outlook e-mail software.
The received image varies according to e-mail software.
1.
E-mail transmitted without speci-
fying a subject in “E-mail Options”.
2.
E-mail transmitted with a subject
specified in “E-mail Options”.
3.
From
The name (e-mail address) of the sender
Note
❒
The display format of the sender name
differs according to that of the Stamp
Sender Name setting and other func-
tions.
4.
Date
The date and time of e-mail transmission
5.
To
The e-mail address of the recipient
6.
Subject
Shows the subject specified in “E-mail
Options” at the time of transmission. If
no subject is specified, one is automati-
cally assigned in the format shown in 1
above.
Note
❒
The format varies according to Stamp
Sender Name and other settings. See
p.60 “About the E-mail Subject”.
7.
The message is inserted in all e-
mails. “xxxx” is the product name.
8.
Attachment File
Any message included by the sender is
displayed as an attached document.
ADJ101S
JupterC2_Fax_AE-F_FM.book Page 66 Monday, December 13, 2004 2:31 PM
Summary of Contents for 3228C
Page 28: ...16...
Page 46: ...Combined Function Operations 34 2...
Page 60: ...Document Server 48 3...
Page 130: ...Troubleshooting 118 5...
Page 131: ...xClearing Misfeeds 119 5 AFZ009S...
Page 132: ...Troubleshooting 120 5...
Page 133: ...xClearing Misfeeds 121 5 AFZ010S...
Page 134: ...Troubleshooting 122 5...
Page 135: ...xClearing Misfeeds 123 5 AFZ011S...
Page 136: ...Troubleshooting 124 5...
Page 137: ...xClearing Misfeeds 125 5 AFZ012S...
Page 142: ...Troubleshooting 130 5 Booklet Finisher AFZ013S...
Page 144: ...Troubleshooting 132 5 Booklet Finisher AFZ014S...
Page 154: ...Troubleshooting 142 5...
Page 197: ...iii What You Can Do with This Machine Colour Functions Colour Adjustments GCMO022e...
Page 198: ...iv AFZ003S...
Page 199: ...v GCMO023e...
Page 201: ...vii...
Page 202: ...viii...
Page 206: ...xii...
Page 214: ...8...
Page 224: ...Placing Originals 18 1...
Page 308: ...Troubleshooting 102 4...
Page 332: ...Specifications 126 6 AFZ029S...
Page 350: ...144 GB GB B180 7501 MEMO...
Page 362: ...4...
Page 376: ...Getting Started 18 1...
Page 482: ...Using the Document Server 124 6...
Page 488: ...The Functions and Settings of the Machine 130 7...
Page 516: ...158 MEMO...
Page 517: ...159 MEMO...
Page 518: ...160 GB GB B180 7510 MEMO...
Page 530: ...2...
Page 538: ...Getting Started 10 1...
Page 578: ...Faxing 50 2...
Page 600: ...Using Internet Fax Functions 72 3...
Page 623: ......
Page 636: ...2...
Page 660: ...Checking and Canceling Transmission Files 26 2...
Page 680: ...Communication Information 46 3...
Page 716: ...Other Transmission Features 82 4...
Page 740: ...Reception Features 106 5...
Page 762: ...Fax via Computer 128 6...
Page 774: ...Simplifying the Operation 140 7...
Page 788: ...Facsimile Features 154 8...
Page 834: ...Solving Operation Problems 200 10...
Page 849: ...215 MEMO...
Page 850: ...216 AE AE B712 8521 MEMO...
Page 851: ......
Page 860: ...vi...
Page 862: ...2...
Page 876: ...Getting Started 16 1...
Page 904: ...Sending Scan Files by Scan to Folder 44 3...
Page 928: ...Delivering Scan Files 68 5...
Page 932: ...Using the Network TWAIN Scanner Function 72 6...
Page 968: ...Initial Scanner Setup 108 9...
Page 986: ...Operating Instructions Scanner Reference GB GB B180 7518...
Page 994: ...vi...
Page 996: ...2...
Page 1002: ...Getting Started 8 1...
Page 1026: ...Preventing Information Leaks 32 2...
Page 1030: ...Preventing Unauthorized Use of Functions and Settings 36 3...
Page 1088: ...Specifying the Administrator Security Functions 94 6...
Page 1094: ...Troubleshooting 100 7...
Page 1147: ...153 MEMO...
Page 1148: ...154 EN USA AE AE B180 7911 MEMO...
Page 1149: ......


