


October 2012
4-86
ColorQube 8570/8870 Service Manual
REP 5.3
Revised, 3rd Revision - Xerox Internal Use Only
Repairs and Adjustments
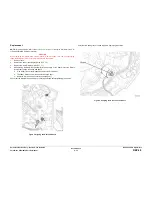
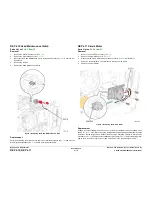
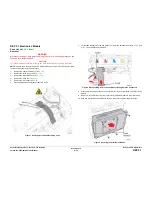
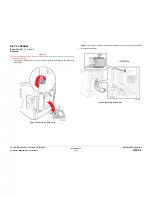
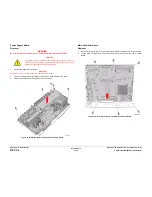
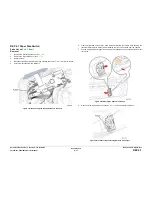
NOTE: Observe the orientation of the RAM device before removing it from the Board.
CAUTION
Be careful when releasing the clips to prevent damaging them.
2.
Release the clips that secure the RAM module and remove the RAM from the Main Con-
troller Board.
Figure 2 Removing the RAM
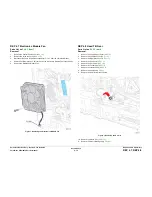
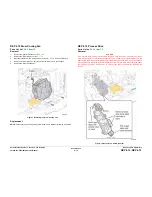
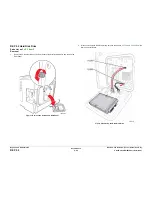
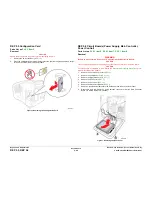
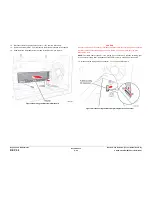
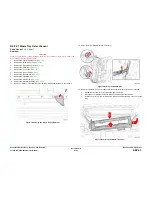
Replacement
NOTE: Memory should be installed in the primary socket before installing in the secondary
socket. The primary memory socket resides on the left side (away from the processor).
Upgrade memory should be added to the secondary memory slot residing on the right side
(close to the processor).
Be sure to secure the RAM in place.
Figure 3 Installing the RAM
Содержание COLORQUBE 8570
Страница 1: ...ColorQube 8570 8870 Printer ColorQube 8570 8870 Service Manual Xerox Internal Use Only...
Страница 2: ......
Страница 152: ...October 2012 3 2 ColorQube 8570 8870 Service Manual Revised 3rd Revision Xerox Internal Use Only Image Quality...
Страница 196: ...October 2012 4 2 ColorQube 8570 8870 Service Manual Revised 3rd Revision Xerox Internal Use Only Repairs and Adjustments...
Страница 304: ...October 2012 5 2 ColorQube 8570 8870 Service Manual Revised 3rd Revision Xerox Internal Use Only Parts List...
Страница 316: ...October 2012 6 2 ColorQube 8570 8870 Service Manual Revised 3rd Revision Xerox Internal Use Only General Troubleshooting...
Страница 372: ...October 2012 7 2 ColorQube 8570 8870 Service Manual Revised 3rd Revision Xerox Internal Use Only Wiring Data...
Страница 392: ...October 2012 8 2 ColorQube 8570 8870 Service Manual Revised 3rd Revision Xerox Internal Use Only Theory of Operation...
Страница 423: ......