


October 2012
4-29
ColorQube 8570/8870 Service Manual
REP 2.3, REP 2.4
Repairs and Adjustments
Xerox Internal Use Only - Revised, 3rd Revision
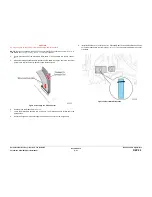
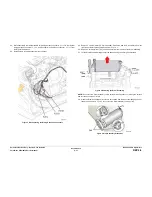
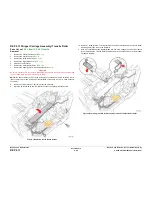
14. Install the ribbon cable retaining clip.
Figure 26 Installing the Retaining Clip
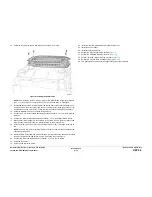
15. Install the Ground Strap and 2 screws.
16. Install the Jetstack Cap.
17. Install the Funnel Cap.
18. Install the Ink Loader.
19. Perform the Homing the Printhead Forward to Print Position procedure (
ADJ 1.2
) to home
the Head Tilt Gear.
20. Reassemble the remaining components, and turn the printer power on.
21. Print the Light Stripes page. Check if any jets are being substituted. If necessary, use the
Control Panel to reset the jet substitution.
22. Package the defective Printhead and completed Printhead Checklist in the replacement
part’s packaging.
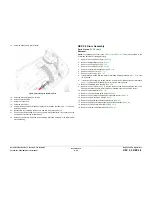
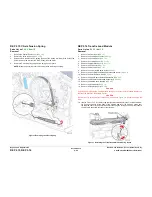
REP 2.4 Drum Assembly
Parts List on
PL 2.1 Item 4
Removal
NOTE: For additional tips, refer to the
Drum Assembly Removal
video (also available in the
ColorQube 8570/8870 Training materials).
1.
Remove the Control Panel Cover (
REP 1.5
).
2.
Remove the Right Side Cover (
REP 1.11
).
3.
Remove the Control Panel (
REP 1.6
).
4.
Remove the Left Side Cover (
REP 1.10
).
5.
Remove the Drum Maintenance Unit (
REP 1.16
).
6.
Remove the Exit Cover (
REP 1.7
).
7.
Remove the Ink Loader (
REP 1.8
).
8.
If the Printhead is tilted forward, perform Printhead Parking procedure (
ADJ 1.4
) to park
the Printhead.
9.
If the Wiper Assembly is in raised position, perform Wiper Blade Alignment procedure
(
ADJ 1.1
) to place the Printhead Wiper in its lowered, home position.
10. Remove the Media Drive Assembly (
REP 4.5
).
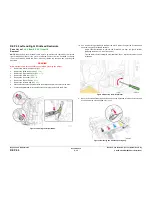
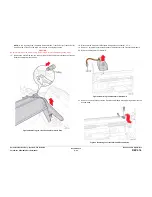
11.
Remove the Y-Axis Belt (
REP 2.5
). Relieve tension on the belt by pulling the end of the
Spring Arm toward the front. With the tension released, slide the belt off the pulley.
12. Remove the Exit Module (
REP 3.13
).
13. Remove the Lower Inner Duplex Guide (
REP 3.2
).
14. Remove the Inner Simplex Guide and Pre-Deskew Sensor (
REP 3.1
).
15. Remove the Outer Duplex Guide (
REP 3.4
).
16. Remove the Upper Duplex Guide and Solenoid (
REP 3.5
).
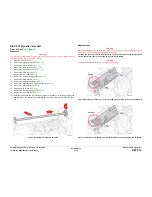
17. Remove the Stripper Carriage Assembly and Transfix Roller (
REP 2.13
).
18. Remove the Transfix Arm Kit with Pins (
REP 2.21
).
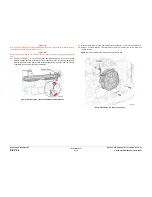
19. Remove the Drum Temperature Sensor (
REP 6.5
).
Содержание COLORQUBE 8570
Страница 1: ...ColorQube 8570 8870 Printer ColorQube 8570 8870 Service Manual Xerox Internal Use Only...
Страница 2: ......
Страница 152: ...October 2012 3 2 ColorQube 8570 8870 Service Manual Revised 3rd Revision Xerox Internal Use Only Image Quality...
Страница 196: ...October 2012 4 2 ColorQube 8570 8870 Service Manual Revised 3rd Revision Xerox Internal Use Only Repairs and Adjustments...
Страница 304: ...October 2012 5 2 ColorQube 8570 8870 Service Manual Revised 3rd Revision Xerox Internal Use Only Parts List...
Страница 316: ...October 2012 6 2 ColorQube 8570 8870 Service Manual Revised 3rd Revision Xerox Internal Use Only General Troubleshooting...
Страница 372: ...October 2012 7 2 ColorQube 8570 8870 Service Manual Revised 3rd Revision Xerox Internal Use Only Wiring Data...
Страница 392: ...October 2012 8 2 ColorQube 8570 8870 Service Manual Revised 3rd Revision Xerox Internal Use Only Theory of Operation...
Страница 423: ......