


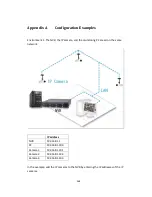


362
2.
Physical disk
In Physical disk, the following options are available:
2.1
Disk Info
2.2
Back to Main Menu
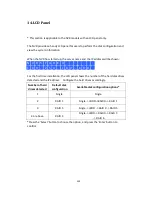
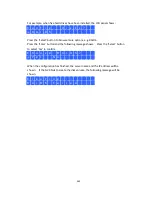
The disk info shows the temperature and the capacity of the hard disk drive.
D i s k : 1
T e m p : 5 0
°
C
S i z e :
2 3 2
G B
3.
Volume
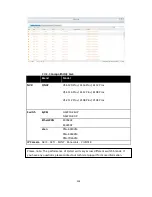
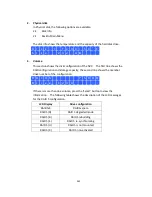
This section shows the disk configuration of the NVR. The first line shows the
RAID configuration and storage capacity; the second line shows the member
drive number of the configuration.
R A I D 5
7 5 0 G
B
D r i v e
1 2 3 4
If there is more than one volume, press the ‘Select’ button to view the
information. The following table shows the description of the LCD messages
for the RAID 5 configuration.
LCD Display
Drive configuration
RAID5+S
RAID5+spare
RAID5 (D)
RAID 5 degraded mode
RAID 5 (B)
RAID 5 rebuilding
RAID 5 (S)
RAID 5 re-synchronizing
RAID 5 (U)
RAID 5 is not mounted
RAID 5 (X)
RAID 5 non-activated
Содержание VIOSTOR
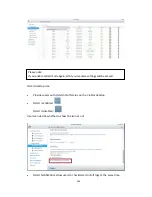
Страница 46: ...46 4 Select the disk configuration 5 In the Summary you can confirm your settings and click Apply to finish ...
Страница 47: ...47 ...
Страница 49: ...49 ...
Страница 90: ...90 ...
Страница 114: ...114 ...
Страница 115: ...115 5 2 6Enable Disable Event Alert To enable event alerts on an E map click ...
Страница 122: ...122 zoom is enabled you can use your mouse wheel to use digital zoom function ...
Страница 140: ...140 Note You cannot play recording files via double click here ...
Страница 142: ...142 ...
Страница 184: ...184 ...
Страница 185: ...185 ...
Страница 194: ...194 ...
Страница 196: ...196 Step2 Enter the Product Authorization Key PAK code to activate the license ...
Страница 217: ...217 10 Confirm the settings and click Next 11 Click Finish to exit the wizard ...
Страница 259: ...259 3 Select a port trunking group to use Click Apply 4 Click here to connect to the login page ...
Страница 264: ...264 ...
Страница 283: ...283 3 Select to change the encryption password or download the encryption key file to the local PC Click Next ...
Страница 292: ...292 Process This tab shows information about the processes running on the NVR ...
Страница 305: ...305 4 Enter a name to register your NVR and click Next ...
Страница 306: ...306 5 The wizard will configure your router automatically ...
Страница 307: ...307 6 Review the summary page and click Finish to complete the wizard ...
Страница 311: ...311 ...
Страница 324: ...324 Step5 Specify your replication schedule ...
Страница 325: ...325 Step6 Click Finish to complete the setup ...
Страница 336: ...336 Step 2 Go to All Apps Step 3 Click Add QSCM Lite to QVR ...
Страница 340: ...340 Step 4 Click Install Manually Step 5 Find the unzipped QSCM Lite and click Install ...
Страница 341: ...341 Step 6 Click OK Step 7 The NVR will then install QSCM Lite ...
Страница 351: ...351 ...


