


245
The original data on the RAID 5, 6, or 10 disk volume will be retained. After the
configuration completes, the status of the disk volume will become “Ready”.
Note:
A hot spare drive must be removed from the disk volume before executing the
following action:
•
Online RAID capacity
expansion
•
Online RAID level
migration
•
Adding a hard drive member to a RAID 5, RAID 6
or RAID 10 volume
Bitmap
Bitmap improves the time for RAID rebuilding after an unexpected error, or removing
or re-adding a member hard drive of the RAID configuration. If an array has a bitmap,
the member hard drive can be removed and re-added and only blocks changes since
the removal (as recorded in the bitmap) will be re-synchronized. To use this feature,
select a RAID volume and click “Enable Bitmap”.
Note:
Bitmap support is only available for RAID 1, 5, 6, and 10.
Recover (RAID Recovery)
RAID Recovery: When the NVR is configured as RAID 1, RAID 5, or RAID 6 and any
number of hard drives is unplugged from the NVR accidentally, you can plug in the
same hard drives into the same drive slots and click “Recover” to recover the volume
status from “Not active” to “Degraded mode”.
Содержание VIOSTOR
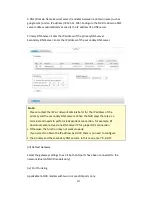
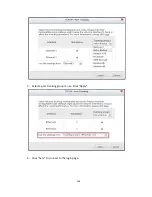
Страница 46: ...46 4 Select the disk configuration 5 In the Summary you can confirm your settings and click Apply to finish ...
Страница 47: ...47 ...
Страница 49: ...49 ...
Страница 90: ...90 ...
Страница 114: ...114 ...
Страница 115: ...115 5 2 6Enable Disable Event Alert To enable event alerts on an E map click ...
Страница 122: ...122 zoom is enabled you can use your mouse wheel to use digital zoom function ...
Страница 140: ...140 Note You cannot play recording files via double click here ...
Страница 142: ...142 ...
Страница 184: ...184 ...
Страница 185: ...185 ...
Страница 194: ...194 ...
Страница 196: ...196 Step2 Enter the Product Authorization Key PAK code to activate the license ...
Страница 217: ...217 10 Confirm the settings and click Next 11 Click Finish to exit the wizard ...
Страница 259: ...259 3 Select a port trunking group to use Click Apply 4 Click here to connect to the login page ...
Страница 264: ...264 ...
Страница 283: ...283 3 Select to change the encryption password or download the encryption key file to the local PC Click Next ...
Страница 292: ...292 Process This tab shows information about the processes running on the NVR ...
Страница 305: ...305 4 Enter a name to register your NVR and click Next ...
Страница 306: ...306 5 The wizard will configure your router automatically ...
Страница 307: ...307 6 Review the summary page and click Finish to complete the wizard ...
Страница 311: ...311 ...
Страница 324: ...324 Step5 Specify your replication schedule ...
Страница 325: ...325 Step6 Click Finish to complete the setup ...
Страница 336: ...336 Step 2 Go to All Apps Step 3 Click Add QSCM Lite to QVR ...
Страница 340: ...340 Step 4 Click Install Manually Step 5 Find the unzipped QSCM Lite and click Install ...
Страница 341: ...341 Step 6 Click OK Step 7 The NVR will then install QSCM Lite ...
Страница 351: ...351 ...