background image

13 


1.2


Hardware Illustration 

1.2.1


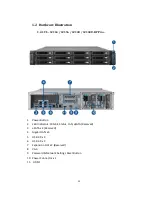
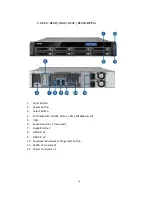
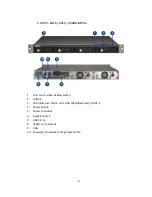
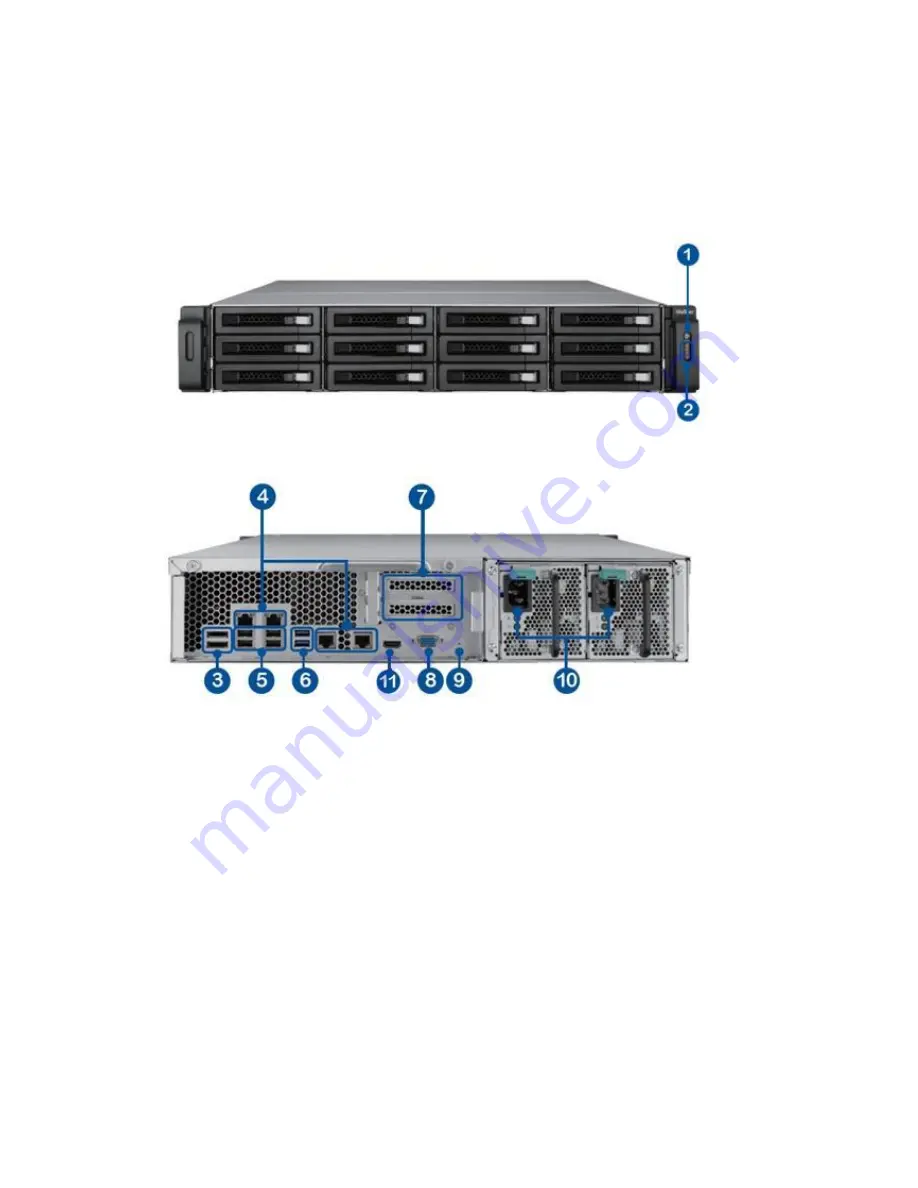
VS – 12164 / 12156 / 12148 / 12140U-RP Pro+ 


1


Power Button   

2


LED Indicators: 10 GbE, Status, LAN, eSATA (Reserved) 

3


eSATA x 2 (Reserved) 

4


Gigabit LAN x 4 

5


USB 2.0 x 4 

6


USB 3.0 x 2 

7


Expansion Slot x 2 (Reserved) 

8


VGA 

9


Password & Network Settings Reset Button 

10


Power Connector x 2   

11.  HDMI 

Содержание VIOSTOR

Страница 1: ...1 VIOSTOR NVR NETWORK VIDEO RECORDER QVR QNAP VIOSTOR RECORDING SYSTEM User Manual Version 5 1 0 2015 QNAP Systems Inc All Rights Reserved ...

Страница 2: ...s and product names referred to are trademarks of their respective holders Further the or symbols are not used in the text LIMITED WARRANTY In no event shall the liability of QNAP Systems Inc QNAP exceed the price paid for the product from direct indirect special incidental or consequential software or its documentation QNAP makes no warranty or representation expressed implied or statutory with r...

Страница 3: ... power supply provided by the manufacturer Service Please contact qualified technicians for any technical enquires Do not repair this product by yourself to avoid any voltage danger and other risks caused by opening this product cover Warning To avoid fire or electric shock do not use this product in rain or humid environments Do not place any objects on this product ...

Страница 4: ...ipment does cause harmful interference to radio or television reception which can be determined by turning the equipment off and on the user is encouraged to try to correct the interference by one or more of the following measures Reorient or relocate the receiving antenna Increase the separation between the equipment and receiver Connect the equipment into an outlet on a circuit different from th...

Страница 5: ... Pro 21 1 2 10 VS 4116 4112 4108 Pro 22 1 2 11 VS 4016 4012 4008 Pro 23 1 2 12 VS 2212 2208 2204 Pro 24 1 2 13 VS 2112 2108 2104 Pro 25 1 2 14 VS 2012 2008 2004 Pro 26 1 2 15 VS S2212 S2208 S2204 Pro 27 1 2 16 VS 2108 2104 L 28 Chapter 2 Install the NVR 29 2 1 Personal Computer Requirements 29 2 2 Browse CD ROM 32 2 3 Hard Disk Drives Compatibility List 33 2 4 IP Cameras Compatibility List 33 2 5 ...

Страница 6: ...ription 108 5 2 2 Add a Map Set or an E map 109 5 2 3 Edit a Map Name 111 5 2 4 Delete a Map Set or an E map 111 5 2 5 Indicate IP Cameras on an E map 112 5 2 6 Enable Disable Event Alert 115 5 3 Remote Monitoring from the QNAP QVR Client for Windows 118 Chapter 6 Play Video Files 119 6 1 Playback Page 120 6 1 1 Play Video Files from NVR 124 6 1 2 Intelligent Video Analytics IVA 126 6 1 3 Export N...

Страница 7: ...4 Protocol Management 190 7 3 Surveillance Logs 191 7 3 1 Surveillance Logs 191 7 4 Push Service 192 7 5 Recovery Management 192 7 6 License Management 195 7 6 1 License Activation 195 Online Activation 195 Offline Activation 198 7 6 2 License Deactivation 202 Online Deactivation 202 Offline Deactivation 205 7 7 On line Users List Only for Upgrade from Previous Version 209 8 Backup Expansion 210 8...

Страница 8: ...rt Fan 268 9 1 6 Power 269 Power Recovery 269 9 1 7 Notification 270 E mail 270 SMS SMSC Settings 271 9 1 8 Firmware Update 272 Live Update 272 Firmware Update 273 9 1 9 Backup Restore 275 Backup Restore Settings 275 Restore to Factory Default 276 9 1 10 External Device 277 External Storage 277 UPS 284 9 1 11 System Status 289 System Information 289 Network Status 289 Hardware Information 289 Reso...

Страница 9: ...lication Job on Amazon S3 321 10 2 File Station 327 10 3 App Center 332 11 QNAP Surveillance Central Management QSCM Lite 335 11 1 Introduction 335 11 2 Install QSCM Lite to NVR Server 335 11 2 1 App Center 335 11 2 2 How to Install QSCM Lite to NVR Server 335 Online installation 335 Offline installation 339 11 2 3 Installation Reminders and Suggestions 343 11 3 Use QSCM Lite on NVR Client PC 343 ...

Страница 10: ...mbedded 355 12 5 1 Topology 355 12 5 2 Switch Control Chart 356 12 5 3 Event Notifications 357 12 5 4 Compatibility List 358 13 LCD Panel 359 14 Troubleshooting 365 Appendix A Configuration Examples 368 Technical Support 373 GNU GENERAL PUBLIC LICENSE 374 ...

Страница 11: ...ny liquid 8 Do not place this product on any uneven surface to avoid falling off and damage 9 Make sure the voltage is correct in your location when using this product If you are not sure about the voltage please contact the distributor or the local power supply company 10 Do not place any object on the power cord 11 Do not attempt to repair this product in any occasions Improper disassembly of th...

Страница 12: ... diversified display modes and recording features e g scheduled recording alarm recording smart recording The NVR also supports data search by date and time timeline event and intelligent video analytics IVA including motion detection missing object foreign object out of focus and camera occlusion All of these functions can be configured by using your web browser The VioStor Pro Series NVR is the ...

Страница 13: ...8 12140U RP Pro 1 Power Button 2 LED Indicators 10 GbE Status LAN eSATA Reserved 3 eSATA x 2 Reserved 4 Gigabit LAN x 4 5 USB 2 0 x 4 6 USB 3 0 x 2 7 Expansion Slot x 2 Reserved 8 VGA 9 Password Network Settings Reset Button 10 Power Connector x 2 11 HDMI ...

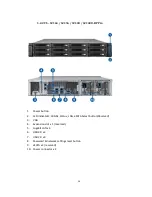
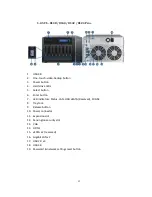
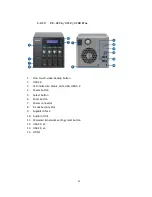
Страница 14: ...1 Power button 2 LED indicators 10 GbE Status LAN eSATA Select button Reserved 3 VGA 4 Expansion slot x 1 reserved 5 Gigabit LAN x 4 6 USB 3 0 x 2 7 USB 2 0 x 4 8 Password network settings reset button 9 eSATA x 2 reserved 10 Power connector x 2 ...

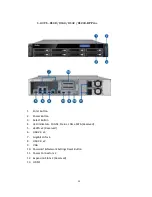
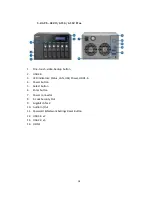
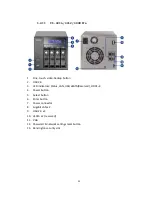
Страница 15: ... Power Button 3 Select Button 4 LED Indicators 10 GbE Status LAN eSATA Reserved 5 eSATA x 2 Reserved 6 USB 2 0 x 4 7 Gigabit LAN x 4 8 USB 3 0 x 2 9 VGA 10 Password Network Settings Reset Button 11 Power Connector x 2 12 Expansion Slot x 2 Reserved 13 HDMI ...

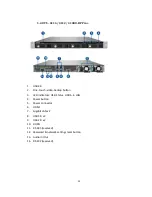
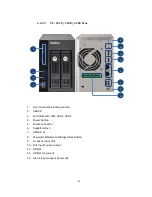
Страница 16: ...on 2 Power button 3 Select button 4 LED indicators 10 GbE Status LAN eSATA Reserved 5 VGA 6 Expansion slot x 2 reserved 7 Gigabit LAN x 2 8 USB 3 0 x 2 9 USB 2 0 x 4 10 Password network settings reset button 11 eSATA x 2 reserved 12 Power connector x 2 ...

Страница 17: ...LEDs 5 Select button 6 Enter button 7 LED indicators Status LAN USB eSATA Reserved 10 GbE 8 Tray lock 9 Release button 10 Power connector 11 Expansion slot 12 Kensington security slot 13 VGA 14 HDMI 15 eSATA x 2 reserved 16 Gigabit LAN x 2 17 USB 2 0 x 4 18 USB 3 0 19 Password network settings reset button ...

Страница 18: ...ton 2 USB 2 0 3 LED indicators Status LAN USB Power HDD1 6 4 Power button 5 Select button 6 Enter button 7 Power connector 8 K Lock Security Slot 9 Gigabit LAN x 2 10 Audio In Out 11 Password Network Settings Reset Button 12 USB 3 0 x 2 13 USB 2 0 x 4 14 HDMI ...

Страница 19: ...on 2 USB 2 0 3 LED indicators Status LAN USB eSATA Reserved HDD1 6 4 Power button 5 Select button 6 Enter button 7 Power connector 8 Gigabit LAN x 2 9 USB 2 0 x 4 10 eSATA x 2 reserved 11 VGA 12 Password network settings reset button 13 Kensington security slot ...

Страница 20: ...uch video backup button 3 LED indicators USB Status HDD1 4 LAN 4 Power button 5 Power connector 6 HDMI 7 Gigabit LAN x 2 8 USB 3 0 x 2 9 USB 2 0 x 2 10 DI DO 11 RS 485 reserved 12 Password network settings reset button 13 Audio In Out 14 RS 232 reserved ...

Страница 21: ...ro 1 One touch video backup button 2 USB 2 0 3 LED indicators Status LAN USB eSATA Reserved HDD1 4 4 Power button 5 Power connector 6 Gigabit LAN x 2 7 USB 2 0 x 4 8 eSATA x 2 reserved 9 VGA 10 Password network settings reset button ...

Страница 22: ... button 2 USB 2 0 3 LED indicators Status LAN USB HDD1 4 4 Power button 5 Select button 6 Enter button 7 Power connector 8 K Lock Security Slot 9 Gigabit LAN x 2 10 Audio In Out 11 Password network settings reset button 12 USB 3 0 x 2 13 USB 2 0 x 4 14 HDMI ...

Страница 23: ...ton 2 USB 2 0 3 LED indicators Status LAN USB eSATA Reserved HDD1 4 4 Power button 5 Select button 6 Enter button 7 Power connector 8 Gigabit LAN x 2 9 USB 2 0 x 4 10 eSATA x 2 reserved 11 VGA 12 Password network settings reset button 13 Kensington security slot ...

Страница 24: ... 3 LED Indicators LAN HDD1 HDD2 4 Power Button 5 Power Connector 6 Gigabit LAN x 2 7 USB 3 0 x 2 8 Password Network Settings Reset Button 9 K Lock Security Slot 10 Mic Input audio output 11 HDMI 1 12 HDMI 2 reserved 13 Alarm input output reserved 1 2 3 4 5 6 7 9 10 11 13 12 ...

Страница 25: ...Pro 1 One touch video backup button 2 USB 3 0 3 LED Indicators LAN HDD1 HDD2 4 Power Button 5 Power Connector 6 Gigabit LAN x 2 7 USB 2 0 x 4 8 Password Network Settings Reset Button 9 K Lock Security Slot 10 Audio In Out 11 HDMI ...

Страница 26: ...uch video backup button 2 USB 2 0 3 LED indicators HDD1 HDD2 LAN eSATA Reserved 4 Power button 5 Power connector 6 Gigabit LAN x 2 7 USB 2 0 x 2 8 eSATA x 2 reserved 9 VGA 10 Password network settings reset button 11 Kensington security slot ...

Страница 27: ...dicators Status LAN HDD1 HDD2 USB Backup 2 Power button 3 One touch video backup button 4 USB 3 0 x 2 5 Password network settings reset button 6 Mic Input audio output 7 USB 3 0 8 Gigabit LAN x 2 9 HDMI 10 Power connector 11 K Lock Security Slot ...

Страница 28: ...touch auto video backup button 2 USB 2 0 3 LED Indicators USB status HDD1 HDD2 LAN power 4 Power button 5 Power connector 6 Gigabit LAN 7 USB 3 0 x 2 8 Password network settings reset button 9 K Lock security slot 10 Power cord hook ...

Страница 29: ...Microsoft Windows 8 7 Professional Memory 8GB or above Graphics Processor NVIDIA GeForce 7600 GT or ATI Radeon X800 XT or better Network port 100Mbps Ethernet port or above Web browser Google Chrome 38 0 2125 104 m Microsoft Internet Explorer 10 11 desktop mode M JPEG Intel Pentium 4 CPU 2 4GHz or above 8 H 264 MPEG 4 MxPEG Dual core CPU 2 4GHz or above M JPEG Intel Pentium 4 CPU 2 8GHz or above 1...

Страница 30: ...ve or Internet Download Recommended resolution 1280 x 720 pixels or above 40 H 264 MPEG 4 MxPEG Core i7 CPU 2 8GHz or above M JPEG Quad core CPU 2 33GHz or above More than 48 H 264 MPEG 4 MxPEG Core i7 CPU 3 4GHz or above M JPEG Quad core CPU 3 0GHz or above ...

Страница 31: ...31 Security Settings of the Web Browser Please make sure the security level of the IE browser in Internet Options is set to Medium or lower Add your NVR s IP address to the list of Trusted sites ...

Страница 32: ... the NVR servers available on the local network and configure the network settings of the NVR QIG View the hardware installation instructions of the NVR QVR The setup program for the QNAP QVR Client an application to see the live view and play videos recorded by the NVR If you were unable to install the QNAP QVR Client when connecting to the monitoring playback page of the NVR install the plug in ...

Страница 33: ...isit http www qnapsecurity com n en product_x_grade 2 4 IP Cameras Compatibility List For the information of supported IP camera models please visit http www qnapsecurity com n en product_z_g_qvr cat_intro php hf 0 QNAP disclaims any responsibility for product damage malfunction or data loss recovery due to misuse or improper installation of hard disks in any occasions for any reasons ...

Страница 34: ...volume has reached its full capacity 3 The disk volume is going to be full 4 The system fan is out of function 5 An error occurs when accessing read write the disk data 6 A bad sector is detected on the hard drive 7 The NVR is in degraded read only mode 2 member drives fail in RAID 5 or 3 member drives fail in RAID 6 configuration the disk data can still be read 8 Hardware self test error Flashes ...

Страница 35: ... accessed Green The hard drive can be accessed USB Blue Flashes blue every 0 5 sec 1 A USB device is detected 2 A USB device is being removed from the NVR 3 The USB device connected to the front USB port of the NVR is being accessed 4 The NVR data is being copied to the external USB device Blue The USB device connected to the front USB port of the NVR is ready Off 1 No USB is detected 2 The NVR ha...

Страница 36: ...ata cannot be copied to the external device by pressing the one touch auto video backup button Short beep 0 5 sec long beep 1 5 sec 3 every 5 min The system fan is out of function Long beep 1 5 sec 2 1 The disk volume is going to be full 2 The disk volume has reached its full capacity 3 The hard drives on the NVR are in degraded mode 4 Hard disk rebuilding process starts 1 1 The NVR is turned off ...

Страница 37: ...ects the NVR servers on the local network If the server has not been initialized you will be prompted to perform quick setup Click Yes to continue Note If the NVR is not found click Refresh to try again 4 Enter the administrator name and password to perform quick setup The default administrator name and password are as below User name admin Password admin Note Make sure all the IP cameras are conf...

Страница 38: ... steps below to add IP cameras 1 Go to Surveillance Settings Please login to the NVR as an administrator and click the Surveillance Settings shortcut on the QVR desktop 2 Go to Camera Configuration Camera Settings 3 Click to add an IP camera 4 Follow the steps to add the camera ...

Страница 39: ...e QVR desktop to go to monitoring page 2 If it is your first time connecting to the NVR monitoring page you will need to install the add on 3 The live video from the IP cameras configured on the NVR and the recording status of each channel are shown ...

Страница 40: ...board optional to the USB ports of the NVR 6 Turn on the NVR All Pro series support HDMI interface now Note This feature is supported by the VioStor Pro Series NVR only The models include VS 12164U RP Pro VS 12156U RP Pro VS 12148U RP Pro VS 12140U RP Pro VS 8148U RP Pro VS 8140U RP Pro VS 8132U RP Pro VS 8124U RP Pro VS 8148 Pro VS 8140 Pro VS 8132 Pro VS 8124 Pro VS 6120 Pro VS 6116 Pro VS 6112 ...

Страница 41: ...in screen will be shown Select the language Enter the administrator name and password If the NVR has not been configured skip the login page and enter Quick Configuration refer to Chapter 3 1 Default user name admin Default password admin ...

Страница 42: ... USB keyboard is connected click to choose the keyboard layout Click the keyboard icon to enter the necessary information if a USB keyboard is not available The monitoring page will be shown upon successful login refer to Chapter 3 3 for details ...

Страница 43: ...l be shown Follow the instructions of the wizard to complete the system setup 3 1 1 Quick Setup 1 In the Quick Setup page the system will search for cameras 2 After searching for cameras a list of discovered cameras will be displayed Note All the changes will be effective only after applying the settings in the last step ...

Страница 44: ...44 3 You can now check that all of the NVR and Camera settings fit your needs 4 To start the setup process click Proceed ...

Страница 45: ...45 3 1 2 Manual Setup Follow these procedures to setup the NVR 1 Enter the NVR name and administrator password 2 Set the time zone date and time 3 Configure the network settings ...

Страница 46: ...46 4 Select the disk configuration 5 In the Summary you can confirm your settings and click Apply to finish ...

Страница 47: ...47 ...

Страница 48: ...rveillance settings such as administrator password network and time settings click on the monitoring screen Note that this button option will be shown for administrator access only Select the language and click the icons to configure the settings ...

Страница 49: ...49 ...

Страница 50: ...示 說明 Main Menu Back to Monitor Control Panel Surveillance Settings File Station Recording Backup and Storage Expansion Background Tasks External Devices Notification Options Search Help Desktop Preferences ...

Страница 51: ...con Description Monitor Enter the monitoring page Playback Enter the playback page Surveillance Settings Enter the surveillance settings page allows admin access only Hide left panel Hide the panel on the left of the monitoring page Show left panel Show the panel on the left of the monitoring page View video image and IP camera info Camera list Select monitoring mode PTZ camera control panel ...

Страница 52: ...r name NVR model and firmware version Logout Logout the NVR Manual recording Enable or disable recording on the IP camera The administrator can select to enable or disable this function in Camera Settings Recording Settings on the web based administration interface Audio optional Turn on or off the audio support for the monitoring page Microphone optional Toggle microphone support for the monitori...

Страница 53: ...cription Event notification When the alarm recording is enabled and an event is detected this icon will be shown Click this icon to view the alert details The alert sound can be turned on or off To clear all the logs click Clear All ...

Страница 54: ... function is in use Icon Description Pan and tilt If the PTZ camera supports pan and tilt functions click these buttons to pan or tilt the camera Preset positions Select the preset positions of the PTZ camera Zoom out Zoom in If the PTZ camera supports zooming click these buttons to zoom in or zoom out Digital zoom Select a channel and click this button to enable the digital zoom function When ena...

Страница 55: ... 3 channel mode 4 channel mode 6 channel mode 8 channel mode 9 channel mode 10 channel mode 12 channel mode 4x4 5x4 5x5 6x5 8x4 6x6 channel mode Select the display page number Sequential mode This mode can be used with other display modes Click to enable or disable sequential mode Click to define the time interval of which the channels will be displayed There are 9 time interval types you can choo...

Страница 56: ...the cameras If the camera supports pan and tilt functions click the channel on the screen and adjust the viewing angle with a mouse If zooming is supported scroll the mouse wheel to zoom in or zoom out the video These functions are available depending on the camera models Please consult the camera s documentation for details ...

Страница 57: ...is IP camera supports PTZ function Manual recording is enabled The recording triggered by advanced event management Camera Settings Alarm Settings Advanced Mode is in process The alarm input 1 of the IP camera is triggered The alarm input 2 of the IP camera is triggered The alarm input 3 of the IP camera is triggered Motion detection recording is in process Digital zoom is enabled ...

Страница 58: ...e error persists Please note 1 Enabling or disabling manual recording will not affect scheduled or alarm recording tasks They are independent processes 2 Right click on the IP camera channel and select the following options A Full screen B Keep aspect ratio C Deinterlace available on particular camera models only D Keep original size E Dewarp fisheye images Right click on the channel and enable th...

Страница 59: ...owone cid 128 Remark 2 This function is only available when the resolution of the video stream is higher than 640x480 on the monitoring page Remark 3 If Dewarping mode is in PTZ mode then in the channel you can use the PTZ control panel or mouse by holding down the mouse left button and then moving the mouse or turning the mouse wheel to change viewing angles or to zoom in out of the screen If the...

Страница 60: ... the icon to view the alert details After enabling Issue notification when the disk reaches maximum operation time set below in System Tools Hard Disk SMART you can then Enable alert for disk error and warning to receive alarm notifications if hard drive events occur System Status Notification Display CPU status will display the CPU status as seen below Display HDD status will display the hard dri...

Страница 61: ... to show channels that the user does not have the access rights to Display unconfigured channels Select this option to show unconfigured channels The NVR automatically detects the resolution settings supported by the connected monitor and will use the optimum settings To change the screen resolution click Settings under the Screen tab After configuring the resolution settings the monitoring screen...

Страница 62: ...62 If the monitor model cannot be detected the NVR will provide resolution options of 1920x1080 1400x1050 1280x1024 and 1024x768 ...

Страница 63: ...cess rights to the IP cameras are required to play the videos Login to the NVR as the admin and edit the playback access rights in User Management using the web based administration interface When the playback screen is shown select a camera channel on the NVR Next select the start and end time of the video and click to start searching The videos that match the search criteria will be played autom...

Страница 64: ...pe including wall ceiling and floor and then select Dewarping mode including Panorama Full View Panorama Dual View and Rectangle Remark 1 If the Mount type is Wall only Panorama Full View and Rectangle are supported in Dewarping mode Remark 2 If Dewarping mode is Rectangle you can use the PTZ control panel to operate PTZ functions excluding digital zoom 6 Dewarp panomorph images for the specific c...

Страница 65: ...eo stream resolution is higher than 640x480 on the monitoring page Remark 3 If Dewarping mode is in PTZ mode for the channel you can use the PTZ control panel or mouse by holding down the mouse left button and then moving the mouse or turning the mouse wheel to change viewing angles or zooming in out the screen If Dewarping mode is in Quad mode the above methods can also be applied to operate PTZ ...

Страница 66: ...ideo files from the NVR and convert the files to an AVI file 1 Enter the playback interface of the NVR Select a camera channel on the NVR Click Convert to AVI file 2 Select the IP camera 3 Specify the start and end times of the video files 4 Select the export format Standard AVI file Convert recording files to standard AVI file More time is needed to export but no additional codecs are required Op...

Страница 67: ...67 5 Enter the file name of the video file 6 Click OK to convert the video files to an AVI file and save them to the external USB storage device ...

Страница 68: ...ents but also functions with great simplicity The QNAP VioStor NVR allows users to choose suitable network cameras for various situations Businesses can enjoy high flexibility in deploying their ideal surveillance solutions with the broad ranged offerings of compatible IP cameras QNAP VioStor NVR also offers An intuitive GUI with multi window multi tasking and multi application support Real time m...

Страница 69: ...e admin Default password admin 3 To view the live video in your web browser please add the NVR IP address to your list of trusted sites When accessing the NVR via Internet Explorer you will be prompted to install the ActiveX add on 4 To view the live video with Google Chrome Mozilla Firefox or by using the QNAP QVR Client on Windows PC please visit http www qnapsecurity com download asp to downloa...

Страница 70: ... are developed by QNAP to enhance your NVR experience Items under SYSTEMS are key system features designed to manage or optimize your NVR These applications can add functionalities to the NVR for their introduction please refer to their description at the App Center Click the icon from the menu to launch the selected application Show Desktop Click to minimize or restore all open windows and Main M...

Страница 71: ...D SMART scanning External Devices Click to list all external devices that are connected to the NVR via its USB ports Click the device listed to open the File Station for that device Click the External Device header to open the External Device page for relevant settings and operations for details on the File Station please refer to the chapter on File Station Click to eject the external device ...

Страница 72: ...and warning notifications Click Clear All to clear all entries from the list To review all the historical event notifications click the Event Notifications header to open the System Logs For more details regarding System Logs please refer to the chapter on System Logs ...

Страница 73: ...73 Personal Setting Admin Control Click to customize your user specific settings change your user password restart shut down the NVR or log out your user account 1 Options ...

Страница 74: ...74 A Profile Specify your user email address B Wallpaper Change the default wallpaper or upload your own wallpaper C Change Password Change your login password ...

Страница 75: ...option and users will be prompted for confirmation each time they leave the QVR Desktop such as clicking the back icon in the browser or close the browser It is recommended to check this option Reopen windows when logging back into QVR Check this option and ...

Страница 76: ...this option Show the NVR time on the desktop If you prefer not to show the NVR time at bottom left side of the desktop uncheck this option Change Password Click to change your login password 2 Restart Click to restart your NVR 3 Shutdown Click to shut down your NVR 4 Logout Click to log yourself out 5 About Click to check the NVR model details including firmware version HDDs already installed and ...

Страница 77: ...esource Click to display a list of online references including the Quick Start Guide QVR Help Tutorials and QNAP Forum Customer Service is available here Language Click to choose your preferred language for the UI ...

Страница 78: ...the application icon displaying style and select your preferred application opening mode on the desktop Application icons can be switched between small thumbnails and detailed thumbnails and applications can be opened in the tab mode or the ...

Страница 79: ...s available Desktop Area You can remove or arrange all applications on the desktop or drag one application icon over the top of another to put them in the same folder Next Desktop and Last Desktop Click the next desktop button right side of the current desktop or the last desktop button left side of the current desktop to switch between desktops The position of the desktop is indicated by the thre...

Страница 80: ... note that the color of the HDD symbol will change based on HDD health Resource Monitor The CPU RAM and bandwidth usage is displayed here Click the Resource Monitor header to open the corresponding page in System Status for details Please note if the port trunking feature is activated the bandwidth statistics are the combined usage of all NICs Storage The shared folder top five largest folders vol...

Страница 81: ...e drop down list to specify the time range for tasks to be listed Slide in window System related news will be displayed on the window at bottom right side of the desktop Click the update to check the relevant details Tip All widgets within the Dashboard can be dragged onto the desktop for monitoring specific details The Dashboard will be presented differently on different screen resolutions The co...

Страница 82: ... Users can find and download this application under the Utility section of the QNAP Security website at http www qnapsecurity com download asp Important Notice 1 Before using the NVR install the hard disks in the server correctly and finish the disk formatting and configuration Otherwise the server will not function properly 2 If your Windows OS is Windows Vista Windows 7 or above it is suggested ...

Страница 83: ...of the icons and their descriptions in the monitoring page Icon Description QVR Desktop Return to the QVR desktop Monitor Enter the monitoring page The administrator can grant access rights to the users to see the live view Playback Enter the video playback page The administrator can grant access rights to the users to play back the videos Event notification When the alarm recording is enabled and...

Страница 84: ... monitored E map Upload E map s and indicate the locations of the IP cameras The administrators are allowed to edit and view the E map s Other users can only view the E map s Options Configure the advanced settings of the monitoring page Specify the source of the video audio stream event notification and snapshot folder Note Click the event notification icon to view the event details enable or dis...

Страница 85: ... the monitoring page For more information about the compatibility of this feature please visit http nvr qnapsecurity com n en product_z_g_qvr cat_intro php hf ol d Please note the two way audio function is currently only supported by the latest version of Internet Explorer Dewarp fisheye images For specific fisheye cameras Note 3 and the specific camera models with panomorph lens Note 4 you can en...

Страница 86: ...hen needed without leaving the Live view page maintaining seamless monitoring so you won t miss any suspicious events Camera information 1 Properties Note 6 Configure other monitoring options 2 Locate in E map Highlight camera icon on E map 3 Connect to camera homepage ROI Region of Interest This function provides you two kinds of magnified viewing modes to choose from You can choose 5 split or 7 ...

Страница 87: ...e you need to select the Enable panomorph support option in the camera configuration page After enabling the feature you can select Mount type including wall ceiling and floor and then select Dewarping mode including Perimeter mode Quad mode and PTZ mode Remark 1 To know the camera models that can be installed with panomorph lens please visit http www qnapsecurity com n en qa con_show php op showo...

Страница 88: ...etwork select this option to stream the video data from the IP cameras If the NVR the IP cameras and the PC are located behind a router virtual server or firewall configure port forwarding on the IP cameras to use certain ports III Show stream information Show video codec frame rate bit rate current recording days and current recording size of this channel B OSD Settings Specify the font color of ...

Страница 89: ...not support streaming from camera or video resolution configuration Both options will not be available if the IP camera does not support multiple streams If an IP camera supports different resolution settings the NVR will select the smallest resolution larger than or equal to the size of the browser window If all the supported resolution settings of an IP camera are smaller than the browser window...

Страница 90: ...90 ...

Страница 91: ...ing to establish connection to the IP camera The NVR cannot connect to the IP camera The configured action triggered by alarm event is in process Alarm settings are configured but not in process Scheduled or continuous recording is in process Schedule recording is enabled but not in process Manual recording is enabled Manual recording is not in process This IP camera supports audio functions This ...

Страница 92: ...ls to display the video of an IP camera a message will be shown in the channel window to indicate the status Message Description No Permission No access right to view the monitoring channel Please login as an authorized user or contact the system administrator Server Error Please check the camera settings or update the firmware of the IP camera if any Contact the technical support if the error per...

Страница 93: ... disabled when the PTZ function is in use QVR 5 0 and above hides the PTZ control panel by default You can enable the PTZ control panel in the options on the monitoring page Note When you enable multi display mode and the live view window is too small to show interactive control buttons please enable PTZ control panel to control the camera Adjust PT angle of the camera Select and configure PTZ cam...

Страница 94: ... out or button to optically zoom in When digital zoom function is enabled you can press to digitally zoom out or button to digitally zoom in Select and configure PTZ camera preset positions Select and view the preset positions of the IP camera from the list For some camera models you can configure PTZ camera preset positions on the monitoring page For more information about the compatibility of PT...

Страница 95: ...nitoring feature of the NVR 1 Click Server List on the monitoring page A Click Auto Detect to search for the NVR on the LAN and add the server to the server list B Click Add to add the NVR to the server list 2 Up to 128 channels from multiple NVR servers can be added for monitoring ...

Страница 96: ...is triggered the alert icon will be shown on the monitoring page instantly Click the icon to view the alert details After enabling Issue notification when the disk reaches maximum operation time set below in System Tools Hard Disk SMART you can then Enable alert for disk error and warning to receive alarm notifications when hard drive events occur Display Order Click Reset to reprioritize the moni...

Страница 97: ... the NVR and the IP cameras are located on the same LAN select this option to stream the video from the IP camera Note that the port forwarding settings on the IP cameras must be configured if the NVR IP cameras and the computer are located behind a router a virtual server or a firewall Video Windows Highlight the video window when an event is triggered The video window will flash if an event is t...

Страница 98: ...where the snapshots are saved and the image format JPEG BMP or TIFF 2 Show timestamp and camera name Show the timestamp and the camera name on the snapshot 3 Save the snapshot as it is displayed Select this option to save the snapshot as it is displayed on the window Otherwise the snapshot will be saved in its original size ...

Страница 99: ...page to do so you can still have full live views of other channels simultaneously 1 Please wait a moment for the system to process your request depends on available network bandwidth 2 Reverse play is used by default When playing to the event time you can drag the playback control button gray part to the right to change to normal playback 3 You can double click on a specific time on the timeline t...

Страница 100: ...ed without leaving the Live view page maintaining seamless s monitoring so you won t miss any suspicious events 1 Please wait a moment for the system to process your request depends on available network bandwidth 2 You can modify camera recording and schedule settings The settings will come into effect after clicking Apply ...

Страница 101: ...1 On the monitoring page of the NVR click and select Connect to camera homepage to go to the configuration page of the PTZ camera 2 Set the preset positions on the PTZ camera 3 Return to the monitoring page of the NVR Click to select Auto Cruising Configure 4 Click the number buttons to view the preset positions of the PTZ camera When this button is clicked the name of the corresponding preset pos...

Страница 102: ...et Name from the drop down menu and enter the staying time interval in seconds Click Add 6 Update To change a setting on the list highlight the selection Select another preset position from the drop down menu and or change the staying time interval Click Update ...

Страница 103: ...elete more than one setting press and hold the Ctrl key and select the settings Then click Delete 8 After configuring the auto cruising settings select the option Enable auto cruising and click OK The NVR will start auto cruising according to the settings 9 Auto cruising supports snapshot ...

Страница 104: ...meras are widely used to monitor larger areas QNAP Qdewarp allows fisheye cameras to use their full features You only need to configure the fisheye camera s installation location ceiling wall or desk then you can start using multiple QNAP Qdewarp modes Qdewarp is supported in the monitor and playback page Qdewarp mode description Icon Function Description 1O3R Provides the original screen and 3 re...

Страница 105: ...ectively and one panorama screen in the center 4R Providing 4 regional screens 9R Providing 9 regional screens Dual Panorama Providing 2 panorama screens Full Panorama Providing one panorama screen ORP Providing one original screen one regional screen and one panorama screen R Providing one regional screen Note Only some dewarping modes are supported on local display ...

Страница 106: ...o configure the ROI 1 Click on the monitoring page select or then the system will automatically go into the ROI monitoring mode 2 You can select the ROI on the camera s field of view The system will automatically show the ROI s on the side grid You can also use the mouse to select the ROI and drag it to change its location or adjust the ROI s border to alter its size 3 Remove the ROI by clicking o...

Страница 107: ...urs to the IP camera The camera icons are available only when the IP cameras have been configured on the NVR To use the E map feature login the monitoring page of the NVR as an administrator and click An E map example is shown below The NVR provides a default E map Administrators can add or remove the E maps whenever necessary E map Enable Disable E map edit mode Enable Disable event alert on E ma...

Страница 108: ...change and flash to alert the administrator To disable event alerts on the E map click this icon Note When event alerts are enabled the E map cannot be edited The icon will become invisible E map Options Click on this icon to change the Icon Size or Double click on camera icon action Use this control bar to zoom in out and see more details of E map Icon for a set of E maps Icon for a single E map ...

Страница 109: ...he locations of the IP cameras click to enable Edit mode A list of IP cameras configured on the NVR will be shown on the left Click Default and then to add an E map Enter the map name and select the file The E map image must be a JPEG format file Click OK The E map will be shown ...

Страница 110: ...the E maps one by one The icon of floor1 will be changed to when more than one E map is added To add another E map of the same level of floor1 select Default and add the E map e g floor2 To zoom in or zoom out the E map you can use your mouse wheel or just change the percentage bar in upper left to enlarge or reduce the view of the E map ...

Страница 111: ...ap and click Enter the new name and click OK To change the picture of the E map delete the E map and add the new file 5 2 4Delete a Map Set or an E map To delete an E map select the map and click To delete a set of maps under the same level select the map set and click ...

Страница 112: ...camera cannot be adjusted The naming rule of camera is as follows Order of Server Order of Channel Camera Name For example 1 05 Corner means channel 5 of NVR1 and its camera name is Corner To delete a camera icon from the E map right click on the icon and select Delete To save the changes made to the E maps click to exit Edit mode When clicking an E map or an IP camera on the left the E map or the...

Страница 113: ...e Camera Icon in Emap Options by clicking Open live view Whether or not Edit mode is enabled the view of IP camera will be shown in single channel mode on the monitoring screen Open live view in new window Whether or not Edit mode is enabled the view of IP camera will be shown on another window ...

Страница 114: ...114 ...

Страница 115: ...115 5 2 6Enable Disable Event Alert To enable event alerts on an E map click ...

Страница 116: ...d the monitor screen will switch to display the alert camera channel in single channel view on the monitor screen automatically The E map with event alerts will not be switched to display automatically if the time difference between the event time and the last time the user uses the E map clicks the E map window is less than 20 seconds In this case refer to the tree menu on the left to locate the ...

Страница 117: ...era icon on an E map Icon Description A moving object has been detected The alarm input 1 of the IP camera has been triggered The alarm input 2 of the IP camera has been triggered The alarm input 3 of the IP camera has been triggered An unidentified event has been triggered ...

Страница 118: ... QNAP QVR Surveillance Client to open the QNAP QVR Client for Windows 2 The following window will be shown 3 Enter the IP address port user name and password to login the NVR 4 All the monitoring functions of the QNAP QVR Client for Windows are similar to those of the browser based interface Please refer to other sections of this chapter ...

Страница 119: ...of trusted sites When accessing the NVR via Internet Explorer you will be prompted to install the ActiveX add on 2 To play the recording files by Google Chrome Mozilla Firefox or QNAP QVR Client on Windows PC please visit http www qnapsecurity com download asp to download and install the QNAP QVR Client for Windows 3 To play the recording files on Mac please visit http www qnapsecurity com downloa...

Страница 120: ...VR desktop 2 The playback page will be shown You can search and play the video files on the NVR servers To return to the monitoring page click To enter the surveillance settings page click Note The playback access right to the IP cameras is required to view and play the video files ...

Страница 121: ...cordings etc Open recording files Standard bandwidth mode Low bandwidth mode Take a snapshot of the video Audio optional Turn on off the audio support Search recording files by IVA Dewarp fisheye images For specific fisheye cameras Note 1 and the specific camera models with panomorph lens Note 2 you can enable disable dewarping function After enabling the function you can then select mount type de...

Страница 122: ...122 zoom is enabled you can use your mouse wheel to use digital zoom function ...

Страница 123: ...own Last frame Next frame Right side of shuttle bar is normal play and left side of shuttle bar is reverse play When you drag the playback control button to right it will play normally When dragging the playback control button to left it will reverse play When dragging to the center of shuttle bar it will pause ...

Страница 124: ...it is blank in the time period it means no files are recorded at that moment 3 Click to start playback or click on a channel screen 4 Specify the time to play back the recording files at that moment 5 Click to control all the playback windows to play back the recording files When this function is enabled the playback options play pause stop previous next frame previous next file speed adjustment w...

Страница 125: ...t Mount type including wall ceiling and floor and then select Dewarping mode including Perimeter mode Quad mode and PTZ mode Remark 1 To know the camera models which can be installed with panomorph lens please visit http www qnapsecurity com n en qa con_show php op showone cid 128 Remark 2 The function is only available when the resolution of the video stream is higher than 640x480 on the monitori...

Страница 126: ... new objects in the video Missing object Detects missing objects in the video Out of focus Detects if the camera is out of focus Camera occlusion Detects if the IP camera is obstructed To use this function follow the steps below 1 Enter the playback page Select one channel and click Note The intelligent video analytics support video search on one IP camera channel only 2 Select recording type star...

Страница 127: ...focus or Camera occlusion Multiple options can be selected B Adjust the sensitivity for object detection C Adjust the time interval for detecting the foreign objects and missing objects If a foreign object appears or a missing object disappears for a period of time which is longer than the time interval the NVR will record the event ...

Страница 128: ...r height less than this setting Enable this option to ignore all the objects smaller than the yellow zone F Enable Disable other options for video search Pause when found Enable this option and the video search will stop when a video file matching the search criteria is found Highlight the detection zone The moving objects detected in the video will be highlighted in red boxes the foreign or missi...

Страница 129: ... entry on the search result dialog to play the video The player will play the video starting from 15 seconds before the event to 15 seconds after the event Right click an entry on the search result dialog to export the video AVI format ...

Страница 130: ...130 and save it to the computer The exported video starts from 15 seconds before the event to 15 seconds after the event ...

Страница 131: ...file 2 Select recording type start time and end time for video exporting A Choose the recording type B Specify the time range Specify a smaller time range or the video file will be too large and take a long time to convert 3 You can specify the location where the file will be saved on client PC or to the NVR 4 Enter the file name 5 You can modify the export options ...

Страница 132: ...he file format video compression of the exported file D You can select to include a time stamp and the channel name in the exported file or to add comments will have one more txt file saved as same file name in the same folder 6 Click OK 7 All the video files that meet the search criteria will be converted ...

Страница 133: ...napshots in the playback page The watermark cannot be removed and can only be verified by the QNAP Watermark Proof software To use digital watermarking in the playback page follow the steps below 1 Enter the playback page 2 Select to add digital watermarks in the exported snapshots or videos 3 Click Convert to AVI file refer to Chapter 6 1 3 Digital watermarks will be added to the exported video f...

Страница 134: ...134 6 1 5 Enable Recording Video Files Please follow the below steps to enable recording video files in the playback page 1 Click to enable AVI files 2 Select the video files and start playback ...

Страница 135: ...135 6 1 6 Average Time Divided Playback Click to designate a channel for Average Time Divided Playback This can be divided for 4 channel or 9 channel display mode ...

Страница 136: ...e Client to open the QNAP QVR Client for Windows 2 The following window will be shown 3 Enter IP address port user name and password to log into the NVR 4 All the playback functions of the QNAP QVR Client for Windows are similar to those of the browser based interface Please refer to other sections of this chapter ...

Страница 137: ...cate Watermark Proof Run Watermark Proof The following window will be shown Click to browse and locate the files Multiple files can be selected at one time Click to check the files and view the proof result When Stop when watermark error is detected is selected the checking process will stop if a failed file is detected Otherwise the program will check all the files selected If a video file ...

Страница 138: ...138 has been modified or is not exported with digital watermark or not an NVR video file the proof result will be shown as Failed ...

Страница 139: ...inistrator access right 6 4 1Microsoft Networking SMB CIFS Access the video files by the SMB CIFS protocol on Windows OS Run NVR_IP from the Windows Start menu For example if the NVR IP is 10 11 19 27 enter 10 11 19 27 6 4 2FTP Server FTP Access the recording data by FTP In Google Chrome Mozilla Firefox or Microsoft Internet Explorer enter ftp username password NVRIP For example enter ftp admin ad...

Страница 140: ...140 Note You cannot play recording files via double click here ...

Страница 141: ...verview You can view a camera preview and more information including the camera name IP address connection status recording setting days recorded recording file size free disk space CPU usage and internet bandwidth 7 1 2Camera Configuration You can add edit a camera s configuration export import a camera s configuration modify recording settings and scheduled recording settings ...

Страница 142: ...142 ...

Страница 143: ...143 Please follow these steps to add a new camera 1 Click to add a camera 2 Search camera s automatically is enabled by default You can select the search type UDP UPnP or ONVIF ...

Страница 144: ...in to the camera And select whether or not to enable the recording The NVR provides an interface for the users to enter the JPEG CGI command of the IP cameras in order to receive the video and audio streaming data from the IP cameras and monitor record and playback the video of the IP cameras on the NVR Please refer to Note 1 for more information 4 Click Next for recording settings ...

Страница 145: ...eo compression Choose a video compression format for the recording C Resolution Select the recording resolution D Frame rate Adjust the frame rate for the recording Note that the frame rate of the IP camera may be affected by network traffic E Quality Select the image quality for the recording More disk space is required to save higher quality recordings F Quality Preview Click Quality Preview to ...

Страница 146: ...gital watermarks to the video files as soon as they are recorded to the NVR Use the Watermark Proof utility to verify if the video files were maliciously modified K Enable recording data retention Turn on this function and specify the minimum number of days to keep the recording data Note that the number of days entered here must be smaller than the maximum number of days to keep all recordings co...

Страница 147: ...ilable After the connection is resumed the NVR will check its recording files and compare the recording schedule set by users If the NVR detects that recording files are missing it will request the camera to upload the missing part 5 Click Next for schedule settings Click and drag on the schedule table to enable scheduled recording for that period of time Click and drag on the schedule table to di...

Страница 148: ...led or alarm recording tasks They are independent processes 2 When applying the changes the recording operation will be temporarily paused maximum 1 minute and then restart 3 The settings of the snapshot folder are global settings which will be applied to every channel You can then click to edit the camera settings ...

Страница 149: ...ake effect until Apply is clicked When applying the changes the recording operation will temporarily stop for a maximum of one minute and then restart Export Import camera settings This helps you backup and replicate camera settings to another NVR it must be the same model ...

Страница 150: ... the camera brand 2 Select Generic JPEG for the camera model 3 Enter the CGI path of the IP camera in the HTTP URL field 4 Enter the camera name or the IP address of the camera 5 Enter the user name and the password of the IP camera 6 Select to enable the recording or not Note The NVR only supports JPEG CGI command interface but does not guarantee the compatibility with all the IP camera brands ...

Страница 151: ...tual cameras from the view management page for easier monitoring To add a virtual camera click after adding a physical camera Configure virtual camera 1 Virtual camera name enter a name for the virtual camera 2 Virtual camera index the virtual camera s number under a physical camera 3 Virtual camera area you can edit the virtual camera s area and its size by dragging the area on the Edit Virtual C...

Страница 152: ...152 Virtual camera s application 1 In the view management page you can add a virtual camera to a view 2 In the monitor page you can drag virtual cameras into any window to monitor it ...

Страница 153: ...dth The same camera stream was used for both live view and recording and more bandwidth was required if a high quality camera stream was selected Fortunately with the introduction of multi stream technology users now can choose the main stream for recording files and the sub stream for live view The multi stream technology was already supported by VioStor NVR before firmware ...

Страница 154: ...ase note that in the Multi Stream Profile the default value is System Configured Smart Recording Smart Recording is a powerful feature in the field of digital surveillance as high quality videos are recorded during an unexpected event and the low quality camera stream is used for regular recording This is extremely beneficial as more details about an event can be revealed from the high definition ...

Страница 155: ... The same stream from the camera is used for both regular recording and alarm recording To use this function please select one camera stream from the stream list Smart Recording mode Different camera streams are used for regular recording and alarm recording To use this function please select one camera stream for regular recording and another for alarm recording ...

Страница 156: ...mera Configure to add a camera which supports user defined multi stream 2 Click Next for recording settings 3 Select User defined from the Multi stream Profile dropdown list 4 Select Smart Recording from the Recording Mode dropdown list 5 Select camera streams for recording modes 6 Select one camera stream from the Regular Recording dropdown list 7 Select a different camera stream from the Alarm R...

Страница 157: ... for stream 1 users may only be left with M JPEG or VGA for stream 2 This is a camera limitation 3 Please refer to our camera compatibility list for supported camera models 4 Because more bandwidth is required for Smart Recording please estimate your bandwidth usage before using this feature Take Vivotek IP8132 for example this model offers three streams Stream 1 uses 663Kbps Stream 2 uses 1000K b...

Страница 158: ...gs page Before adding this camera to the NVR please ensure that the camera time is synchronized with that of the NVR The NVR will apply the settings in the edge profile to the AXIS camera automatically The codec setting of videos recovered from Edge Recording is fixed as H 264 ...

Страница 159: ...ecording videos If not please enable Continuous Recording and make sure that the SD card is not full or damaged After enabling Edge Recording please make sure that Recording Settings have been enabled on the camera page and select NVRedgeProfile as the stream profile ...

Страница 160: ...the recovery schedule and check the recovery status and the status of Edge Recording attempts Applied models AXIS P1343 P1344 P3343 P5534 M5013 Q1602 Limitations and Restrictions 1 The camera audio function is not supported by Edge Recording 2 The camera time must be synchronized with the NVR time for this feature to work 3 Please refer to the camera user manual to finish related settings on the c...

Страница 161: ...tion properly and is formatted to VFAT and not EXT4 6 The codec setting of videos recovered from Edge Recording is fixed as H 264 7 Edge Recording will only check and recover recording files in the scheduled period 8 Please refer to our camera compatibility list for your camera selection http www qnapsecurity com pro_compatibility_camera asp ...

Страница 162: ... D1 but is lower than HD Full HD here means the number of channels where the recording resolution exceeds HD Applied Channels Full HD HD D1 mean the number of channels where the recording resolution exceeds HD exceeds D1 but is lower than HD and will be lower than D1 respectively Full HD HD D1 Available channels Maximum channels mean the number of Full HD HD D1 channels you can add and the maximum...

Страница 163: ...ode the maximum number of recording channels will be 48 You can add up to 48 channels with max D1 resolution 24 channels with max HD resolution or 12 channels with Full HD resolution Or you can add 16 channels with max D1 resolution 8 channels with max HD resolution and 4 channels with Full HD resolution If you change to the flexible channel mode some advanced features will be disabled such as use...

Страница 164: ...ion Activate alarm recording only on selected schedule is enabled the alarm recording will be activated only when the alarm input is triggered or a moving object is detected within the schedule To apply the same settings to all the channels on the list click Apply to all cameras Note All the settings will be effective after clicking Apply When applying the changes the current recording process wil...

Страница 165: ...il account Secure connection Choose SSL or TLS to ensure a secure connection between the NVR and SMTP server or None based on your needs It is recommended to enable this function if the SMTP server supports it Email Notifications If you enable notifications for all error alerts you will by default receive notifications when cameras disconnect and recording failure events occur If you enable notifi...

Страница 166: ...MSC server settings to send SMS messages to the specified phone number s from the NVR The default SMS service provider is Clickatell You can add your own SMS service provider by selecting Add SMS Provider from the drop down menu When Add SMS service provider is selected enter the name of the SMS provider and the URL template text SMS Notification If you enable notifications for every error alert y...

Страница 167: ...numbers are allowed Advanced Settings To avoid excessive SMS messages due to similar surveillance events you can set a time period here After configuration you will not receive SMS messages for similar surveillance events in the defined period of time The settings here except the notifications for specific surveillance events and advanced settings will be synced with Control Panel System Settings ...

Страница 168: ...ied after the NVR restarts even if you have selected to exit the settings page The settings will be cancelled if Traditional Mode is selected after exiting the Advanced Mode To avoid blocking by the firewall the IP cameras or the video servers configured for the alarm recording must be located on the same subnet as the NVR To switch from the advanced mode to the traditional mode select Traditional...

Страница 169: ...fore specifying the action settings select the events to manage and configure the settings 1 Motion detection This option allows the NVR to trigger an action when a moving object is detected by the IP camera or the video server Select Camera event from the Event List Locate the channel and click Motion Detection Next click the edit button enable this option configure the settings and click Apply S...

Страница 170: ... settings After that define the action on the right discussed in the later sections 3 Alarm event The alarm input and the motion detection settings of some IP cameras or video servers may be combined together and called Alarm Event on the Event List Edit the event settings and define the action on the right discussed in the later sections 4 Connection failure This option allows the NVR to trigger ...

Страница 171: ...action on the right discussed in the later sections After configuring the action settings enter the CGI command including the self defined event name in the web browser to trigger the action anytime The format of the CGI command is http NVRIP cgi bin logical_input cgi name event name For example http 10 8 12 12 80 cgi bin logical_input cgi name door Event schedule settings When editing an event no...

Страница 172: ...al table Click Apply to save the settings To use the same schedule for all the events click Apply to All Events Select to use the default schedule or a formerly created schedule from the list The default alarm settings are active all day every day ...

Страница 173: ... Add an action After configuring an event on the left click Add to create an action in response to the event Click Apply to save the settings Delete Delete an action Select an event on the left All the actions defined for this event will be shown Select the box in front of the action name to delete and click Delete Multiple actions can be deleted Note Please ensure the action in the event settings...

Страница 174: ...oth settings i ii are enabled the NVR will execute the second setting ii only Click Select from the list to select an action setting which has been configured before 2 Camera control Configure the PTZ camera to adjust to the preset position for monitoring or act according to the HTTP URL entered when an event is triggered Select a preset position from the drop down menu or enter the HTTP URL Click...

Страница 175: ...t is an event with a start and end time and lasts for a set period of time It does not include the events related to status change such as a camera disconnection or NVR recording failure Click Select from the list to select an action setting which has been configured before 4 Email To receive an instant email alert when an event is triggered enter the SMTP settings Multiple email addresses can be ...

Страница 176: ...efore Note Always follow the standard of the SMS service provider to receive the SMS properly 6 Buzzer Enable the buzzer when an event is triggered The following options are also available A Enter the time in seconds the buzzer will sound when the event is triggered B Execute the buzzer when the event starts and stop the buzzer when the event ends The option ii is applicable to duration events onl...

Страница 177: ...nd the HTTP URL of other surveillance devices to manage the devices such as fire protection devices power controller and air conditioning control Click Select from the list to select an action setting which has been configured before 7 1 4View Management View Management allows users to customize view layouts and to assign cameras to specific windows Users can define view layouts to suit their need...

Страница 178: ... Normal Mode You can choose a customized view in the left view tree list in monitor mode Edit View 1 To add a camera to a view you can choose a view you want then drag a camera from the left list to the right channel screen 2 To remove a camera from a view you can double click on a camera snapshot or drag it to the left camera tree list You can also click Restore to remove all of the camera ...

Страница 179: ...179 Add customize layout You can add a customized layout as a new layout 1 To choose a type of layout for example you can choose 6x6 ...

Страница 180: ...180 2 To edit the Layout you can click a square and draw a larger square And you can double click the combined region to restore it Or you can click Restore to restore the original layout ...

Страница 181: ...181 3 To finish click Save and it will show on left tree list 4 To edit the layout choose the layout edit it in the right zone then click Save 5 To delete a layout choose the layout then click Delete ...

Страница 182: ...nter and 8 regional screens around it 1P6R Mode Provides an original screen in the center and 6 regional screens around it Dual Panorama Provides 2 panorama screens 1P3R Mode Provides 3 regional screens in the upper side and one panorama screen below 1P2R Mode Provides 2 regional screens in the upper side and one panorama screen below OPR Mode Provides one original screen one regional screen and o...

Страница 183: ... name cannot be duplicated You can find your customized view mode How to edit view mode 1 Choose display mode 2 Drag a camera from left camera tree to the right preview 3 To alter the size drag position in preview use the mouse wheel to zoom in out Then you can see the view Choose View Mode to monitor You can also choose the view mode in the left tree s view tab on the monitor ...

Страница 184: ...184 ...

Страница 185: ...185 ...

Страница 186: ... all recording files are kept day s Enter the number of calendar days that the NVR should keep the recording files Please make sure the storage capacity is enough to save the data for the number of calendar days specified When the recording data has reached the expiry date all of the expired video files will be deleted For example if the NVR is configured to delete the recording data after 7 calen...

Страница 187: ...R when the idling time has reached Note The timeout logoff does not apply to the monitoring playback advanced mode device configuration system update remote replication and logs statistics pages Network intrusion detection The system will alert users when possible attacks on the network are detected and give recommendations for actions to take Maximum number of concurrent logins http You can defin...

Страница 188: ...l and D1 channel is 4 2 and 1 Using the VS 2212 Pro as an example as long as the amount of recording resolution indexes does not exceed 48 12 4 you can add more than 12 cameras Note 1 If you change to the flexible channel mode some advanced features will be disabled such as user defined multi stream smart recording dual recording edge recording auto snapshot advanced event management auto cruising...

Страница 189: ...u can check the rights of camera management for all users You can also modify access right of monitoring playback PTZ control and audio for a general user If you want to add a user please go to Control Panel Privilege Settings Users ...

Страница 190: ...e IP cameras on the Internet The real time data transfer is monitored and controlled by RTP also RTCP The default setting is 6100 6299 If the IP cameras use different RTP ports enable Specify RTP port range and specify the port numbers Note Make sure the ports have been opened on the router or firewall to ensure normal monitoring and recording ...

Страница 191: ...veillance Logs This page shows the surveillance logs such as camera connection motion detection and camera authentication failure Please Note The logs are currently only available in English 7 3 1Surveillance Logs ...

Страница 192: ...ings and to receive push notifications After being added the information of the mobile device will be listed on the page including the model name device name version of Vmobile and user details on the NVR You can also disable the push service to specific mobile devices 7 5 Recovery Management This page is related to the edge recording feature You can edit the recovery schedule monitor the recovery...

Страница 193: ...Available when edge recording is in use You can monitor the recovery status in this tab 3 Edge Recording Status Status of edge recording You can check time synchronization between the NVR and cameras the status of cameras set up for edge recording and the details of recording files stored on camera s SD card ...

Страница 194: ...194 ...

Страница 195: ...ng on different models After purchasing a license you can add extra recording channels You can click Install License to begin installing the license to the NVR 7 6 1License Activation Online Activation Step1 If your VioStor NVR is connected to the Internet please select Online Activation ...

Страница 196: ...196 Step2 Enter the Product Authorization Key PAK code to activate the license ...

Страница 197: ...197 Step3 The License has been activated Please click FINISH button to close the window Step4 The additional camera license will be displayed in the license management list after the license activation ...

Страница 198: ...ivation Step1 If the VioStor NVR is behind a firewall or doesn t have an Internet connection please select Offline Activation Step2 Please copy the system UDI and go to the License Store for offline license activation ...

Страница 199: ...199 Step3 Please login to the License Store with your registered account Step4 At Offline Activation page please fill out the UDI and PAK fields and then click the Activate button ...

Страница 200: ...hed permission file after the offline activation is verified Step6 Please check the email and download the permission file The permission file can only be used on the VioStor NVR with the UDI you specified Please do not decompress the permission file ...

Страница 201: ...201 Step7 Please go back to the offline activation page on your VioStor NVR You will need import the permission file to activate the license Step8 The license has been activated ...

Страница 202: ... of deactivating a license If your VioStor NVR is connected to the Internet please select Online deactivation If not please select Offline deactivation Online Deactivation Step 1 After you press the License deactivate button you will be prompted to confirm that you want to deactivate the license ...

Страница 203: ...lease select Online Deactivation Step 3 The system will prompt you to confirm your choice to remove the license If you are sure about deactivating the license check Yes I want to remove the license from the system ...

Страница 204: ...ose the window Step 5 And now you will see that the status of the license has changed to Deactivated Note If you want to transfer the License to another VioStor NVR please download the deactivation ticket from the icon under the Action column Then contact QNAP support for help ...

Страница 205: ...205 Offline Deactivation Step 1 After you press the License deactivate button you will be prompted to confirm that you want to deactivate the license Step 2 Please select Offline Deactivation ...

Страница 206: ... download the deactivation ticket and visit the QNAP license store to complete the deactivation http license qnap com deactivate html Step 4 The system will prompt you to confirm your choice to remove the license If you are sure about deactivating the license check Yes I want to remove the license from the system ...

Страница 207: ... had been deactivated Please download the deactivated ticket from the column Action Step 6 Then please go to the QNAP license store import the deactivation ticket and then enter the code in the box Please click Apply after you finish all these steps ...

Страница 208: ...cense store will show License deactivated Note If you want to transfer the License to another VioStor NVR please download the deactivation ticket from the icon under the Action column Then contact QNAP support for help ...

Страница 209: ...List Only for Upgrade from Previous Version This page shows the information of the users before you upgraded to QVR 5 0 e g the user name IP address and login time Please Note The logs are currently only available in English ...

Страница 210: ...between the internal disk volumes on the NVR and external USB storage devices To use this feature follow the steps below 1 Connect one or more external storage devices to the USB interfaces of the NVR 2 Click Create a job 3 When the wizard is shown read the instructions carefully and click Next ...

Страница 211: ...tions A Select an external disk volume from the drop down menu The NVR supports EXT3 EXT4 FAT NTFS and HFS file systems The general information of the storage device will be shown B Click Next 5 Configure the replication schedule ...

Страница 212: ...when an hourly backup should be executed e g select 01 to execute the backup job every first minute of an hour 1 01 2 01 3 01 Daily Specify the time when a daily backup should be executed e g 02 02 every day Weekly Select a day of the week and the time when a weekly backup should be executed Periodically Enter the time interval in hour and minute that the backup job should be executed The minimum ...

Страница 213: ...213 A Configure backup channel If the backup channel settings are not changed the system will back up all recording channels by default You can click Backup channel to configure the backup channels ...

Страница 214: ... be backed up If 3 days are entered the recordings of today yesterday and the day before yesterday will be backed up Or set the time period for backup You can click Backup duration and files to configure the backup duration and files Enable Include auto snapshots to also copy the auto snapshot files when the recordings are configured to back up C Click Next 7 If you choose Schedule you can configu...

Страница 215: ...215 A Configure backup channel If the backup channel settings are not changed the system will back up all of the recording channels by default You can click Backup channel to configure backup channels ...

Страница 216: ...nd files to configure backup duration and files Enable Include auto snapshots to also copy the auto snapshot files when the recordings are configured to back up C Click Next 8 Advanced Settings include the ability to overwrite old recordings and to enable password protection 9 Enter a name for the backup job A job name supports up to 63 characters it cannot start or end with a space Click Next ...

Страница 217: ...217 10 Confirm the settings and click Next 11 Click Finish to exit the wizard ...

Страница 218: ... Backup button to back up recording files To use this function please follow the steps below 1 Connect a USB storage device for example a USB disk drive to the front USB port of the NVR 2 Enable the option Enable One Touch Video Backup 3 Configure backup channel If the backup channel settings are not changed the system will back up all recording channels by default You can click Backup channel to ...

Страница 219: ...ng files on the specified days by default A Set the number of days that the latest recordings should be backed up If 3 days are entered the recordings of today yesterday and the day before yesterday will be backed up B Or set the time period for backup C You can click Backup duration and files to configure backup duration and files ...

Страница 220: ...ck Apply 7 Press and hold the video backup button for 3 seconds and the NVR will immediately start copying the recording data to the USB device If the USB device is recognized the USB LED will glow blue The USB LED will flash blue when the data is being copied The LED will turn off after the data has been copied Then users can safely remove the device Note Only USB devices with at least 10GB stora...

Страница 221: ...rage device is enabled and the corresponding path and user access right has been correctly configured 1 Login to the QVR desktop and go to Backup Expansion Remote Replication 2 Enable remote replication supports multiple choices In the above example the NVR only copies the alarm recording data of the latest 3 days to the remote storage device Select Enable remote replication to activate this featu...

Страница 222: ...nly and enter the number of days the NVR will back up the latest recording data to the remote storage device automatically according to the settings If this option is unselected the NVR will copy all of the recording data to the remote storage device 3 Configure the remote storage server Enter the IP address path user name and password of the remote storage device Note It is recommended to execute...

Страница 223: ... Select Perform mirroring replication by deleting extra files on the remote replication the NVR will synchronize the recording data between itself and the remote storage device and delete any extra files on the remote storage device When the above options are all selected and remote replication is executed the NVR will do the following i The NVR checks if there are files on the remote storage devi...

Страница 224: ...nternal error occurred Check the hard drive status of the NVR and view the Event Logs Note The time required by the NVR to replicate the data to the remote storage device varies depending on the network environment If the remote replication takes too long some recording files may be overwritten by the NVR To avoid this it is recommended to refer to the status messages to analyze the time required ...

Страница 225: ...Reducing expense This is a cost effective choice for expanding storage capacity 3 Highly scalable for future storage expansion Limitations and Restrictions 1 Currently Storage Expansion is only supported by the VioStor Pro series and QNAP x86 based NAS models with firmware version v4 0 2 and above and they are required to be set on the same LAN 2 A gigabit switch is required for this application 3...

Страница 226: ...e StorageExpansion QPKG on the NAS Note Please visit our download center to download the QPKG Before installing the QPKG package please make sure the QPKG is correct read the instructions carefully and back up all the important data on the NAS 1 Download and unzip the StorageExpansion package To install the QPKG please click Browse to select the correct QPKG file and click INSTALL Disable disable ...

Страница 227: ...after storage expansion assignment is completed Step2 Please make sure that the StorageExpansion QPKG has been installed on the NAS and enable Storage Expansion 1 Go to Camera Setting Storage Expansion to configure relevant settings on the page ...

Страница 228: ...228 2 Click Overview then the Add button Please enter the IP port username password destination volume and cache count for the NAS ...

Страница 229: ...olume The volume assigned for storage expansion Backup buffer The time period for recording files to be moved to the NAS The range is from 2 48 hours 3 Config NAS Modify NAS settings on this page 4 Click Storage Expansion Assignment to choose a NAS as the storage unit for each channel ...

Страница 230: ...230 Review all of the configured settings and recording storage details under Overview The page will automatically refresh the status every fifteen minutes ...

Страница 231: ...nagement The default port is 80 If you are not sure about this setting use the default port number Enable Secure Connection SSL To allow the users to connect the NVR by HTTPS turn on secure connection SSL and enter the port number If the option Force secure connection SSL only is turned on the users can only connect to the web administration page by HTTPS connection Time Adjust the date time and t...

Страница 232: ...for example time nist gov time windows com Then enter the time interval for synchronization This option can be used only when the NVR is connected to the Internet Disable RTC synchronization Disable this option to enable RTC synchronization Note A real time clock RTC is a computer clock most often in the form of an integrated circuit that keeps track of the current time Set the server time the sam...

Страница 233: ... will create the following default share folders mp4 The shared folder for MP4 Recordings App record_export The shared folder for Recording Export Pro APP record_nvr The default shared folder for regular recording files record_nvr_alarm The default shared folder for alarm recording files snapshot The default shared folder for auto snapshot Note The default shared folders of the NVR are created on ...

Страница 234: ...standalone disk If a hard drive is damaged all the data will be lost JBOD Just a bunch of disks JBOD is a collection of hard drives that does not offer any RAID protection The data are written to the physical disks sequentially The total storage capacity is equal to the sum of the capacity of all member hard drives RAID 0 Striping Disk Volume RAID 0 striping disk combines 2 or more hard drives int...

Страница 235: ...he data are striped across all the hard drives in a RAID 5 array The parity information is distributed and stored across each hard drive If a member hard drive fails the array enters degraded mode After installing a new hard drive to replace the failed one the data can be rebuilt from other member drives that contain the parity information To create a RAID 5 disk volume a minimum of 3 hard drives ...

Страница 236: ... to N 2 size of smallest hard drive N is the number of hard drives in the array RAID 10 Disk Volume RAID 10 combines four or more disks in a way that protects data against loss of non adjacent disks It provides security by mirroring all data on a secondary set of disks while using striping across each set of disks to speed up data transfers RAID 10 requires an even number of hard drives minimum 4 ...

Страница 237: ...e RAID capacity expansion or add an even number of hard disk drives to the volume Expand Capacity Online RAID Capacity Expansion Scenario You bought three 250GB hard drives for initial setup of a NVR and configured RAID 5 disk configuration with the three hard drives A half year later the data size of the department has largely increased to 1 5TB In other words the storage capacity of the NVR is r...

Страница 238: ...eans you can replace the hard drive to a larger one or skip this step if the hard drives have been replaced already Caution When the hard drive synchronization is in process do NOT turn off the NVR or plug in or unplug the hard disk drives When the description displays Please remove this drive remove the hard drive from the NVR Wait for the NVR to beep twice after removing the hard drive ...

Страница 239: ...e insert the new drive plug in the new hard drive to the drive slot After plugging in the hard drive wait for the NVR to beep The system will start rebuilding After rebuilding has completed repeat the steps above to replace other hard drives ...

Страница 240: ...tarts to expand the capacity The process may take from hours to tens of hours to finish depending on the drive size Please wait patiently for the process to finish Do NOT turn off the power of the NVR After RAID capacity expansion has finished the new capacity is shown and the status is Ready You can start to use the NVR In the example you have 1 8TB logical volume ...

Страница 241: ...grade the RAID level of the NVR with online RAID level migration in the future The migration process can be done without turning off the NVR All the data will be retained You can do the following with online RAID level migration Migrate the system from single disk to RAID 1 RAID 5 RAID 6 or RAID 10 Migrate the system from RAID 1 to RAID 5 RAID 6 or RAID 10 Migrate the system from RAID 5 with 3 har...

Страница 242: ...e NVR will detect the new hard drives The status of the new hard drives is Unmounted Go to Storage Manager RAID Management click Migrate from the Action Select one or more available drives and the migration method The drive capacity after migration is shown Click Migrate ...

Страница 243: ...tes the new drive configuration RAID 5 is shown and the status is Ready You can start to use the new drive configuration The process may take from hours to tens of hours to finish depending on the hard drive size You can connect to the web page of the NVR to check the status later Use Online RAID Capacity Expansion and Online RAID Level Migration Add a hard drive Follow the steps below to add a ha...

Страница 244: ... a few hours to tens of hours to complete depending on the number and the size of the hard drive Please wait patiently for the process to finish Do NOT turn off the NVR during this process You can use a RAID configuration of larger capacity after the process Configure Spare Drive You can add a spare drive to or remove a spare drive from a RAID 5 6 or 10 configuration Follow the steps below to use ...

Страница 245: ...emoving or re adding a member hard drive of the RAID configuration If an array has a bitmap the member hard drive can be removed and re added and only blocks changes since the removal as recorded in the bitmap will be re synchronized To use this feature select a RAID volume and click Enable Bitmap Note Bitmap support is only available for RAID 1 5 6 and 10 Recover RAID Recovery RAID Recovery When ...

Страница 246: ...1 Yes 1 or 2 RAID 5 Yes 2 or more RAID 6 Yes 3 or more RAID 10 No Note After recovering a RAID 1 RAID 5 or RAID 6 disk volume from not active to degraded mode by the RAID recovery you can read or write the volume normally The volume status will be recovered to normal after synchronization If the disconnected drive member is damaged the RAID recovery function will not work Standard RAID 5 QNAP RAID...

Страница 247: ...d any of the remaining hard drives cannot be spun up identified accessed N Number of hard disk drives in the array Further information about RAID management of the NVR The NVR supports the following actions according to the number of hard disk drives and disk configurations supported Please refer to the following table for the details Original Disk Configuration No of Hard Disk Drives No of New Ha...

Страница 248: ...6 RAID 5 5 2 Add hard drive member RAID 5 7 RAID 5 5 3 Add hard drive member RAID 5 8 RAID 5 6 1 Add hard drive member RAID 5 7 RAID 5 6 2 Add hard drive member RAID 5 8 RAID 5 7 1 Add hard drive member RAID 5 8 RAID 6 4 1 Add hard drive member RAID 6 5 RAID 6 4 2 Add hard drive member RAID 6 6 RAID 6 4 3 Add hard drive member RAID 6 7 RAID 6 4 4 Add hard drive member RAID 6 8 RAID 6 5 1 Add hard ...

Страница 249: ...dd hard drive member RAID 10 8 RAID 10 6 2 Add hard drive member RAID 10 8 RAID 1 2 1 Online RAID capacity expansion RAID 1 2 RAID 5 3 1 Online RAID capacity expansion RAID 5 3 RAID 5 4 1 Online RAID capacity expansion RAID 5 4 RAID 5 5 1 Online RAID capacity expansion RAID 5 5 RAID 5 6 1 Online RAID capacity expansion RAID 5 6 RAID 5 7 1 Online RAID capacity expansion RAID 5 7 RAID 5 8 1 Online R...

Страница 250: ...D 10 6 1 Online RAID capacity expansion RAID 10 6 RAID 10 8 1 Online RAID capacity expansion RAID 10 8 Single 1 1 Online RAID level migration RAID 1 2 Single 1 2 Online RAID level migration RAID 5 3 Single 1 3 Online RAID level migration RAID 5 4 Single 1 4 Online RAID level migration RAID 5 5 Single 1 5 Online RAID level migration RAID 5 6 Single 1 6 Online RAID level migration RAID 5 7 Single 1 ...

Страница 251: ...nline RAID level migration RAID 10 6 Single 1 7 Online RAID level migration RAID 10 8 RAID 1 2 1 Online RAID level migration RAID 5 3 RAID 1 2 2 Online RAID level migration RAID 5 4 RAID 1 2 3 Online RAID level migration RAID 5 5 RAID 1 2 4 Online RAID level migration RAID 5 6 RAID 1 2 5 Online RAID level migration RAID 5 7 RAID 1 2 6 Online RAID level migration RAID 5 8 RAID 1 2 2 Online RAID lev...

Страница 252: ...RAID level migration RAID 10 4 RAID 1 2 4 Online RAID level migration RAID 10 6 RAID 1 2 6 Online RAID level migration RAID 10 8 RAID 5 3 1 Online RAID level migration RAID 6 4 RAID 5 3 2 Online RAID level migration RAID 6 5 RAID 5 3 3 Online RAID level migration RAID 6 6 RAID 5 3 4 Online RAID level migration RAID 6 7 RAID 5 3 5 Online RAID level migration RAID 6 8 ...

Страница 253: ...Hard disk information Display the hard drive details for example model serial number HDD capacity SMART information Display the hard drive S M A R T information Any items that the values are lower than the threshold are regarded as abnormal Test Perform quick or complete hard drive S M A R T test Settings Configure temperature alarm When the hard drive temperature is over the preset values the NVR...

Страница 254: ...the TCP IP settings The NVR will acquire two IP addresses which allow access from two different subnets This is known as multi IP settings When using the Finder to detect the NVR IP the IP of the Ethernet 1 will be shown in LAN 1 only and the IP of the Ethernet 2 will be shown in LAN 2 only To use the port trunking mode for dual LAN connection see section iv Network Parameters Under the Network Pa...

Страница 255: ... the Ethernet frames that are larger than 1500 bytes It is designed to enhance Ethernet networking throughput and reduce the CPU utilization of large file transfers by enabling more efficient larger payloads per packet Maximum Transmission Unit MTU refers to the size in bytes of the largest packet that a given layer of a communications protocol can transmit The NVR uses standard Ethernet frames 15...

Страница 256: ... network access errors The DHCP server option is available to Ethernet 1 only when both LAN ports of a dual LAN NVR are connected to the network and Ethernet 1 is assigned with a fixed IP Start IP End IP Lease Time Set the range of IP addresses allocated by the NVR to the DHCP clients and the lease time The lease time refers to the time that an IP address is leased to the clients During that time ...

Страница 257: ... IP address of the primary and the secondary DNS servers When the NVR plays the role as a terminal and needs to perform independent connection for example BT download enter at least one DNS server IP for proper URL connection Otherwise the function may not work properly If you select to obtain the IP address by DHCP there is no need to configure the primary and the secondary DNS servers In this ca...

Страница 258: ...e when the primary network interface also known as the master interface does not correspond correctly to maintain high availability To use port trunking on the NVR make sure at least two LAN ports of the NVR have been connected to the same switch and the settings described in sections i and ii have been configured Follow the steps below to configure port trunking on the NVR 1 Click Port Trunking 2...

Страница 259: ...259 3 Select a port trunking group to use Click Apply 4 Click here to connect to the login page ...

Страница 260: ...ts packets in sequential order from the first available slave through the last Balance rr provides load balancing and fault tolerance Supports static trunking Make sure static trunking is enabled on the switch Active Backup Active Backup uses only one Ethernet interface It switches to the second Ethernet interface if the first Ethernet interface does not work properly Only one interface in the bon...

Страница 261: ...ynamic Link Aggregation Dynamic Link Aggregation uses a complex algorithm to aggregate adapters by speed and duplex settings It utilizes all slaves in the active aggregator according to the 802 3ad specification Dynamic Link Aggregation mode provides load balancing and fault tolerance but requires a switch that supports IEEE 802 3ad with LACP mode properly configured Supports 802 3ad LACP Balance ...

Страница 262: ...and overwrites the source hardware address with the unique hardware address of one of the Ethernet interfaces in the bond such that different peers use different hardware address for the server This mode provides load balancing and fault tolerance General switches DDNS Service To allow remote access to the NVR using a domain name instead of a dynamic IP address enable the DDNS service The NVR supp...

Страница 263: ...unication between the web servers and the web browsers for secure data transfer You can upload a secure certificate issued by a trusted provider After uploading a secure certificate users can connect to the administration interface of the NVR by SSL connection and there will not be any alert or error message The NVR supports X 509 certificate and private key only Download Certificate To download t...

Страница 264: ...264 ...

Страница 265: ... data will be retained System Basic system reset 1 beep Advanced system reset 2 beeps All NVR models Press the reset button for 3 sec Press the reset button for 10 sec Basic system reset 3 sec After pressing the reset button for 3 seconds a beep sound will be heard The following settings will be reset to default System administration password admin TCP IP configuration Obtain IP address settings a...

Страница 266: ...the shared folders previously created will be cleared Enable light signal alert when the free size of SATA disk is less than the value The status LED flashes red and green when this option is turned on and the free space of the SATA hard drive is less than the value The valid range of the value is 1 51200 MB Enable warning alert for redundant power supply on the web based interface If two power su...

Страница 267: ... disabled by default Buzzer Enable alarm buzzer Turn on this option to allow the alarm buzzer to beep when certain system operations startup shutdown or firmware upgrade are executed or system events error or warning occur ...

Страница 268: ...en the system default settings are selected the fan rotation speed will be automatically adjusted when the NVR temperature CPU temperature and hard drive temperature meet the criteria It is recommended to enable this option Set fan rotation speed manually By manually setting the fan rotation speed the fan rotates at the defined speed continuously ...

Страница 269: ...269 9 1 6 Power Power Recovery Configure the NVR to resume to the previous power on or power off status turn on or remain off when the AC power resumes after a power outage ...

Страница 270: ...he alert recipient User name and Password Enter the login information of the email account Secure connection Choose SSL or TLS to ensure a secure connection between the NVR and SMTP server or None based on your needs It is recommended to enable this function if the SMTP server supports it Email Notification You can toggle email notifications for all error events or warning events A maximum of five...

Страница 271: ...ecting Add SMS Provider from the drop down menu When Add SMS service provider is selected enter the name of the SMS provider and the URL template text SMS Notification You can toggle SMS messages for all error events or warning events A maximum of two phone numbers are allowed The settings here will be synced with Surveillance Settings Camera Settings Event Management SMS settings when choosing Tr...

Страница 272: ...ce to allow the NVR to automatically check if a new firmware version is available for download from the Internet If a new firmware is found you will be notified after logging in the NVR as an administrator Click Check for Update to check if a firmware update is available Note that the NVR must be connected to the Internet for these features to work ...

Страница 273: ...nzip the IMG file to the computer 3 Before updating the system firmware back up all the disk data on the NVR to avoid any potential data loss during the system update 4 Click Browse to select the correct firmware image for the system update Click Update System to update the firmware The system update may take tens of seconds to several minutes to complete depending on the network connection status...

Страница 274: ...rator 3 Browse and select the firmware for the NVR Click Start to update the system Note The NVR servers of the same model on the same LAN can be updated by the Finder at the same time Administrator access is required for system update ...

Страница 275: ...back up all the settings including the user accounts server name network configuration and so on click Backup and select to open or save the setting file Restore System Settings To restore all the settings click Browse to select a previously saved setting file and click Restore ...

Страница 276: ... OK Caution When RESET is pressed on this page all the disk data user accounts shared folders and system settings will be cleared and restored to default Always back up all the important data and system settings before resetting the NVR To reset the NVR by the reset button see System Settings Hardware ...

Страница 277: ...device is successfully detected the details will be shown on this page Storage Information Select a storage device and click Storage Information to check for its details The number of USB interfaces supported varies by models Please refer to http www qnapsecurity com for details It may take tens of seconds for the NVR server to detect the external USB device successfully Please wait patiently ...

Страница 278: ...age device click Encryption Select the encryption method AES 128 192 or 256 bit and enter the password 8 16 characters Select Save encryption key to save the password in a hidden location on a hard drive of the NVR The NVR will unlock the encrypted external storage device automatically every time the device is connected Click Format to proceed Click OK and all the data will be cleared The device w...

Страница 279: ...ernal storage devices without the risk of losing any data when the device is removed First choose a device to eject click Eject and then to disconnect the disk partition or remove the device Encryption management If an external storage device is encrypted by the NVR the button Encryption Management will appear Click this button to manage the encryption password key or lock or unlock the device Loc...

Страница 280: ... scheduled backup job is running on the device To disable the backup job go to Control Panel External Device External Storage 1 To lock an encrypted external storage device click Encryption Management 2 Select Lock this device and click Next 3 Click Next to lock the device ...

Страница 281: ...281 Unlock the device 1 To unlock an encrypted external storage device click Encryption Management 2 Select Unlock this device Click Next ...

Страница 282: ... location on a hard drive of the NVR The NVR will unlock the encrypted external storage device automatically every time the device is connected Click Next Manage the encryption key 1 To change an encryption password or download an encryption key file click Encryption Management 2 Select Manage encryption key Click Next ...

Страница 283: ...283 3 Select to change the encryption password or download the encryption key file to the local PC Click Next ...

Страница 284: ...low 1 Plug in the USB cable on the UPS to the NVR 2 Select the option Enable UPS Support 3 Choose between whether the NVR will shut down or enter auto protection mode after AC power fails Specify the time in minutes that the NVR should wait before executing the option you have selected After the NVR enters auto protection mode the NVR resumes the previous operation status when the power restores 4...

Страница 285: ...ction mode the NVR resumes the previous operation status when the power restores 6 Click Apply All to confirm Network master mode A network UPS master is responsible for communicating with network UPS slaves on the same physical network about critical power status To set up your NVR with UPS as network master mode plug in the USB cable on the UPS to the NVR and follow the steps below 1 Make sure t...

Страница 286: ...e event of power failure 6 Click Apply All to confirm and continue the setup for the NVR systems which operate in network slave mode below Network slave mode A network UPS slave communicates with network UPS master to receive the UPS status To set up your NVR with UPS as network slave mode follow the steps below 1 Make sure the NVR is connected to the same physical network as the network UPS maste...

Страница 287: ...he IP address of the NVR in the configuration page of the UPS device Behavior of the UPS feature of the NVR In case of power loss and power recovery the events will be logged in the System Event Logs During a power loss the NVR will wait for the specified time you enter in the UPS Settings before powering off or entering auto protection mode If the power restores before the end of the waiting time...

Страница 288: ...de The NVR will be shut down properly The NVR will remain off after the power recovery Manual power on of the NVR is required If the power restores after the NVR has been shut down and before the UPS device is powered off you may power on the NVR by Wake on LAN if your NVR and UPS device both support Wake on LAN and Wake on LAN is enabled on the NVR If the power restores after both the NVR and the...

Страница 289: ...system up time on this page Network Status View the current network settings and statistics on this page and they are displayed based on network interfaces Click the up arrow at top right to collapse the interface page and down arrow to expand the page Hardware Information View basic hardware information of the NVR on this page ...

Страница 290: ... can view the CPU usage disk usage and bandwidth transfer statistics of the NVR on this page CPU Usage This tab shows the CPU usage of the NVR Memory Usage This tab shows the memory usage of the NVR by real time dynamic graph ...

Страница 291: ...291 Disk Usage This tab shows the disk space usage of each disk volume and its shared folders Bandwidth Usage This tab provides information about bandwidth transfer of each available LAN port of the NVR ...

Страница 292: ...292 Process This tab shows information about the processes running on the NVR ...

Страница 293: ...oubleshooting System Connection Logs The NVR supports recording HTTP FTP Telnet SSH AFP SAMBA and iSCSI connections Click Options to select the connection type to be logged The file transfer performance can be slightly affected when this feature is turned on Tip Right click a log and select to delete the record or block the IP and select how long the IP should be blocked To clear all the logs clic...

Страница 294: ...he number of logs reaches the upper limit The file level access logs are available on this page The NVR will record the logs when users access create delete move or rename any files or folders via the connection type specified in Options Online Users The information of the on line users connecting to the NVR by networking services is shown on this page ...

Страница 295: ...og search is provided to search for system event logs system connection logs and online users based on user preferences First specify the log type users computer name date range and source IP and click Search to search for the desired logs or reset to list all logs Please note that for online users only the source IP and Computer name can be specified ...

Страница 296: ...rd admin This account has the right of system administration and cannot be deleted sysmgr can create and delete other system manager and general user accounts and assign monitoring playback and administration rights to them Other newly created system managers will also have the administration right but some rights are different from sysmgr 3 user The general users have only the rights of monitorin...

Страница 297: ...297 Create a User To create a user on the NVR click Create Follow the instructions of the wizard to complete the details ...

Страница 298: ...twork Services 9 3 1 Win Microsoft Networking To allow access to the NVR on Microsoft Windows Network enable file service for Microsoft networking Specify also how the users will be authenticated Advanced Options ...

Страница 299: ...aiting time for connecting to the Network Neighborhood My Network Places too long it may be caused by failure of an existing master browser or a missing master browser on the network If there is no master browser on your network select the option Domain Master to configure the NVR as the master browser Do not turn on this option if you are not sure about the settings Allow only NTLMv2 authenticati...

Страница 300: ...ion the users can use the same login name format domain username to connect to the NVR via AFP FTP and File Station Automatically register in DNS When this option is turned on and the NVR is joined to an Active Directory the NVR will register itself automatically in the domain DNS server This will create a DNS host entry for the NVR in the DNS server If the NVR IP is changed the NVR will automatic...

Страница 301: ...setting is No If your FTP client does not support Unicode you are recommended to turn off this option and select the language you specify in General Settings Codepage so that the file and folder names can be correctly shown If your FTP client supports Unicode enable Unicode support for both your client and the NVR Anonymous Login You can turn on this option to allow anonymous access to the NVR by ...

Страница 302: ...pond with external IP address for passive FTP connection request When passive FTP connection is in use the FTP server NVR is behind a router and a remote computer cannot connect to the FTP server over the WAN enable this function When this option is turned on the NVR replies the IP address you specify or automatically detects the external IP address so that the remote computer is able to connect t...

Страница 303: ...e automatic port forwarding on the UPnP router and publish NVR services for remote access over the Internet To use the myQNAPcloud service make sure the NVR has been connected to an UPnP router and the Internet and click the myQNAPcloud shortcut from the NVR Desktop or Main Menu 10 1 1 Remote Access Services myQNAPcloud wizard The first time you use the myQNAPcloud service you are recommended to u...

Страница 304: ...304 2 Click Start 3 Please use your myQNAPcloud ID QID and password to login Click Create myQNAPcloud account if you don t have myQNAPcloud account ...

Страница 305: ...305 4 Enter a name to register your NVR and click Next ...

Страница 306: ...306 5 The wizard will configure your router automatically ...

Страница 307: ...307 6 Review the summary page and click Finish to complete the wizard ...

Страница 308: ...308 Manage and configure your myQNAPcloud account Click Manage myQNAPcloud Account on top of the page after launching myQNAPcloud or log into your account at http www myqnapcloud com ...

Страница 309: ...Sign in you can enter your device name in Enter device name to search your devices Or you can select My Devices from the drop down menu in left side to review all your device published services and details including the name DDNS address LAN and WAN IP ...

Страница 310: ...310 Or select button My Account in top left corner to check your profile change your password and monitor your account activity ...

Страница 311: ...311 ...

Страница 312: ...s via the myQNAPcloud website To access the NVR services via the myQNAPcloud website specify the NVR you registered with in the search box and click search button in the right The published public NVR services will be listed ...

Страница 313: ...s Note For configuration on private NVR services please refer to the DDNS Cloud Portal section later in this chapter Auto Router Configuration In Remote Access Services Auto Router Configuration you can enable or disable UPnP port forwarding When this option is enabled your NVR is accessible from the Internet via the UPnP router ...

Страница 314: ... be detected Click Rescan to detect the router if no UPnP router is found on the local network and Diagnostics to check the diagnostic logs If the UPnP router is incompatible with the NVR click and then click UPnP Router Compatibility Feedback http www qnap com go compatibility_router html to contact the technical support ...

Страница 315: ... to one UPnP router please specify a different port for each NVR If the router does not support UPnP users are required to configure port forwarding manually on the router Please refer to the links below Application note http www qnap com go notes html FAQ http www qnap com faq UPnP router compatibility list http www qnap com UPnP_Router_Compatibility_List My DDNS With the Cloud Portal web based N...

Страница 316: ...ame can only be used with one NVR A registered myQNAPcloud name will expire in 120 days if your NVR remains offline within the period Once the name is expired it will be released for new registration by other users Cloud Portal In Remote Access Services My DDNS Cloud Portal Cloud Portal the web based NVR services are shown Select Publish to publish the NVR services to myQNAPcloud website Select Pr...

Страница 317: ...NAPcloud website Note If a disabled NVR service is published the service will not be accessible even the corresponding icon is shown on myQNAPcloud website http www myQNAPcloud com Click Add Users and specify maximum 9 local NVR users who are allowed to view the private NVR services published on the myQNAPcloud website Select the users and connection method myQNAPcloud website Click Apply ...

Страница 318: ...318 Then click Apply to save the settings To send the instructions of the myQNAPcloud service to users via email select the user s and click the Send Invitation button ...

Страница 319: ...319 Note To use this function the mail server settings must be properly configured in Control Panel System Settings Notification SMTP Server Enter the email address Click Send ...

Страница 320: ...ckup Create your own Amazon S3 account To use the Amazon S3 feature on VioStor NVR follow the steps below Step 1 Sign up Login Amazon Web Services Account You need to sign up for Amazon S3 account http aws amazon com s3 For the price information please refer to the Amazon web services website Step 2 Get Your Access Key ID and Secret Access Key Once you have successfully signed up an account you wi...

Страница 321: ...You can back up the NVR data to or retrieve the data from the Amazon S3 Amazon s services will generally accept requests that are received within 15 minutes after you login Amazon S3 Before getting started make sure your system clock is set correctly according to your time zone It is suggested to configure your NVR to automatically synchronize with the system clock using the Network Time Protocol ...

Страница 322: ...vate key and remote path A bucket is the root directory on Amazon S3 You can do remote host testing by clicking TEST Other settings are optional Note To use this function you must create at least one Bucket on Amazon S3 Please go to Amazon S3 on website and select Create Bucket to create one Bucket on your Amazon S3 account ...

Страница 323: ...323 Step4 Specify the local path as Network Share Directory Select the network share from dropdown menu and input the directory ...

Страница 324: ...324 Step5 Specify your replication schedule ...

Страница 325: ...325 Step6 Click Finish to complete the setup ...

Страница 326: ...326 Upon successful job creation you will see the status of the replication job s You can edit or delete them if necessary ...

Страница 327: ...opy Paste files and folders 5 Upload Select the folder to upload the file to 6 Share Share a file or folder with other users using various methods 7 More Action Add the shared folders to bookmark 8 Refresh Refresh this page 9 Settings Show files and folders of my PC Show hidden files Before getting started Enable the service in Control Panel Applications Station Manager Click the link on the page ...

Страница 328: ...R Uploading files To use this feature install Adobe Flash plug in for your web browser 1 Select a folder and click 2 Click Browse to select the file s 3 Select to skip or overwrite the existing file s in the folder 4 Click to upload a file or Upload All to upload all the selected files ...

Страница 329: ...e or folder to download 2 Right click the mouse and select Download to download the file Please note that if all files within a folder are selected they will be compressed and downloaded as a zip file Creating folders 1 Select a shared folder or folder in which you want to create a new folder 2 Click 3 Enter the name of the new folder and click OK ...

Страница 330: ...iles or folders to copy 2 Click 3 Click the destination folder 4 Click and confirm to copy the files or folders Moving files or folders 1 Select the files or folders to move 2 Right click the mouse and select Move 3 Select the destination folder Click OK Deleting files or folders 1 Select a file or folder to delete 2 Right click the mouse and select Delete 3 Confirm to delete the file or folder Fi...

Страница 331: ...331 The File Station supports smart search of files sub folders and folders on the NVR You can search a file or folder by all or part of the file or folder name or by the file extension ...

Страница 332: ...he App Center to expand the services and add new features on the NVR Starting App Center The App Center can be launched from the App Center shortcut on the Main Menu or the QVR Desktop Familiarizing yourself with App Center Menu Bar No Name Description 1 Search Bar Search apps that are available to install on the NVR 2 Update all Update all apps that are currently installed on the NVR ...

Страница 333: ...stalled app will then show up in My Apps Note Make sure the NVR is connected to the Internet QNAP is not responsible for troubleshooting any issues caused by the open source software add ons When installing an add on which requires a prerequisite app the prerequisite add on will be added to the installation queue automatically prior to the dependent add on If the app update process is canceled bef...

Страница 334: ...VR is offline or beta apps that are not officially available on the QNAP App server users can download the app application qpkg from the QNAP security website http www qnapsecurity com or forum http forum qnapsecurity com index php unzip the files and click Install Manually on the menu bar to install the apps manually ...

Страница 335: ...d CMS server function to a NVR all you have to do is install the QSCM Lite App QSCM Lite can manage NVRs that are in the same private LAN with QSCM Lite 11 2 Install QSCM Lite to NVR Server 11 2 1 App Center To install QSCM Lite please download it from the QVR 5 0 App Center For more information about the App Center please refer to Section 10 3 App Center 11 2 2 How to Install QSCM Lite to NVR Ser...

Страница 336: ...336 Step 2 Go to All Apps Step 3 Click Add QSCM Lite to QVR ...

Страница 337: ...337 Step 4 Start downloading QSCM Lite Step 5 After QSCM Lite has been downloaded the system will automatically install QSCM Lite ...

Страница 338: ...338 Step 6 When the option to Open appears QSCM Lite has been successfully installed Step 7 QSCM Lite will now be listed in My Apps with the default Open status QVR 5 0 is now a CMS server ...

Страница 339: ...ded Offline installation If the NVR is not connected to the Internet an offline installation is available Step 1 Download QSCM Lite from the QNAP Security website http www qnapsecurity com download asp Step 2 Unzip the files Step 3 Return to the NVR and enter the App Center ...

Страница 340: ...340 Step 4 Click Install Manually Step 5 Find the unzipped QSCM Lite and click Install ...

Страница 341: ...341 Step 6 Click OK Step 7 The NVR will then install QSCM Lite ...

Страница 342: ...342 Step 8 Click OK Step 9 QSCM Lite will now be listed in My Apps with the default Open status QVR 5 0 is now a CMS server If needed QSCM Lite can be turned off to disable the CMS server function ...

Страница 343: ...rver s hardware resources will be shared by the NVR server service the CMS server service If the CPU usage rate is more than 80 or when the throughput is busy the performance of both the NVR server and CMS server will be impacted It is strongly recommended to enable just one QVR 5 0 as QSCM Lite to centrally manage the NVRs in a LAN Otherwise the QSCM Lite event management including the live view ...

Страница 344: ...344 Step 2 Go to the App Center on the QVR 5 0 desktop Or the Main Menu of QVR 5 0 Step 3 Click on the QSCM Lite icon to go to the QSCM Lite login page ...

Страница 345: ...the QSCM Lite login page and you can log in by using the default username password admin admin Step 5 The first page you will see after logging into QSCM Lite is the live view page Before you have configured QSCM Lite no camera feedback will be displayed ...

Страница 346: ...anual Note VioStor CMS is a high performance turnkey CMS solution The CMS Server supports up to a maximum of 128 multi server monitoring and management Users can monitor up to a maximum of 1 024 IP cameras with up to 64 channels per screen Concurrent independent playback and display controls in four screens are also supported The CMS Server has the highest compatibility with ...

Страница 347: ...ill double For client PC requirements please refer the Section 2 1 Personal Computer Requirements of this user manual 11 3 3 QSCM Lite Client Specification The QSCM Lite client specification is mostly synchronized with the VioStor CMS client specification The specification difference between the QSCM Lite client VioStor CMS client is subject to change without prior notification 11 4 Comparison bet...

Страница 348: ...eature Multi Server Enhancement Centralized Monitoring and Management The QSCM Lite client specification is mostly synchronized with the VioStor CMS client specification The specification difference between the QSCM Lite client VioStor CMS client is subject to change without prior notification ...

Страница 349: ...t troubleshooting Qstart provides users with a refreshing experience when installing and remotely maintaining NVRs 12 2 Before Using Qstart 1 All devices including IP cameras Client PCs a QNAP VioStor should be connected to the same PoE switch VioStor now only supports the scenario of one PoE switch please avoid cascade PoE cases 2 Do not set your device to a static IP including the client PC and ...

Страница 350: ...asked to enable the NVR s DHCP server to start initialization Users can enable the DHCP server by selecting Yes 4 TThe Quick Setup page includes basic information for both the NVR and devices connected to the switch including the time zone name IP Disk configuration and more Confirm that this information is correct and proceed to complete the initialization ...

Страница 351: ...351 ...

Страница 352: ...Intuitive channel mapping The video shown on channel 1 represents the recording view of port 1 to the switch Please note Users cannot modify network settings DHCP Static in Qstart mode The channel number is based on the port number of the switch For example if a VS 2112 Pro connects to a 24 port switch the table will show channel 1 to channel 24 regardless of the NVR s supported channels Default s...

Страница 353: ...rom the port will clear the camera settings 3 Any port changes will be saved in the system logs If you want to check Qstart mode please go to Surveillance Settings Advanced Settings Qstart Settings Also be sure to use supported switches to enable Qstart mode The brand and model name will be shown and users can test the connection Qstart mode is enabled by default if users select Qstart during init...

Страница 354: ...the VioStor desktop Qstart is enabled Qstart is disabled Users can decide whether to show the icon or not Qstart Notifications allow users to check Qstart on off logs at the same time Please note If you enable Qstart mode again all of your camera settings will be erased ...

Страница 355: ...once users finish initializing Qstart 12 5 Network Switch Control Embedded 12 5 1 Topology 1 Show the switch s complete connection relationship 2 The diagram will display supported switches cameras VioStor NVR and other devices including PCs laptops unsupported switches and other unknown devices ...

Страница 356: ...tch Control Chart This switch control chart includes information as follows 1 Complete switch information table Firmware version IP address MAC total power and remaining power 2 Complete port information Camera name Device IP MAC TX RX power consumption PoE ability Network ability Corresponding switch status types 6 status types combinations of Network PoE and link status N Network P PoE L Link On...

Страница 357: ...n On On 12 5 3 Event Notifications 13 Enter the log list by selecting Event Notifications in Switch Control This table shows behaviors relevant to the switch only Users can keep track of the situation between the switch and the devices linked to it ...

Страница 358: ... 2108 Pro 2104 Pro Switch ZyXEL GS2210 24HP GS2210 8HP EtherWAN EX76402 EX22402 eten PSG 6010VM PSG 6018VM PSG 7026VM IP Camera AXIS ACTi SONY Panasonic VIVOTEK Please note The performance of Qstart will vary across different switch brands If you have any questions please contact our technical support for more information ...

Страница 359: ... 1 6 9 2 5 4 1 0 0 1 0 0 For the first time installation the LCD panel shows the number of the hard disk drives detected and the IP address Configure the hard drives accordingly Number of hard drives detected Default disk configuration Available disk configuration options 1 Single Single 2 RAID 1 Single JBOD RAID 0 RAID 1 3 RAID 5 Single JBOD RAID 0 RAID 5 4 or above RAID 5 Single JBOD RAID 0 RAID...

Страница 360: ...ions e g RAID 6 Press the Enter button and the following message shows Press the Select button to select Yes to confirm C h o o s e R A I D 5 Y e s N o When the configuration has finished the server name and the IP address will be shown If the NVR fails to create the disk volume the following message will be shown C r e a t i n g R A I D 5 F a i l e d ...

Страница 361: ...e 4 System 5 Shut down 6 Reboot 7 Password 8 Back 1 TCP IP In TCP IP the following options are available 1 1 LAN IP Address 1 2 LAN Subnet Mask 1 3 LAN Gateway 1 4 LAN PRI DNS 1 5 LAN SEC DNS 1 6 Enter Network Settings 1 6 1 Network Settings DHCP 1 6 2 Network Settings Static IP 1 6 3 Network Settings BACK 1 7 Back to Main Menu In Network Settings Static IP configure the IP address subnet mask gat...

Страница 362: ...AID configuration and storage capacity the second line shows the member drive number of the configuration R A I D 5 7 5 0 G B D r i v e 1 2 3 4 If there is more than one volume press the Select button to view the information The following table shows the description of the LCD messages for the RAID 5 configuration LCD Display Drive configuration RAID5 S RAID5 spare RAID5 D RAID 5 degraded mode RAI...

Страница 363: ...option to restart the NVR Press the Select button to select Yes Then press the Enter button to confirm 7 Password The default password of the LCD panel is blank Enter this option to change the password of the LCD panel Select Yes to continue C h a n g e P a s s w o r d Y e s N o Enter a password of maximum 8 numeric characters 0 9 When the cursor moves to OK press the Enter button Verify the passw...

Страница 364: ...stem fan fails Sys Overheat The system overheats HDD Overheat The hard drive overheats CPU Overheat The CPU overheats Network Lost Both LAN 1 and LAN 2 are disconnected in failover or load balancing mode LAN1 Lost LAN 1 is disconnected LAN2 Lost LAN 2 is disconnected HDD Failure The hard drive fails Vol1 Full The volume is full HDD Ejected The hard drive is ejected Vol1 Degraded The volume is in d...

Страница 365: ...When the PC and the IP camera are on the same subnet while the NVR is on another subnet the monitoring screen cannot be viewed from the PC Solve the problems by the following methods Method 1 Enter the IP address of the IP camera as the WAN IP on the NVR Method 2 Configure the router to allow internal access to the public IP address and the mapped ports of the IP cameras 3 The recording is not wor...

Страница 366: ...ltiple NVR servers for recording at the same time 6 The alarm recording does not function a Please login the NVR and go to Camera Settings Alarm Settings Make sure the alarm recording is enabled for the IP camera b If the NVR is installed behind a router while the IP camera is not the alarm recording will not work c When the alarm recording is enabled make sure the number of days that the alarm re...

Страница 367: ...tion page click Apply to apply the changes 11 The monitoring page cannot be fully displayed in Internet Explorer When using the zooming function of Internet Explorer the page may not be displayed properly Please click F5 to refresh the page 12 I cannot use the SMB FTP and Web File Manager services of the NVR a Login the NVR as an administrator Go to Network Settings File Services and check if thes...

Страница 368: ... IP camera and the monitoring PC are all on the same network IP address NVR 192 168 1 1 PC 192 168 1 100 Camera 1 192 168 1 101 Camera 2 192 168 1 102 Camera 3 192 168 1 103 In the example add the IP cameras to the NVR by entering the IP addresses of the IP cameras ...

Страница 369: ...lled behind the router while the monitoring PC is located remotely IP address Mapped port on the router NVR 192 168 1 1 8000 Camera 1 192 168 1 101 8001 Camera 2 192 168 1 102 8002 Camera 3 192 168 1 103 8003 Router public IP 219 87 144 205 PC 10 8 10 100 ...

Страница 370: ...ess settings Note When configuring the IP camera the WAN IP and LAN IP must be entered To open FTP port 21 and SMB port 445 of the NVR on WAN configure the following port mapping settings From Forward to 219 87 144 205 21 192 168 1 1 21 219 87 144 205 139 192 168 1 1 139 219 87 144 205 445 192 168 1 1 445 After finishing the above two steps connect to the NVR on WAN by entering the IP address http...

Страница 371: ... 87 144 205 Camera 1 61 62 100 101 Camera 2 61 62 100 102 Camera 3 61 62 100 103 In this example add the IP camera to the NVR by adding its IP address to the IP Address settings Note If a particular port is assigned to connect to the IP camera specify the port in the system configuration ...

Страница 372: ... 2003 192 168 1 103 21 Connect to NVR 1 by ftp 219 87 145 205 2001 Connect to NVR 2 by ftp 219 87 145 205 2002 Connect to NVR 3 by ftp 219 87 145 205 2003 Step 2 Enable FTP port mapping on the NVR To connect to each NVR via FTP by clicking FTP on the playback page of each NVR enable FTP port mapping in Network Settings File Services on the system administration page and set the mapped port number ...

Страница 373: ...t http www qnapsecurity com onlinesupport asp Facebook https www facebook com nvr qnap Forum http forum qnapsecurity com Technical Support in the USA and Canada Email q_supportus qnap com TEL 1 909 595 2782 Address 168 University Parkway Pomona CA 91768 Service Hours 08 00 17 00 GMT 08 00 Pacific Time Monday to Friday ...

Страница 374: ...eased this way by its authors You can apply it to your programs too When we speak of free software we are referring to freedom not price Our General Public Licenses are designed to make sure that you have the freedom to distribute copies of free software and charge for them if you wish that you receive source code or can get it if you want it that you can change the software or use pieces of it in...

Страница 375: ...table Therefore we have designed this version of the GPL to prohibit the practice for those products If such problems arise substantially in other domains we stand ready to extend this provision to those domains in future versions of the GPL as needed to protect the freedom of users Finally every program is threatened constantly by software patents States should not allow patents to restrict devel...

Страница 376: ... computer network with no transfer of a copy is not conveying An interactive user interface displays Appropriate Legal Notices to the extent that it includes a convenient and prominently visible feature that 1 displays an appropriate copyright notice and 2 tells the user that there is no warranty for the work except to the extent that warranties are provided that licensees may convey the work unde...

Страница 377: ...ource code for shared libraries and dynamically linked subprograms that the work is specifically designed to require such as by intimate data communication or control flow between those subprograms and other parts of the work The Corresponding Source need not include anything that users can regenerate automatically from other parts of the Corresponding Source The Corresponding Source for a work in...

Страница 378: ...ect to the covered work and you disclaim any intention to limit operation or modification of the work as a means of enforcing against the work s users your or third parties legal rights to forbid circumvention of technological measures 4 Conveying Verbatim Copies You may convey verbatim copies of the Program s source code as you receive it in any medium provided that you conspicuously and appropri...

Страница 379: ...d its resulting copyright are not used to limit the access or legal rights of the compilation s users beyond what the individual works permit Inclusion of a covered work in an aggregate does not cause this License to apply to the other parts of the aggregate 6 Conveying Non Source Forms You may convey a covered work in object code form under the terms of sections 4 and 5 provided that you also con...

Страница 380: ...nder subsection 6d A separable portion of the object code whose source code is excluded from the Corresponding Source as a System Library need not be included in conveying the object code work A User Product is either 1 a consumer product which means any tangible personal property which is normally used for personal family or household purposes or 2 anything designed or sold for incorporation into...

Страница 381: ...orresponding Source conveyed and Installation Information provided in accord with this section must be in a format that is publicly documented and with an implementation available to the public in source code form and must require no special password or key for unpacking reading or copying 7 Additional Terms Additional permissions are terms that supplement the terms of this License by making excep...

Страница 382: ...hese contractual assumptions directly impose on those licensors and authors All other non permissive additional terms are considered further restrictions within the meaning of section 10 If the Program as you received it or any part of it contains a notice stating that it is governed by this License along with a term that is a further restriction you may remove that term If a license document cont...

Страница 383: ...ated and not permanently reinstated you do not qualify to receive new licenses for the same material under section 10 9 Acceptance Not Required for Having Copies You are not required to accept this License in order to receive or run a copy of the Program Ancillary propagation of a covered work occurring solely as a consequence of using peer to peer transmission to receive a copy likewise does not ...

Страница 384: ...n A contributor s essential patent claims are all patent claims owned or controlled by the contributor whether already acquired or hereafter acquired that would be infringed by some manner permitted by this License of making using or selling its contributor version but do not include claims that would be infringed only as a consequence of further modification of the contributor version For purpose...

Страница 385: ...all recipients of the covered work and works based on it A patent license is discriminatory if it does not include within the scope of its coverage prohibits the exercise of or is conditioned on the non exercise of one or more of the rights that are specifically granted under this License You may not convey a covered work if you are a party to an arrangement with a third party that is in the busin...

Страница 386: ...vised and or new versions of the GNU General Public License from time to time Such new versions will be similar in spirit to the present version but may differ in detail to address new problems or concerns Each version is given a distinguishing version number If the Program specifies that a certain numbered version of the GNU General Public License or any later version applies to it you have the o...

Страница 387: ... INCLUDING ANY GENERAL SPECIAL INCIDENTAL OR CONSEQUENTIAL DAMAGES ARISING OUT OF THE USE OR INABILITY TO USE THE PROGRAM INCLUDING BUT NOT LIMITED TO LOSS OF DATA OR DATA BEING RENDERED INACCURATE OR LOSSES SUSTAINED BY YOU OR THIRD PARTIES OR A FAILURE OF THE PROGRAM TO OPERATE WITH ANY OTHER PROGRAMS EVEN IF SUCH HOLDER OR OTHER PARTY HAS BEEN ADVISED OF THE POSSIBILITY OF SUCH DAMAGES 17 Inter...

Отзывы: