106
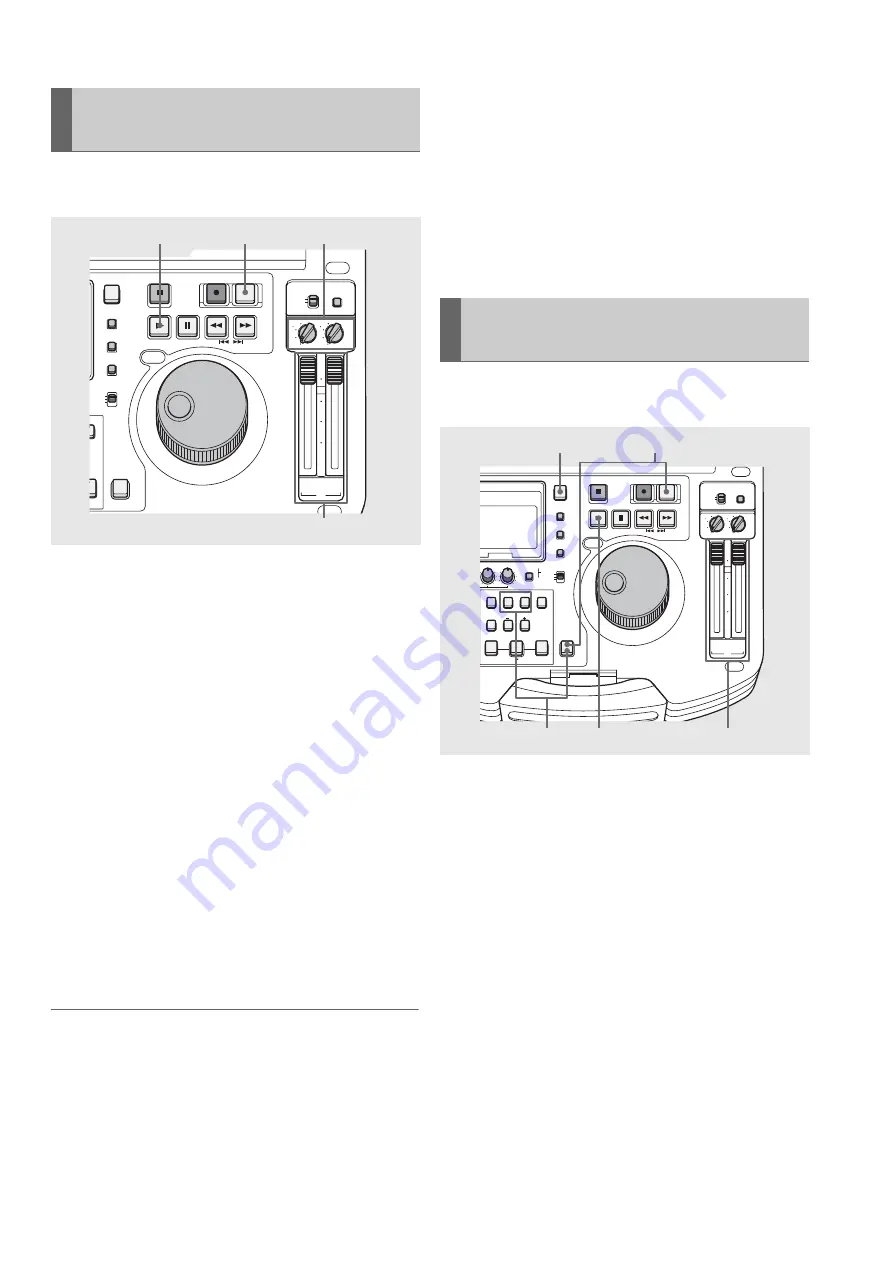
Editing: Setting Audio Level
When registering a new event in a playlist, change the audio
level during the registration of the event.
1
Assign IN and OUT points to enable event
registration.
2
Use the UNITY/VAR channel selection switch to
select tracks for level setting.
3
Press the PREVIEW button to register the event.
During preview, the audio is output according to the set
level.
4
Use the UNITY/VAR channel selection switch of the
audio fader and fader control during preview
playback to change the level.
After ending or interrupting a preview, the audio level set
so far is reflected and an icon indicating that a level setting
has been made appears on the event on the timeline.
5
Check audio level by performing a review or playlist
playback.
◆
NOTE:
• If the level setting value for all sections in an event is UNITY, the icon
indicating that an event level setting has been made does not
appear.
• If a level setting for an entire playlist has been made for an extended
period of time, a level setting cannot be added and an error is
displayed.
• A level setting for the preroll and postroll playback section cannot
be changed.
• This method for setting the audio level is not available when the
player is a hard disk or an external device.
When an event has been captured to a P2 card, set the audio level.
• Repeating previewing clears the level setting for the preview section
where track selection is available at the start of each preview.
• When a preview is interrupted during the preroll section, the level
setting is not made and the previous level setting is not cleared.
• Pressing the STOP button to interrupt preview makes settings valid
until stopping. Audio level after the interruption point in the event is
set to the same level as the interruption point.
Use the following steps to change the audio level for specific
sections in a playlist.
1
Press the PLAYER button to switch to recorder
operations.
2
Set the IN point at the location where you want to
start setting the audio level of the recorder and set
the OUT point where you want it to end.
➝
Refer to “Setting IN and OUT points” (page 91).
3
Select the track where the audio level will be set.
Select using the A1/A2/A3 (SHIFT + A1)/A4 (SHIFT + A2)
buttons.
4
Press the A LEVEL REC (SHIFT + PREVIEW) button
to start audio level recording/playback.
Playback starts at the beginning of the preroll time section
before the set IN point and stops 1 second later. During
playback of audio level recording, the recorder screen
displays "A LEVEL REC".
Changing Audio Level in an Event
during Event Registration
CLIP
F3
SHIFT
PF4
TO
UT
UB
DE
TCG
TC PRESET
PROP
RESET
COUNTER
PLAYER
STOP
STILL/
PAUSE
PREVIEW
A.LEVEL REC
REW
REC
FF
PREV
NEXT
PLAY
REVIEW
1 CLIP PLAY
SOURCE SELECT
NEW
T
REGEN
RESET
EXT
MODE
CONTROL
REMOTE
LOCAL
UNITY
4
2
2 4
UNITY
3
1
1 3
PB
∞
CH
30
10
0
10
20
2/4
CH
1/3
2,4
4
5
3
Setting Audio Levels for Specific
Sections
IN
ENTRY
SLOT CLIP
PF1
ALL CLIP
PF3
SHIFT
PF4
CLIP LIST
PF2
SLOT SELECT
LAST X
TRIM
DELETE
VIDEO
GO TO
OUT
EDIT MODE
A.DUB
MODE
A1
A3
A2
A4
CH 3
CH 4
TEXT
MEMO
TCG
TC PRESET
PROP
RESET
COUNTER
PLAYER
STOP
STILL/
PAUSE
PREVIEW
A.LEVEL REC
REW
REC
FF
PREV
NEXT
PLAY
REVIEW
1 CLIP PLAY
SOURCE SELECT
NEW
INT
REGEN
PRESET
EXT
MARKER
MODE
CONTROL
REMOTE
LOCAL
UNITY
4
2
2 4
UNITY
3
1
1 3
PB
∞
CH
30
10
0
10
20
2/4
CH
1/3
4
6
3
5
1


