3. SIGNALS AND WIRING
3 - 16
3.3.2 Power-on sequence
POINT
The voltage of analog monitor output, output signal, etc. may be unstable at
power-on.
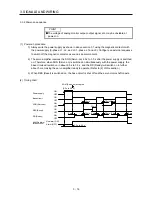
(1) Power-on procedure
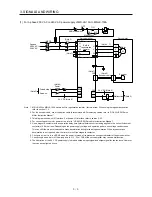
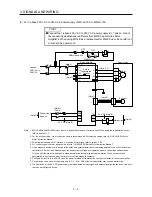
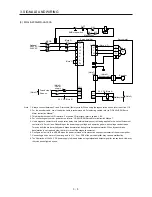
1) Always wire the power supply as shown in above section 3.1 using the magnetic contactor with
the power supply (3-phase: L1, L2, and L3, 1-phase: L1 and L3). Configure an external sequence
to switch off the magnetic contactor as soon as an alarm occurs.
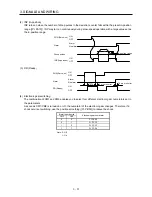
2) The servo amplifier receives the SON (Servo-on) 2.5 s to 3.5 s after the power supply is switched
on. Therefore, when SON (Servo-on) is switched on simultaneously with the power supply, the
base circuit will switch on in about 2.5 s to 3.5 s, and the RD (Ready) will switch on in further
about 5 ms, making the servo amplifier ready to operate. (Refer to (2) of this section.)
3) When RES (Reset) is switched on, the base circuit is shut off and the servo motor shaft coasts.
(2) Timing chart
95 ms
95 ms
RD (Ready)
RES (Reset)
SON (Servo-on)
OFF
ON
OFF
ON
ON
OFF
Base circuit
OFF
ON
Power supply
OFF
ON
10 ms
5 ms
10 ms
10 ms
5 ms
10 ms
5 ms
10 ms
(2.5 s to 3.5 s)
SON (Servo-on) accepted
Alarm (OFF)
No alarm (ON)
ALM No alarm
(Malfunction)
2.5 s to 3.5 s
Содержание MELSERVO-JE MR-JE-100A
Страница 23: ...1 FUNCTIONS AND CONFIGURATION 1 12 MEMO ...
Страница 29: ...2 INSTALLATION 2 6 MEMO ...
Страница 91: ...3 SIGNALS AND WIRING 3 62 MEMO ...
Страница 171: ...5 PARAMETERS 5 44 MEMO ...
Страница 195: ...6 NORMAL GAIN ADJUSTMENT 6 24 MEMO ...
Страница 221: ...7 SPECIAL ADJUSTMENT FUNCTIONS 7 26 MEMO ...
Страница 249: ...8 TROUBLESHOOTING 8 28 MEMO ...
Страница 254: ...9 DIMENSIONS 9 5 2 SCR connector system 3M Receptacle 36210 0100PL Shell kit 36310 3200 008 Unit mm 34 8 39 5 22 4 11 0 ...
Страница 255: ...9 DIMENSIONS 9 6 MEMO ...
Страница 263: ...10 CHARACTERISTICS 10 8 MEMO ...
Страница 293: ...11 OPTIONS AND PERIPHERAL EQUIPMENT 11 30 MEMO ...


