3. SIGNALS AND WIRING
3 - 10
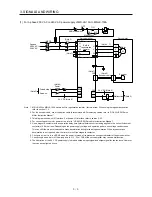
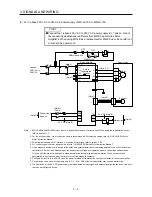
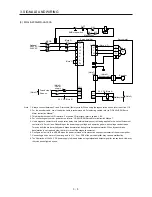
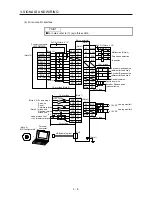
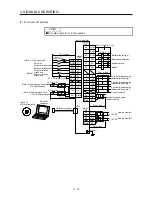
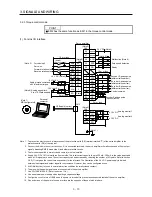
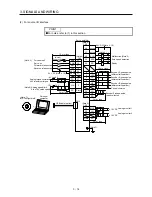
Note 1. To prevent an electric shock, always connect the protective earth (PE) terminal (marked ) of the servo amplifier to the
protective earth (PE) of the cabinet.
2. Connect the diode in the correct direction. If it is connected reversely, the servo amplifier will malfunction and will not output
signals, disabling EM2 (Forced stop 2) and other protective circuits.
3. The forced stop switch (normally closed contact) must be installed.
4. Supply 24 V DC ± 10% to interfaces from outside. The total current capacity is up to 300 mA. 300 mA is the value applicable
when all I/O signals are used. The current capacity can be decreased by reducing the number of I/O points. Refer to section
3.9.2 (1) that gives the current value necessary for the interface. The illustration of the 24 V DC power supply is divided
between input signal and output signal for convenience. However, they can be configured by one.
5. When starting operation, always turn on EM2 (Forced stop 2), LSP (Forward rotation stroke end) and LSN (Reverse rotation
stroke end) (normally closed contact).
6. ALM (Malfunction) turns on in normal alarm-free condition (normally closed contact). When this signal is switched off (at
occurrence of an alarm), the output of the programmable controller should be stopped by the sequence program.
7. The pins with the same signal name are connected in the servo amplifier.
8. Connect them within 2 m because of open-collector type.
9. Use SW1DNC-MRC2-E. (Refer to section 11.4.)
10. Configure a circuit to turn off EM2 when the power is turned off to prevent an unexpected restart of the servo amplifier.
11. Select the number of I/O points of the programmable controller depending on your system.
12. It will be COM0 for FX
3U
-16MT/ES.
13. It will be COM4 for FX
3U
-16MT/ES.
14. Select it within X000 to X007.
15. When a command cable malfunctions due to disconnection or noise, a position mismatch can occur. To avoid position
mismatch, it is recommended that Encoder A-phase pulse and Encoder B-phase pulse be checked.
Содержание MELSERVO-JE MR-JE-100A
Страница 23: ...1 FUNCTIONS AND CONFIGURATION 1 12 MEMO ...
Страница 29: ...2 INSTALLATION 2 6 MEMO ...
Страница 91: ...3 SIGNALS AND WIRING 3 62 MEMO ...
Страница 171: ...5 PARAMETERS 5 44 MEMO ...
Страница 195: ...6 NORMAL GAIN ADJUSTMENT 6 24 MEMO ...
Страница 221: ...7 SPECIAL ADJUSTMENT FUNCTIONS 7 26 MEMO ...
Страница 249: ...8 TROUBLESHOOTING 8 28 MEMO ...
Страница 254: ...9 DIMENSIONS 9 5 2 SCR connector system 3M Receptacle 36210 0100PL Shell kit 36310 3200 008 Unit mm 34 8 39 5 22 4 11 0 ...
Страница 255: ...9 DIMENSIONS 9 6 MEMO ...
Страница 263: ...10 CHARACTERISTICS 10 8 MEMO ...
Страница 293: ...11 OPTIONS AND PERIPHERAL EQUIPMENT 11 30 MEMO ...


