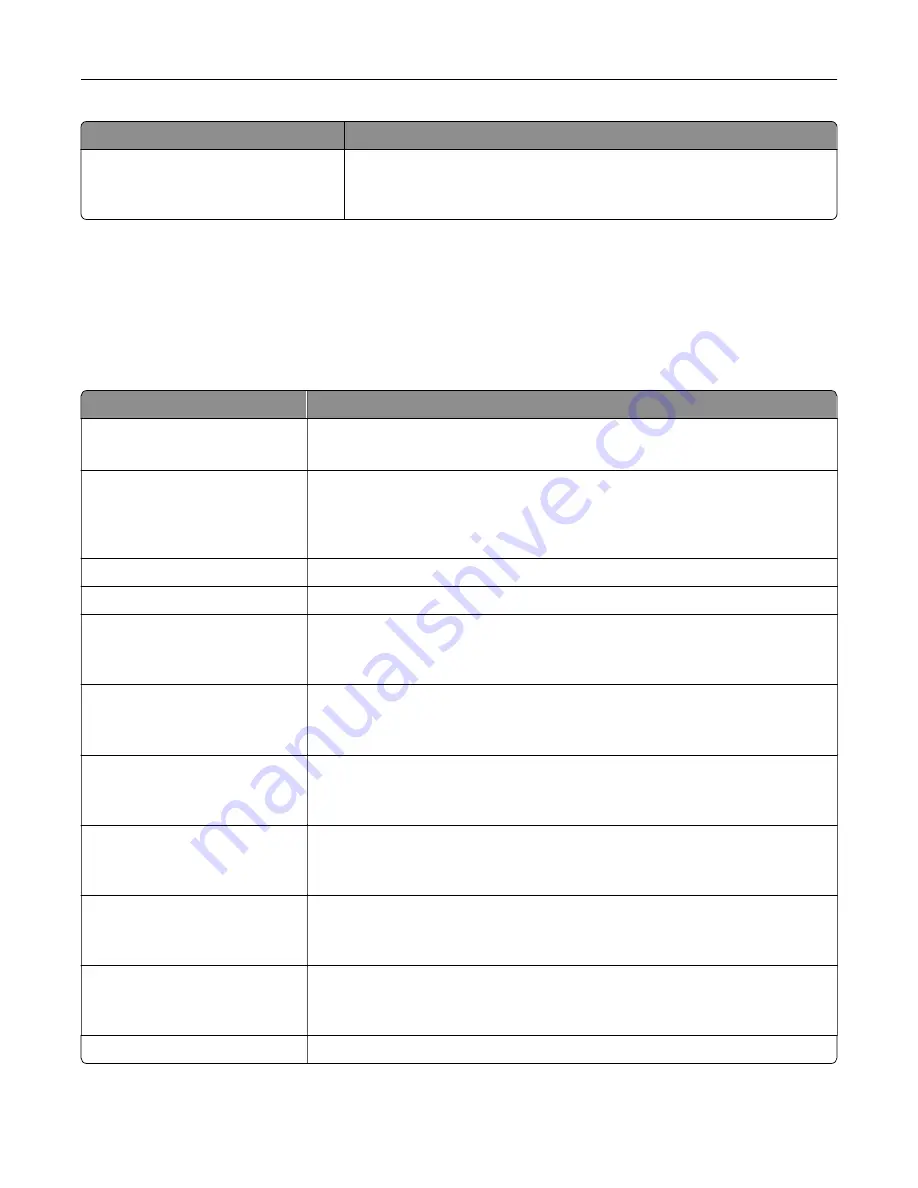
Use
To
Banner Page
Off
On
Allow the printer to print a banner page.
Note:
Off is the factory default setting.
TCP/IP menu
To access the menu, navigate to either of the following:
•
Network/Ports
>
Standard Network
>
Standard Network Setup
>
TCP/IP
•
Network/Ports
>
Network [x]
>
Network [x] Setup
>
TCP/IP
Note:
This menu is available only in network printers or printers attached to print servers.
Use
To
Set Hostname
Set the current TCP/IP host name.
Note:
This can be changed only from the Embedded Web Server.
IP Address
View or change the current TCP/IP address.
Note:
Manually setting the IP address sets the Enable DHCP and Enable Auto
IP settings to Off. It also sets Enable BOOTP and Enable RARP to Off on
systems that support BOOTP and RARP.
Netmask
View or change the current TCP/IP netmask.
Gateway
View or change the current TCP/IP gateway.
Enable DHCP
On
Off
Specify the DHCP address and parameter assignment.
Note:
On is the factory default setting.
Enable RARP
On
Off
Specify the RARP address assignment setting.
Note:
Off is the factory default setting.
Enable BOOTP
On
Off
Specify the BOOTP address assignment setting.
Note:
On is the factory default setting.
Enable AutoIP
Yes
No
Specify the Zero Configuration Networking setting.
Note:
Yes is the factory default setting.
Enable FTP/TFTP
Yes
No
Enable the built-in FTP server, which lets you send files to the printer using File
Transfer Protocol.
Note:
Yes is the factory default setting.
Enable HTTP Server
Yes
No
Enable the built-in Web server (Embedded Web Server). When enabled, the
printer can be monitored and managed remotely using a Web browser.
Note:
Yes is the factory default setting.
WINS Server Address
View or change the current WINS server address.
Understanding the printer menus
84
Содержание MS910 Series
Страница 1: ...MS910 Series User s Guide July 2017 www lexmark com Machine type s 4021 Model s 230...
Страница 133: ...Emptying the hole punch box 1 Open door H 2 Remove and empty the hole punch box Maintaining the printer 133...
Страница 167: ...Fuser area Below the fuser area Duplex area Above the duplex area Clearing jams 167...
Страница 175: ...Door J Note If there is a jammed paper between the nisher bins then remove the paper Areas H1 and H2 Clearing jams 175...
Страница 183: ...Door J Note If there is a jammed paper between the nisher bins then remove the paper Areas H1 and H2 Clearing jams 183...
Страница 185: ...Area H8 Area H9 Clearing jams 185...


