Ver. 3.003
p11
CONCEPT IQ. PLUS Programmer’s Manual.
2) “Option” data.
Data field that allows the Installer to select between two alternatives (Select/De-select,
Enable/Disable, Assign/Un-assign, etc.) for up to 8 Options or Items that relate to a
particular feature.
e.g. Setting Dialer options, Assigning Areas to a User, Defining options for Individual Zone
Inputs, etc. (Similar to the Y / n options screens in Concept 3000 / Access 4000)
Refer to page 10 for more information and examples of Data Types.
4.4 EXAMPLE OF PROGRAMMING.
This example shows how Zone 1 would be changed to the “Hand-over” Input Type.
Zone 1 Input Type is stored in Address 601.
STEP 1. Logon with the Installer PIN Code.
Enter Installer PIN code;
... .
STEP 2. Select the Address to be changed.
Press
, then
.
The current data will now be displayed via the Zone Lamps.
(Multi-digit Value data will display sequentially. A chirp sounds as each digit is displayed.
3 beeps indicate the end of the data sequence, then the “1” lamp will flash to prompt for
the 1st digit of the new data.)
STEP 3. Enter the new Data Value.
Select the new Input Type;
(Handover), then
STEP 4. Repeat Steps 2 and 3 to perform any additional programming required.
Remember that pressing
after keying in the data automatically advances the program-
ming to the next Field or Address (i.e. Address 602 in this example).
Step 2 is only required if you need to program in a location other than the next Field or
Address.
STEP 5. Exit the programming mode.
Press
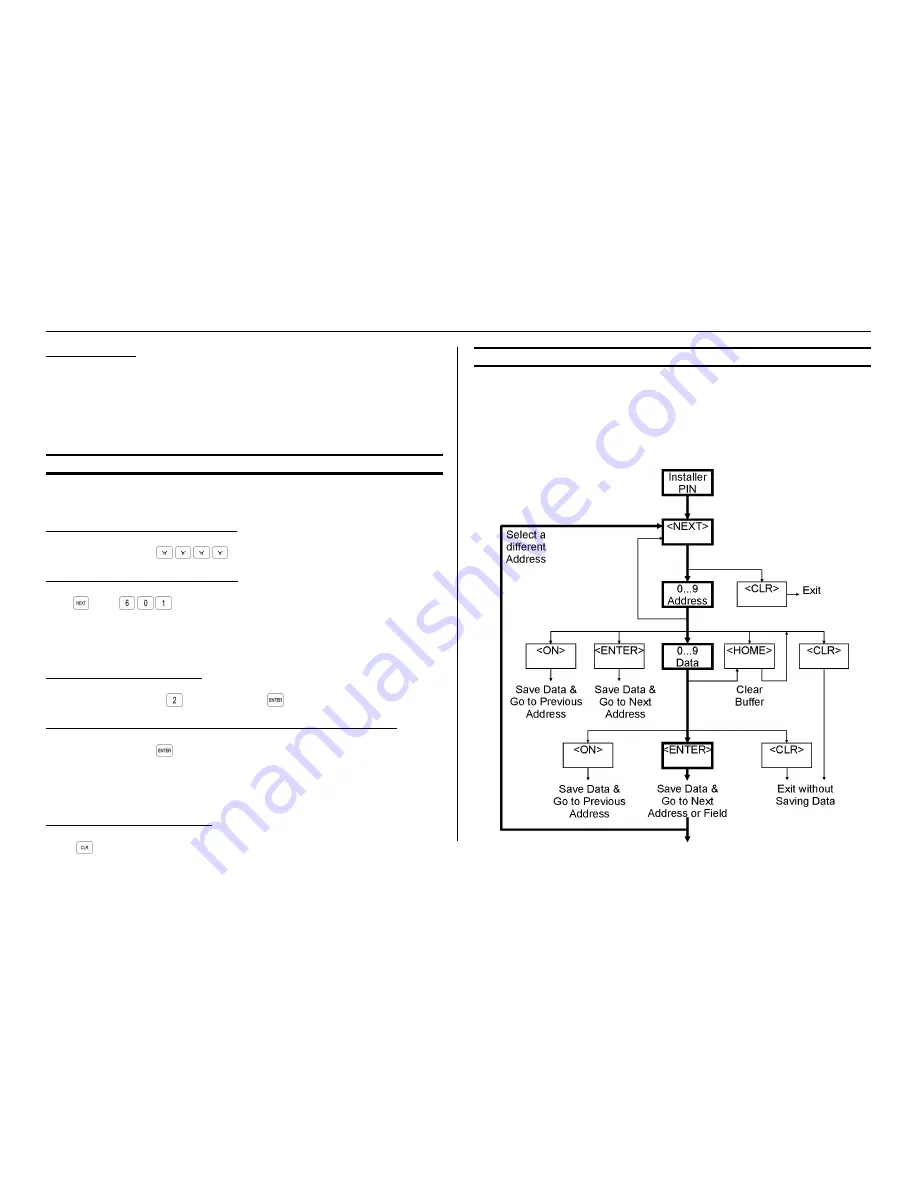
4.5 PROGRAMMING FLOWCHART.
The following flowchart provides an overview of the simple steps involved in programming
the system Data and Options.
•
The Bold path indicates the typical sequence.
•
“<CLR>” can be used at anytime to Exit programming mode without saving changes
in the current data field displayed.
•
“<HOME>” can be used to clear the buffer of all data, ready for a new data entry.


