32
Basic Operation
Setting Initial Settings on the Operator Panel
You need to set the printer language, country, clock date, time, and fax settings when you turn on the printer for the
first time.
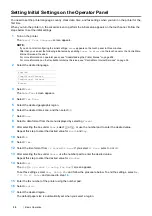
When you turn the printer on, the wizard screen to perform the initial setup appears on the touch panel. Follow the
steps below to set the initial settings.
1
Turn on the printer.
The
Select Your Language
screen appears.
NOTE:
•
If you do not start configuring the initial settings,
Ready
appears on the touch panel in three minutes.
After that, you can set the following initial setup by enabling
Power On Wizard
on the touch panel or the CentreWare
Internet Services if needed.
For more information on operator panel, see "Understanding the Printer Menus" on page 206.
For more information on the CentreWare Internet Services, see "CentreWare Internet Services" on page 38.
2
Select the desired language.
3
Select
Next
.
The
Date/Time
screen appears.
4
Select
Time Zone
.
5
Select the desired geographic region.
6
Select the desired time zone, and then select
OK
.
7
Select
Date
.
8
Select a data format from the menu displayed by selecting
Format
.
9
After selecting the box under
Year
, select
or
, or use the number pad to enter the desired value.
Repeat this step to enter the desired value for
Month
and
Day
.
10
Select
OK
.
11
Select
Time
.
12
Select the time format from
12 Hour
or
24 Hour
. If you select
12 Hour
, select
AM
or
PM
.
13
After selecting the box under
Hours
, use the number pad to enter the desired value.
Repeat this step to enter the desired value for
Minutes.
14
Select
Next
.
The
Fax
(
Do you want to setup Fax Now?
) screen appears.
To set fax settings, select
Yes, Setup FAX
and follow the procedure below. To end the settings, select
No,
I'll Do it later
and proceed to step
19
.
15
Enter the fax number of the printer using the number pad.
16
Select
Region
.
17
Select the desired region.
The default paper size is automatically set when you select a region.
English
Simplified Chinese
Traditional Chinese
Korean
Содержание DocuPrint CM225FW
Страница 1: ...DocuPrint CM225 fw User Guide ...
Страница 10: ...10 Contents Technical Support 338 Online Services 339 Index 340 ...
Страница 157: ...Scanning 157 5 Select any unused number and click Add The Add Network Scan Address page appears 9 8 7 6 5 4 3 2 1 ...
Страница 260: ...260 Digital Certificates 11 Digital Certificates Using Digital Certificates on page 261 ...
Страница 272: ...272 Troubleshooting 4 Lower the levers to their original position 5 Close the rear cover ...
Страница 337: ...Contacting Fuji Xerox 337 14 Contacting Fuji Xerox Technical Support on page 338 Online Services on page 339 ...
Страница 344: ...DocuPrint CM225 fw User Guide ME6939E2 1 Edition 1 July 2014 Fuji Xerox Co Ltd Copyright 2014 by Fuji Xerox Co Ltd ...

