168
Scanning
Adjusting Scanning Options
Adjusting the Default Scan Settings
For a complete list of all of the defaults settings, see "Defaults Settings" on page 239.
Setting the Scanned Image File Type
To specify the file type of the scanned image:
1
Press the
(
System
) button.
2
Select the
Tools
tab, and then select
Default Settings
.
3
Select
Scan Defaults
.
4
Select
File Format
.
5
Select the type, and then select
OK
.
Available types:
•
(factory default)
•
Multi-Page TIFF
•
TIFF
•
JPEG
Setting the Color Mode
You can scan an image in color or in black and white. Selecting black and white significantly reduces the file size of
the scanned images. An image scanned in color will have a larger file size than the same image scanned in black
and white.
1
Press the
(
System
) button.
2
Select the
Tools
tab, and then select
Default Settings
.
3
Select
Scan Defaults
.
4
Select
Output Color
.
5
Change the color setting to
Color
,
Black
&
White
or
Gray Scale
, and then select
OK
.
NOTE:
•
The
Black
&
White
mode is available only when
File Format
is set to PDF or TIFF.
Содержание DocuPrint CM225FW
Страница 1: ...DocuPrint CM225 fw User Guide ...
Страница 10: ...10 Contents Technical Support 338 Online Services 339 Index 340 ...
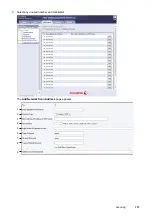
Страница 157: ...Scanning 157 5 Select any unused number and click Add The Add Network Scan Address page appears 9 8 7 6 5 4 3 2 1 ...
Страница 260: ...260 Digital Certificates 11 Digital Certificates Using Digital Certificates on page 261 ...
Страница 272: ...272 Troubleshooting 4 Lower the levers to their original position 5 Close the rear cover ...
Страница 337: ...Contacting Fuji Xerox 337 14 Contacting Fuji Xerox Technical Support on page 338 Online Services on page 339 ...
Страница 344: ...DocuPrint CM225 fw User Guide ME6939E2 1 Edition 1 July 2014 Fuji Xerox Co Ltd Copyright 2014 by Fuji Xerox Co Ltd ...


