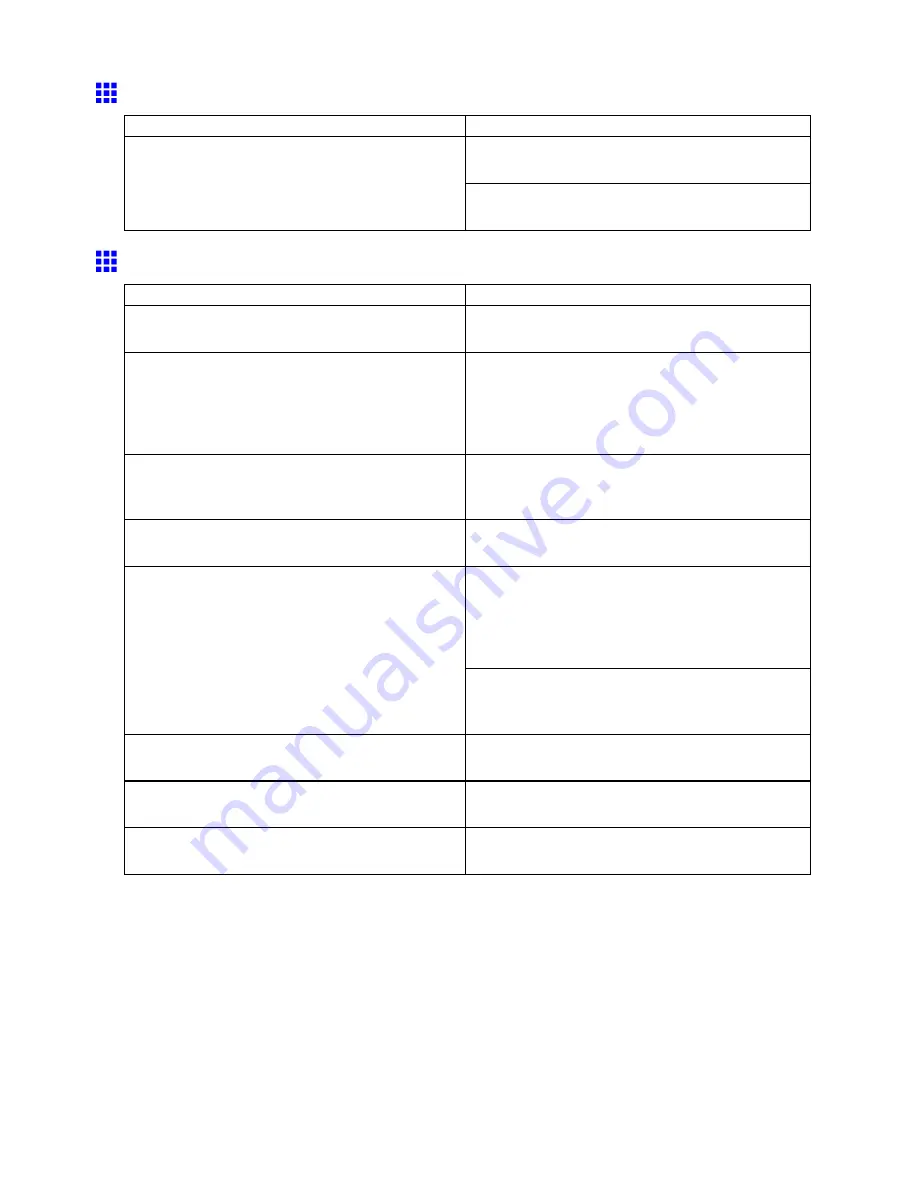
Problems with the printing quality
The contrast becomes uneven during printing
Cause
Corrective Action
Adjust the feed amount.
(→P.651)
The paper feed amount is out of adjustment.
Execute
Fine Band Adj.
during printing.
(→P.651)
Colors in printed images are uneven
Cause
Corrective Action
Line Drawing/Text
is selected when printing images
in many solid colors.
Specify
Image
in the printer driver.
You are printing on paper that curls easily.
Printed colors may appear uneven on the leading
edge of paper that is susceptible to curling. Increase
the level of vacuum holding the paper against the
Platen or specify a margin of 20 mm (0.79 in) or more
for the leading edge. (→P.657)
Printed colors may be uneven if you set the
Quality
too low.
Choose a higher level of
Print Quality
in the
Advanced Settings
of the printer driver.
(→P.241)
Color may be uneven between dark and light image
areas.
Select
Unidirectional Printing
in the
Advanced
Settings
of the printer driver.
Specify
No
in
Auto Cut
in the printer driver before
printing. In this case, the paper can be printed without
borders on the left and right sides only. Cut the
printed document ejected from the printer, then use
scissors to cut away the edges on the top and bottom.
When using Borderless Printing, the edge of the
paper is cut during printing. Thus, ink density may
not be even at the edges.
Choose a higher level of
Print Quality
in the
Advanced Settings
of the printer driver.
(→P.241)
The Printhead is out of alignment.
Adjust the Printhead alignment.
(→P.646)
Drying documents stacked on each other may cause
uneven colors.
To avoid uneven colors, we recommend drying each
sheet separately.
Color density may be uneven if you use Glossy
Paper , art paper, or Coated Paper .
In
Advanced Settings
of the printer driver, choose
Highest
or
High
in
Print Quality
.
Troubleshooting 739
Содержание 2162B002
Страница 1: ...User Manual ENG Large Format Printer ...
Страница 2: ......
Страница 105: ...Hard Disk Note Enter a password if one has been set 2 Select the print job in the list and click Move Printer parts 91 ...
Страница 124: ...Hard Disk 2 Select the saved job in the list and click Delete For details refer to the RemoteUI help 110 Printer parts ...
Страница 240: ...Output Stacker 3 Push in the left and right Basket Arms toward the back all the way until they stop 226 Handling Paper ...
Страница 727: ...Cleaning the Printer 4 Plug the power cord into the outlet Maintenance 713 ...
Страница 807: ... CANON INC 2007 ...


