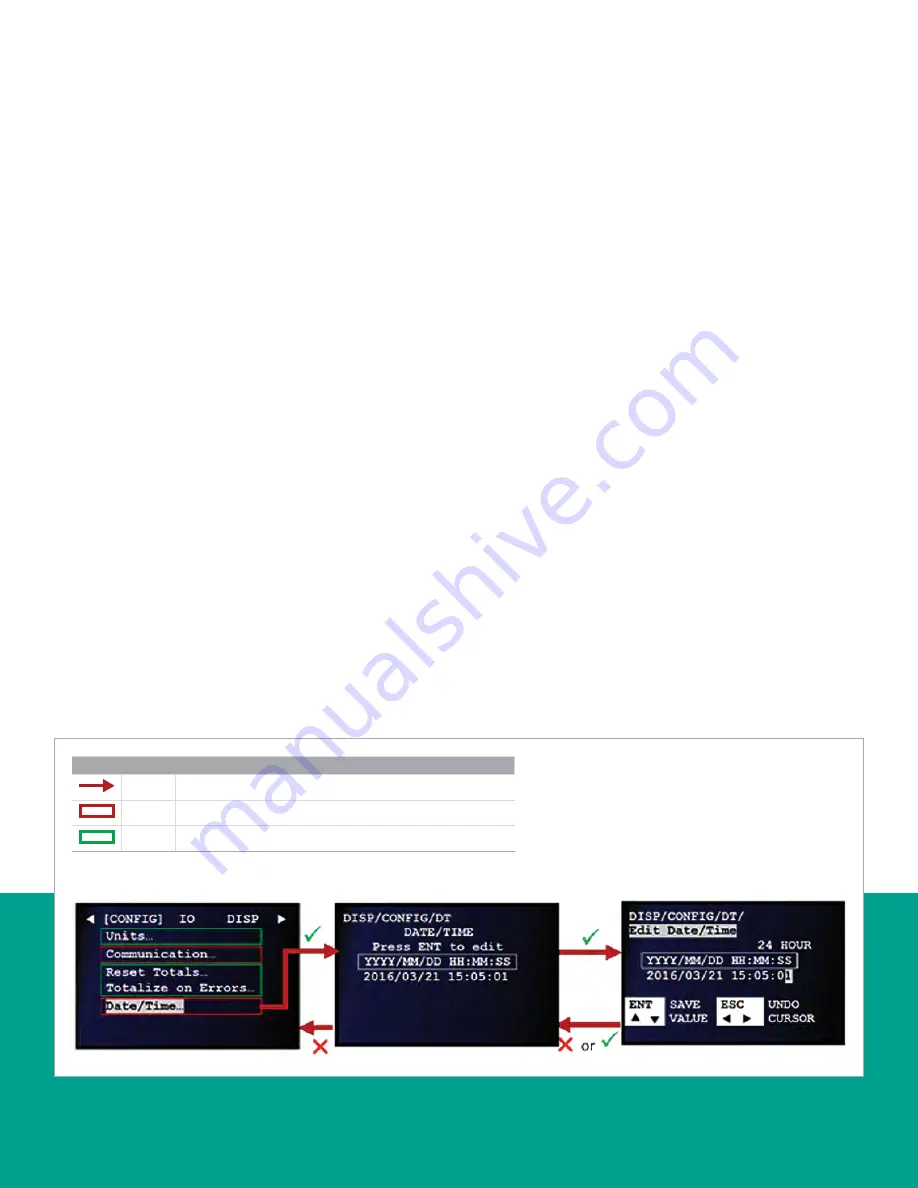
3.5.5 Setting the date and time
To set the
date/time
, refer to
Figure 59
below and proceed
as follows:
NOTE:
If necessary, refer to
as a
reminder about color code meanings.
1. Refer to
and navigate to
page 4: configuration (generic)
.
2. Use the [
] and [
] keys to highlight
date/time
and press
the [
] key to confirm your choice.
3. When the screen with the current
date/time
opens, press
the [
] key to edit the setting or press the [
] key to
cancel and return to the previous screen.
4. If you chose to edit the setting, use the [
] and [
] keys
to highlight the desired character. Then, use the [
] and
[
] keys to increment or decrement the value for that
character. Repeat this process until all characters of the
date/time
have been set as desired. Then, press the [
]
key to confirm the new setting or press the [
] key to
cancel and return to the previous screen.
Figure 59: Setting the date and time
Legend
Red
At least user 1 level access required to follow the step.
Red
Option only visible to user 1 or above.
Green
Option only visible to user 3 or above.
Use
or
arrow keys to position
the cursor.
Use
or
arrow keys to
increment or decrement the digits
to set the desired “date and time.”
52
Содержание Panametrics Sentinel LCT8
Страница 1: ...Sentinel LCT8 User s manual...
Страница 2: ...ii...
Страница 4: ...no content intended for this page proceed to next page iv...
Страница 29: ...Figure 32 Wiring LCT8 to SEN898 electronics cross plane 6 24 flowcell local mount ref dwg 702 2041 19...
Страница 30: ...20...
Страница 98: ...88...
Страница 122: ...no content intended for this page 112...
Страница 132: ...122...


