


6
Intera 5.3
Welcome!
Rethink Robotics’ collaborative robots are not serviceable or repairable by end-users. In the
event servicing or repairs are required for the robot, please contact your distributor or Rethink
Robotics for technical assistance.
When the robot is moving a heavy part (>2.5 kg) and a user removes the part from the gripper
or the part unintentionally falls (and no logic has been trained to handle these issues), the arm will
still try to compensate for a mass that is no longer there and the arm may move unexpectedly. This
includes having the arm point straight up. In order to mitigate these behaviors, please train your
task accordingly so that it may handle these error cases. In addition, always perform a Risk Assess-
ment so you may understand the risk levels and ways to mitigate these.
Use caution when servicing robot workcell, including following OSHA's Lockout/Tagout Pro-
cedures 1910.147 if Safety Assessment of application recommends it.
If a supplementary audible means of robot operation is necessary, it shall exceed the ambi-
ent noise at the end-use application.
If controller is placed inside the robot workspace, caution needs to be taken when training
tasks to avoid coming in contact with it.
In Europe, Rethink Robotics’ collaborative robots are provided with a Declaration of Incorpo-
ration (DoI) per Annex IIB of the EC Machinery Directive. The Machinery Directive requires that the
integrator and/or end user must ensure that all incomplete machinery must be incorporated into a
complete machine and certified to the Machinery Directive requirements resulting in an EC Declara-
tion of Conformity certificate being generated, and the machine being CE marked. Only then can
the machinery be operated. The system integrator and/or end user is responsible for the following
tasks:
o
Installing
the
industrial
robot
Summary of Contents for Sawyer
Page 15: ...8 Intera 5 3 Getting to Know Sawyer Hardware Overview of Your Robot ...
Page 16: ...9 Intera 5 3 Getting to Know Sawyer Dimensions ...
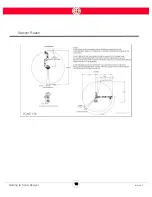
Page 17: ...10 Intera 5 3 Getting to Know Sawyer Sawyer Reach ...
Page 93: ...86 Intera 5 3 Train Pick and Place Patterns on the Head 11 Press OK to go to the next step ...
Page 104: ...97 Intera 5 3 Train Pick and Place Patterns on the Head You may now run the task ...
Page 134: ...127 Intera 5 3 TCP IP The Set To node in the Behavior Editor is used to output information ...
Page 138: ...131 Intera 5 3 Fieldbus Devices 3 Using a keyboard navigate to CONFIGURATION and press ENTER ...
Page 155: ...148 Intera 5 3 ...
Page 156: ...149 Intera 5 3 ...
Page 180: ...173 Intera 5 3 ...
Page 190: ...183 Intera 5 3 Fixed Data 112 From Robot ...
Page 206: ...199 Intera 5 3 Small Assembly 114 From Robot 115 To Robot ...
Page 207: ...200 Intera 5 3 Large Assembly 116 From Robot 117 To Robot ...
Page 208: ...201 Intera 5 3 Floats 118 From Robot 119 To Robot ...
Page 209: ...202 Intera 5 3 Strings 120 From Robot 121 To Robot ...
Page 218: ...Z Zero G button 16 17 Zero G mode 24 Zero Gravity mode 17 zoom reset 42 ...
Page 219: ......
Page 220: ...Last updated June 18 2018 Intera 5 3 User Guide Getting Started Rev A ...