


111
Intera 5.3
I/O Devices
I/O Devices
For the latest and most detailed information on Sawyer and Intera 5, we always recommend you
see the Online User Guide at:
mfg.rethinkrobotics.com/intera.
The Rethink Robotics support page
is here:
This section describes the electrical interfaces available to the Sawyer robot. The different inter-
faces are:
•
Controller I/O
•
External I/O
•
Safety Rated Controller I/O
DISCLAIMER
Any advice provided to you relating to the integration of a Rethink Robotics product with any third
party product into to your facility is provided “as is.” Because Rethink Robotics does not have
access to the systems you are using, nor does Rethink Robotics have any control over how you
may implement any integration with third party products, Rethink Robotics assumes no liability for
this limited advice.
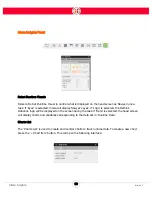
Controller I/O
The Sawyer robot controller uses a Moxa ioLogik E1212 Remote Terminal Unit for interfacing with
the external world. This unit has been preconfigured to work out-of-the-box with the Intera software
and shows up as the “Robot” device when configuring signals on a task.
Please refer to ioLogik E1200 Series User’s Manual for details on the ratings and specifications of
the switch: http://www.moxa.com
Summary of Contents for Sawyer
Page 15: ...8 Intera 5 3 Getting to Know Sawyer Hardware Overview of Your Robot ...
Page 16: ...9 Intera 5 3 Getting to Know Sawyer Dimensions ...
Page 17: ...10 Intera 5 3 Getting to Know Sawyer Sawyer Reach ...
Page 93: ...86 Intera 5 3 Train Pick and Place Patterns on the Head 11 Press OK to go to the next step ...
Page 104: ...97 Intera 5 3 Train Pick and Place Patterns on the Head You may now run the task ...
Page 134: ...127 Intera 5 3 TCP IP The Set To node in the Behavior Editor is used to output information ...
Page 138: ...131 Intera 5 3 Fieldbus Devices 3 Using a keyboard navigate to CONFIGURATION and press ENTER ...
Page 155: ...148 Intera 5 3 ...
Page 156: ...149 Intera 5 3 ...
Page 180: ...173 Intera 5 3 ...
Page 190: ...183 Intera 5 3 Fixed Data 112 From Robot ...
Page 206: ...199 Intera 5 3 Small Assembly 114 From Robot 115 To Robot ...
Page 207: ...200 Intera 5 3 Large Assembly 116 From Robot 117 To Robot ...
Page 208: ...201 Intera 5 3 Floats 118 From Robot 119 To Robot ...
Page 209: ...202 Intera 5 3 Strings 120 From Robot 121 To Robot ...
Page 218: ...Z Zero G button 16 17 Zero G mode 24 Zero Gravity mode 17 zoom reset 42 ...
Page 219: ......
Page 220: ...Last updated June 18 2018 Intera 5 3 User Guide Getting Started Rev A ...