


6.12 Language selection
The system can operate in the following languages:
English (US)
English (UK)
Arabic
Chinese
Croatian
Danish
Dutch
Finnish
French
German
Greek
Italian
Japanese
Korean
Norwegian
Polish
Portuguese (Brazilian)
Russian
Spanish
Swedish
Turkish
With the homescreen displayed:
1. Select
Customize
.
2. Select
Language
.
3. Select from the languages available.
6.13 Pages
Pages are used to display applications.
Pages are displayed and accessed on the homescreen. Each page
can display more than 1 application.
• You can set up and display up to 4 applications per page using
a New c Series or New e Series (except for the e7 and e7D)
multifunction display.
• The New a Series and the e7 / e7D multifunction displays can
only set up and show up to 2 applications per page.
• ~The New a series and the e7 / e7D can however show up to
4 application per page if they are sharing the homescreen of a
capable multifunction display which already has pages with up
to 4 applications set up.
Any page on the homescreen can be customized, enabling you to
group your applications into different pages, each designed for a
specific purpose. For example, you could have a page that includes
the chart and fishfinder applications, suitable for fishing, and another
page that includes the chart and data applications, which would
be suitable for general sailing.
You can add any application(s) to any
empty page.
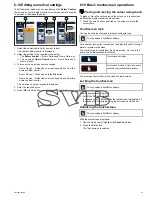
Page featuring a single application.
Page featuring multiple applications.
You can also define a "layout" for each page, which determines how
the applications are arranged on the screen.
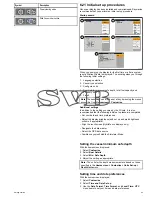
Changing an existing page on the homescreen
With the homescreen displayed:
1. Select
Customize
.
2. Select
Homescreen
.
3. Select
Edit Page
.
4. Select the page icon that you want to change.
The Customize menu options are displayed.
5. Select the appropriate page layout (for example, “Splitscreen”).
6. Select the application(s) you want to display on the page, either
by selecting the relevant menu item or dragging it over to the
displayed page.
7. Select
Finish
.
The Rename Page dialog is displayed.
8. Use the on-screen keyboard to name the page, then select
Save
.
Getting started
75
Summary of Contents for A65
Page 2: ......
Page 4: ......
Page 8: ...8 New a Series New c Series New e Series...
Page 12: ...12 New a Series New c Series New e Series...
Page 20: ...20 New a Series New c Series New e Series...
Page 36: ...36 New a Series New c Series New e Series...
Page 64: ...64 New a Series New c Series New e Series...
Page 86: ...86 New a Series New c Series New e Series...
Page 96: ...96 New a Series New c Series New e Series...
Page 106: ...106 New a Series New c Series New e Series...
Page 138: ...138 New a Series New c Series New e Series...
Page 192: ...192 New a Series New c Series New e Series...
Page 202: ...202 New a Series New c Series New e Series...
Page 206: ...206 New a Series New c Series New e Series...
Page 218: ...218 New a Series New c Series New e Series...
Page 228: ...228 New a Series New c Series New e Series...
Page 232: ...232 New a Series New c Series New e Series...
Page 242: ...242 New a Series New c Series New e Series...
Page 248: ...248 New a Series New c Series New e Series...
Page 286: ...286 New a Series New c Series New e Series...
Page 300: ...300 New a Series New c Series New e Series...
Page 307: ......
Page 308: ...www raymarine com...