


9.1 Autopilot control
You can use your multifunction display to control your autopilot.
Note:
For information on connecting your multifunction display
to a Raymarine autopilot system, refer to the documentation that
accompanied your autopilot.
With the Autopilot Control function enabled, you can use your
multifunction display to:
• Engage the autopilot and instruct it to follow a route, or a waypoint.
• Disengage the autopilot.
• Silence the waypoint arrival alarm.
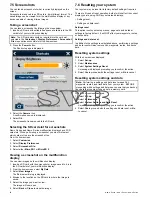
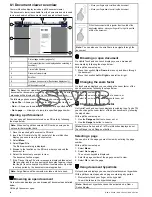
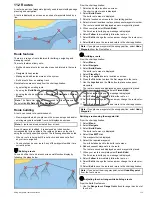
Pilot Control dialog
1
2
3
5
4
6
7
10
9
8
D
12206-1
Item
Description
1
Pilot Mode.
2
Current Locked Heading.
3
STANDBY
— Disengages the autopilot and return to manual vessel
control.
4
Auto
—Engages the autopilot.
5
Turn angle — The turn angle is only available for SPX autopilots
connected using SeaTalk
ng
. This indicates the direction and severity of
turns to be made under autopilot.
6
Track
— Engages the autopilot in Track mode and automatically steers
your vessel along a route plotted on your chartplotter.
7
Dismiss
— Dismisses the Pilot Control dialog.
8
Distance to next waypoint.
9
Bearing to next waypoint.
10
Next waypoint name.
Note:
The
Pilot Control
dialog will close if no action is taken
for 10 seconds.
The Pilot Control dialog is displayed in the following situations:
• When you select
Menu > Navigate > Goto Waypoint
,
Goto
Cursor
or
Follow Route
option in the chart application.
• When you select
Goto Waypoint
or
Goto Cursor
using the chart
context menu.
• When you place the cursor over an active route or waypoint
on the chart and select
Stop Goto
,
Stop Follow
or
Advance
Waypoint
from the context menu.
• When you are following a route or going to a waypoint or cursor
position, and select
Menu > Navigate > Stop Goto
,
Stop Follow
,
or
Advance Waypoint
.
• When you arrive at a target waypoint.
Note:
When arriving at a waypoint, the dialog title bar turns red to
indicate waypoint arrival.
Enabling the autopilot control function
From the homescreen:
1. Select
Set-up
.
2. Select
System Settings
.
3. Select
Autopilot Control
so that On is highlighted.
Selecting Autopilot Control will switch the control between On
and Off.
Disengaging the autopilot using the shortcuts
menu
On multifunction displays which do not have a dedicated pilot button
(i.e. a65, a67, e7 and e7D) you can disengage the autopilot from
the Shortcuts menu.
With the autopilot engaged:
1. Press and release the
POWER
button.
2. Select
Disengage Pilot
.
The autopilot is disengaged, and put into standby mode.
Disengaging the autopilot using the pilot
button
On multifunction displays which have a dedicated pilot button (i.e.
New c Series and New e Series displays, excluding the e7 and e7D)
you can disengage the autopilot using the dedicated Pilot button.
With the autopilot engaged:
1. Press the
Pilot
button.
The autopilot is disengaged, and put into standby mode.
Disengaging the autopilot from the chart
application
On all multifunction display variants the autopilot can be disengaged
from the chart application’s menu.
In the chart application with the autopilot engaged:
1. Select
Menu > Navigate > Stop Goto
or
Stop Follow
.
The Pilot Control dialog is displayed.
2. Select
STANDBY
.
The autopilot is disengaged, and put in standby mode.
Engaging the autopilot using the shortcuts
menu
On multifunction displays which do not have a dedicated pilot button
(i.e. a65, a67, e7 and e7D) you can engage the autopilot from the
Shortcuts menu.
With the autopilot engaged:
1. Press and release the
POWER
button.
2. Select
Engage Pilot
.
The autopilot is engaged.
Engaging the autopilot using the pilot
button
On multifunction displays which have a dedicated pilot button (i.e.
New c Series and New e Series displays, excluding the e7 and e7D)
you can engage the autopilot using the dedicated Pilot button.
With the autopilot disengaged:
1. Press the
Pilot
button.
The pilot control dialog is displayed.
2. Select
Engage Pilot
.
Note:
You can also automatically engage the autopilot by
pressing and holding the
Pilot
button.
Engaging the autopilot from the chart
application menu
In the chart application:
1. Select
Menu > Navigate > Goto Cursor
,
Goto Waypoint
, or
Follow Route
as appropriate.
The Pilot Control dialog is displayed.
2. Select
Engage Pilot
.
A confirmation pop-up message is displayed.
3. Select
Yes
to confirm and engage the autopilot, or
4. Select
No
to leave the autopilot in the current state.
98
New a Series / New c Series / New e Series
Summary of Contents for A65
Page 2: ......
Page 4: ......
Page 8: ...8 New a Series New c Series New e Series...
Page 12: ...12 New a Series New c Series New e Series...
Page 20: ...20 New a Series New c Series New e Series...
Page 36: ...36 New a Series New c Series New e Series...
Page 64: ...64 New a Series New c Series New e Series...
Page 86: ...86 New a Series New c Series New e Series...
Page 96: ...96 New a Series New c Series New e Series...
Page 106: ...106 New a Series New c Series New e Series...
Page 138: ...138 New a Series New c Series New e Series...
Page 192: ...192 New a Series New c Series New e Series...
Page 202: ...202 New a Series New c Series New e Series...
Page 206: ...206 New a Series New c Series New e Series...
Page 218: ...218 New a Series New c Series New e Series...
Page 228: ...228 New a Series New c Series New e Series...
Page 232: ...232 New a Series New c Series New e Series...
Page 242: ...242 New a Series New c Series New e Series...
Page 248: ...248 New a Series New c Series New e Series...
Page 286: ...286 New a Series New c Series New e Series...
Page 300: ...300 New a Series New c Series New e Series...
Page 307: ......
Page 308: ...www raymarine com...


