


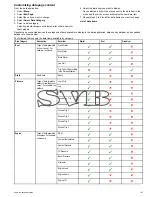


Menu Item
Description
Options
• Select Data Category
• Data Cell 2
• Select Data Category
Allows selection of a
data type by category.
Data Cell 2
• On
• Off
Select Data Category
Allows selection of a
data type by category.
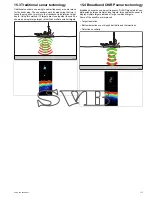
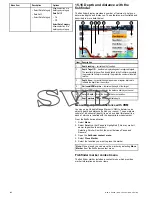
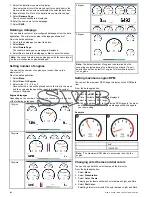
15.16 Depth and distance with the
fishfinder
The fishfinder display provides a number of features to help you
determine depths and distances. These features are illustrated and
described in more detail below:
D
12222-2
1
2
4
3
5
6
7
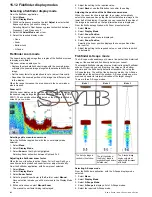
Item
Description
1
Depth reading
— current depth of seabed.
2
Depth Target ID
— depths are displayed against recognized targets.
The sensitivity of these IDs is directly linked to the Fish Alarm sensitivity;
the greater the fish alarm sensitivity, the greater the number of labelled
returns.
3
Depth lines
— horizontal dashed lines drawn at regular intervals to
indicate the depth from the surface.
4
Horizontal VRM marker
— indicates the depth of the target.
5
Vertical VRM marker
— indicates the distance behind your vessel.
6
Cursor Depth
— this is the depth of the cursor position.
7
Depth markers
— these numbers indicate depth.
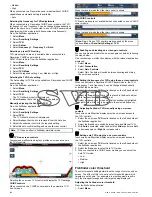
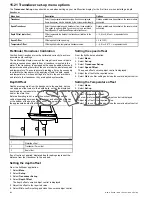
Measuring depth and distance with VRM
You can use a Variable Range Marker (VRM) to determine an
object's depth and distance behind your vessel. These markers
consist of a horizontal (depth) line and a vertical (distance) line,
each of which are labelled with the appropriate measurement.
From the fishfinder application:
1. Select
Menu
2. Select
Scroll
so that Pause is highlighted (This may make it
easier to position the marker).
Selecting Scroll will switch the scroll between Pause and
Resume.
3. Open the
fishfinder context menu
.
4. Select
Place Marker
.
5. Select the location you want to place the marker.
Note:
Once placed you can move the marker by selecting
Move
Marker
from the fishfinder context menu.
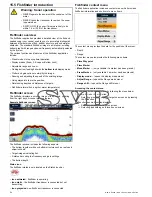
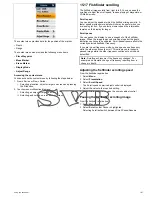
Fishfinder marker context menu
The fishfinder marker includes a context menu which provides
marker information and menu items.
186
New a Series / New c Series / New e Series
Summary of Contents for A65
Page 2: ......
Page 4: ......
Page 8: ...8 New a Series New c Series New e Series...
Page 12: ...12 New a Series New c Series New e Series...
Page 20: ...20 New a Series New c Series New e Series...
Page 36: ...36 New a Series New c Series New e Series...
Page 64: ...64 New a Series New c Series New e Series...
Page 86: ...86 New a Series New c Series New e Series...
Page 96: ...96 New a Series New c Series New e Series...
Page 106: ...106 New a Series New c Series New e Series...
Page 138: ...138 New a Series New c Series New e Series...
Page 192: ...192 New a Series New c Series New e Series...
Page 202: ...202 New a Series New c Series New e Series...
Page 206: ...206 New a Series New c Series New e Series...
Page 218: ...218 New a Series New c Series New e Series...
Page 228: ...228 New a Series New c Series New e Series...
Page 232: ...232 New a Series New c Series New e Series...
Page 242: ...242 New a Series New c Series New e Series...
Page 248: ...248 New a Series New c Series New e Series...
Page 286: ...286 New a Series New c Series New e Series...
Page 300: ...300 New a Series New c Series New e Series...
Page 307: ......
Page 308: ...www raymarine com...


