
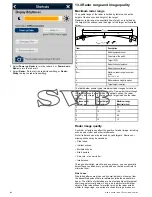


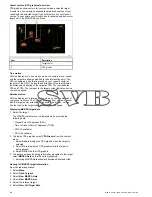

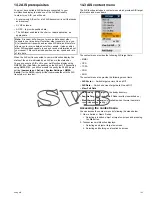


VRM/EBL context menu
The VRM/EBL function includes a context menu which provides
positional data and menu items.
The context menu provides positional data of the VRM/EBL in
relation to your vessel:
• Range
• Bearing
The context menu also provide the following menu items:
•
Float Centre
•
Adjust
•
VRM/EBL Off
Accessing the context menu
You can access the context menu by following the steps below.
1. New e Series or New c Series:
i.
Selecting a location or the relevant object on-screen and
pressing the
Ok
button.
2. Touchscreen multifunction displays:
i.
Selecting and holding on a location or relevant object
on-screen.
Creating a VRM/EBL on the radar display
To create a VRM/EBL on a touchscreen multifunction display follow
the steps below:
From the radar application:
1. Select and hold on the screen.
The radar context menu is displayed.
2. Select
Place VRM/EBL
.
3. Select the required location / target.
The VRM/EBL is now set at the selected location.
Creating a VRM/EBL on the radar display
From the radar application:
1. Select a target or location on screen.
2. Press the
Ok
button.
The radar context menu is displayed.
3. Select
Place VRM/EBL
.
4. Using the
Joystick
adjust the VRM/EBL to the required bearing
and range.
5. Press the
Ok
button to save the setting.
Creating a floating VRM/EBL on the radar
display
To float a VRM/EBL on a touchscreen multifunction display follow
the steps below:
From the radar application with a VRM/EBL already created:
1. Press and hold on the VRM/EBL.
The VRM/EBL context menu is displayed.
2. Select
Float Center
.
3. Select the desired location for the center position.
The VRM/EBL is placed at the new location.
Creating a floating VRM/EBL on the radar
display
From the radar application with a VRM/EBL already created:
1. Position the cursor over the VRM/EBL.
2. Press the
Ok
button.
The radar context menu is displayed.
3. Use the
Rotary Control
to select
Float Center
.
4. Press the
Ok
button.
5. Using the
Joystick
, move the center position of the circle to
the desired position.
6. Press the
Ok
button to confirm the new position.
Unfloating a VRM/EBL on the radar display
To re-center a VRM/EBL on a touchscreen multifunction display
follow the steps below:
From the radar application:
1. Position the cursor over the VRM/EBL.
The Radar context menu is displayed.
2. Select
Center
.
Unfloating a VRM/EBL on the radar display
From the radar application:
1. Position the cursor over the VRM/EBL.
2. Press the
Ok
button.
The VRM/EBL context menu is displayed.
3. Select
Center
.
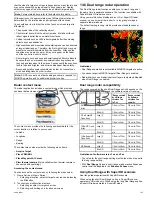
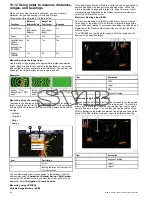
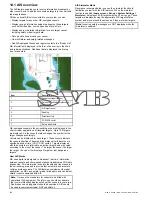
Using the radar range rings
Radar range rings enable you to measure the distance between
two points on the radar display.
Use the range rings to gauge the approximate distances between
points. Range rings are concentric circles displayed on the screen
and centred from your vessel at pre-set distances. The number and
spacing of the rings changes as you range in and out.
Examples:
D
12214-1
D
12215-1
D
12216-1
Range — 1/4 nm
Range Rings — 760ft
apart
Range — 3/4 nm
Range Rings — 1/4 nm
apart
Range — 1 1/2 nm
Range Rings — 1/4 nm
apart
Enabling and disabling radar range rings
From the radar application:
1. Select
MENU
.
2. Select
Presentation
.
3. Select
Range Rings
.
Selecting Range rings will switch the range rings On and Off.
Using radar
155
Summary of Contents for A65
Page 2: ......
Page 4: ......
Page 8: ...8 New a Series New c Series New e Series...
Page 12: ...12 New a Series New c Series New e Series...
Page 20: ...20 New a Series New c Series New e Series...
Page 36: ...36 New a Series New c Series New e Series...
Page 64: ...64 New a Series New c Series New e Series...
Page 86: ...86 New a Series New c Series New e Series...
Page 96: ...96 New a Series New c Series New e Series...
Page 106: ...106 New a Series New c Series New e Series...
Page 138: ...138 New a Series New c Series New e Series...
Page 192: ...192 New a Series New c Series New e Series...
Page 202: ...202 New a Series New c Series New e Series...
Page 206: ...206 New a Series New c Series New e Series...
Page 218: ...218 New a Series New c Series New e Series...
Page 228: ...228 New a Series New c Series New e Series...
Page 232: ...232 New a Series New c Series New e Series...
Page 242: ...242 New a Series New c Series New e Series...
Page 248: ...248 New a Series New c Series New e Series...
Page 286: ...286 New a Series New c Series New e Series...
Page 300: ...300 New a Series New c Series New e Series...
Page 307: ......
Page 308: ...www raymarine com...


