


3. Select
Transducer Set-Up
.
4. Select
Transducer
.
A list of transducers is displayed.
5. Select the transducer you want to use.
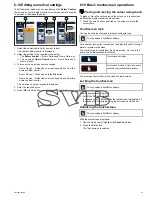
Checking the sonar
Sonar checks are made using the fishfinder application.
1. Select the fishfinder page.
2. Check the fishfinder display.
With the fishfinder active you should see:
• Depth reading (indicates the transducer is working). The
depth is shown in large white numbers at the bottom left of
the screen.
Thermal camera setup and checks
To ensure correct operation of the thermal camera you should setup
and check the camera's main functions.
Before proceeding ensure that the camera is connected correctly,
according to the instructions provided. If your system includes the
optional Joystick Control Unit (JCU) and PoE (Power over Ethernet)
injector, ensure these units are also connected correctly.
Set up the camera
You will need to:
• Adjust the image (aspect ratio, contrast, brightness, and so on).
Check the camera
You will need to:
• Check the camera movement (pan, tilt, zoom).
• Check the camera “home” position is appropriate.
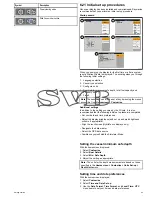
Adjusting the thermal camera image
With the thermal camera application displayed:
1. Select
Menu
.
2. Select
Adjust Contrast
.
3. Select the Contrast, Brightness, or Color option as appropriate.
The relevant numeric adjust control is displayed.
4. Adjust the value as required.
5. Select
Back
or
Ok
to confirm the new value.
Panning and tilting, and the thermal image
On a New e Series multifunction display you can pan and tilt the
thermal camera image using the touchscreen.
Move your finger up and down the screen to tilt the camera
up or down.
Move your finger left and right on the screen to rotate the
camera left or right (panning).
Panning, Tilting and zooming the thermal image
On New c Series and New e Series multifunction displays you can
pan, tilt and zoom the thermal camera image using the physical
buttons.
In some circumstances it may be better to use just the UniControl's
rotary and joystick controls to manipulate the thermal camera view.
For example, this method is ideal for finer control over the camera
and is particularly useful in rough sea conditions.
UniControl joystick — is used for rotating the camera left or
right (panning), or tilting the camera up or down.
UniControl rotary — is used to zoom in and out.
Note:
Only the Uni-control can be used on a New c Series display
to pan, tilt and zoom the thermal image.
Resetting the thermal camera to the home position
In the thermal camera application:
1. Select
Menu
.
2. Select
Camera Home
.
The camera returns to its currently defined home position, and
the “Home” icon appears on-screen momentarily.
Getting started
73
Summary of Contents for A65
Page 2: ......
Page 4: ......
Page 8: ...8 New a Series New c Series New e Series...
Page 12: ...12 New a Series New c Series New e Series...
Page 20: ...20 New a Series New c Series New e Series...
Page 36: ...36 New a Series New c Series New e Series...
Page 64: ...64 New a Series New c Series New e Series...
Page 86: ...86 New a Series New c Series New e Series...
Page 96: ...96 New a Series New c Series New e Series...
Page 106: ...106 New a Series New c Series New e Series...
Page 138: ...138 New a Series New c Series New e Series...
Page 192: ...192 New a Series New c Series New e Series...
Page 202: ...202 New a Series New c Series New e Series...
Page 206: ...206 New a Series New c Series New e Series...
Page 218: ...218 New a Series New c Series New e Series...
Page 228: ...228 New a Series New c Series New e Series...
Page 232: ...232 New a Series New c Series New e Series...
Page 242: ...242 New a Series New c Series New e Series...
Page 248: ...248 New a Series New c Series New e Series...
Page 286: ...286 New a Series New c Series New e Series...
Page 300: ...300 New a Series New c Series New e Series...
Page 307: ......
Page 308: ...www raymarine com...


