


3. Select
Radar
so that Transmit is highlighted.
The radar scanner should now be transmitting and receiving.
4. Check that the radar screen is operating correctly.
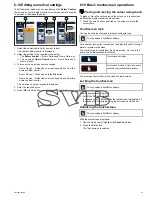
Typical HD radar screen
Note:
The example above is representative of the enhanced
output provided by a HD radar scanner.
Points to check:
• Radar sweep with echo responses are shown on screen.
• Radar status icon rotating in top right hand corner of the status
bar.
Check and adjust bearing alignment
Bearing alignment
The radar bearing alignment ensures that radar objects appear at
the correct bearing relative to your boat’s bow. You should check
the bearing alignment for any new installation.
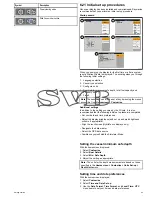
Example misaligned radar
D11590-2
1
2
Item
Description
1
Target object (such as a buoy) dead ahead.
2
Target displayed on the radar display is not aligned with the
Ship's Heading Marker (SHM). Bearing alignment is required.
Checking the bearing alignment
1. With your vessel under way: Align the bow with a stationary
object identified on the radar display An object between 1 & 2
NM distant is ideal.
2. Note the position of the object on the radar display. If the target
is not under the ships heading marker (SHM), there is an
alignment error and you will need to carry out bearing alignment
adjustment.
Adjusting the bearing alignment
Once you have checked the bearing alignment you can proceed and
make any required adjustments.
With the radar application displayed:
1. Select
Menu
.
2. Select
Scanner Set-up
.
3. Select
Advanced
.
4. Select
Bearing Alignment
.
Selecting Bearing Alignment displays the numeric adjust control.
5. Adjust the setting so that the selected target is under the Ship’s
Heading Marker.
6. Select
Back
or
Ok
when complete.
Sonar check
Warning: Sonar operation
• NEVER operate the sonar with the vessel out of the
water.
• NEVER touch the transducer face when the sonar
is powered on.
• SWITCH OFF the sonar if divers are likely to be
within 7.6 m (25 ft) of the transducer.
Sonar transducer and sonar module selection
You must designate the sonar transducer and Sonar module that
you want to use.
Sonar module selection
• Sonar variant displays are fitted with an internal sonar.
• All variants allow you to connect a compatible sonar module.
• If an external sonar module is connected to a sonar variant display
and a power supply the internal sonar should be switched off.
• To use a displays internal sonar on a system containing an
external sonar module, disconnect the network cable from the
external sonar module and use the
Sounder Set-Up
menu in the
fishfinder application to enable the internal sonar.
Transducer selection
• Sonar variant displays allow the direct connection of EITHER a
Raymarine OR a Minn Kota sonar transducer.
• All variants allow the connection of a Raymarine sonar transducer
via a compatible external sonar module.
• For all variants use the
Transducer Set-Up
menu in the fishfinder
application to specify the sonar transducer you want to use.
Selecting the sonar module
Sonar variant multifunction displays can use either their internal
sonar module or an external Raymarine sonar module.
Applicable only to sonar variant multifunction displays.
With the fishfinder application displayed:
1. Select
Menu
.
2. Select
Set-Up
.
3. Select
Sounder Set-Up
.
4. To use the internal sonar module select
Internal Sounder
so
that On is highlighted.
5. To use a connected external Raymarine sonar module select
Internal Sounder
so that Off is highlighted.
Note:
The Internal Sounder cannot be switched on if an external
sonar module is connected to the system and switched on.
Disconnect the network cable from the external sonar module to
enable the display's internal sonar option.
Selecting the sonar transducer
With the fishfinder application displayed:
1. Select
Menu
.
2. Select
Set-Up
.
72
New a Series / New c Series / New e Series
Summary of Contents for A65
Page 2: ......
Page 4: ......
Page 8: ...8 New a Series New c Series New e Series...
Page 12: ...12 New a Series New c Series New e Series...
Page 20: ...20 New a Series New c Series New e Series...
Page 36: ...36 New a Series New c Series New e Series...
Page 64: ...64 New a Series New c Series New e Series...
Page 86: ...86 New a Series New c Series New e Series...
Page 96: ...96 New a Series New c Series New e Series...
Page 106: ...106 New a Series New c Series New e Series...
Page 138: ...138 New a Series New c Series New e Series...
Page 192: ...192 New a Series New c Series New e Series...
Page 202: ...202 New a Series New c Series New e Series...
Page 206: ...206 New a Series New c Series New e Series...
Page 218: ...218 New a Series New c Series New e Series...
Page 228: ...228 New a Series New c Series New e Series...
Page 232: ...232 New a Series New c Series New e Series...
Page 242: ...242 New a Series New c Series New e Series...
Page 248: ...248 New a Series New c Series New e Series...
Page 286: ...286 New a Series New c Series New e Series...
Page 300: ...300 New a Series New c Series New e Series...
Page 307: ......
Page 308: ...www raymarine com...


