


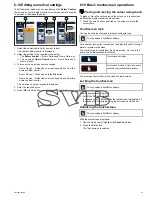


Adjusting the display brightness — New a
Series and New e Series
1. Press the
POWER
button once.
The Shortcuts menu is displayed.
2. Adjust the brightness to the required level using the on-screen
brightness slider bar control, or
3. Touch the Sun icon to increase the brightness level or the Moon
icon to decrease the brightness level.
Note:
The brightness level can also be increased by pressing the
Power
button multiple times.
Adjusting the display brightness
1. Press the
POWER
button once.
The Shortcuts menu is displayed.
2. Adjust the brightness to the required level using the
Rotary
control
.
Note:
The brightness level can also be increased by pressing the
Power
button multiple times.
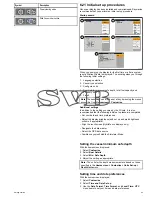
Touchscreen alignment
If the touchscreen is misaligned to your touch, you can realign it
to improve the accuracy.
Realignment involves a simple exercise to align an on-screen object
with your touch. For best results, perform this exercise when your
vessel is anchored or moored.
Note:
This only applies to touchscreen multifunction displays.
Aligning the touchscreen
With the homescreen displayed:
1. Select
Set-up
.
2. Select
Maintenance
.
3. Select
Touchscreen Alignment
.
4. Place your finger over the on-screen object momentarily, then
remove it.
5. Repeat the action a further 3 times.
6. If the operation was successful, an “Alignment Completed”
message is displayed.
7. Select
Exit
to return to the Maintenance menu.
8. If the operation was unsuccessful at any point during the
alignment exercise, an “Incorrect touch detected" message is
displayed, the alignment exercise is repeated.
9. After 2 failed alignment exercises you may be asked to perform
a precision alignment exercise.
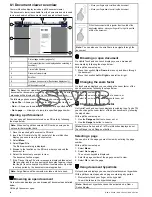
Data master
Any system containing more than one networked multifunction
display must have a designated data master.
The data master is the display which serves as a primary source
of data for all displays, it also handles all external sources of
information. For example the displays may require heading
information from the autopilot and GPS systems, usually received
through a SeaTalk
ng
or NMEA connection. The data master is the
display to which the SeaTalk, NMEA and any other data connections
are made, it then bridges the data to the SeaTalk
hs
network and
any compatible repeat displays. Information shared by the data
master includes:
• Cartography
• Routes and waypoints
• Radar
• Sonar
• Data received from the autopilot, instruments, the engine and
other external sources.
Your system may be wired for redundancy with data connections
made to repeat displays. However these connections will only
become active in the event of a fault and/or reassignment of the
data master.
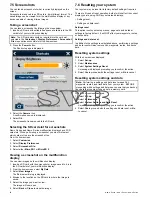
Designating the data master
For systems with 2 or more displays the following task must be
performed on the multifunction display that you want to designate
as the data master.
With the homescreen displayed:
1. Select
Set-up
.
2. Select
Maintenance
.
3. Select
Data Master
.
4. Select the display that you want to designate as the data master.
GPS selection
You can use an internal (if available) or external GPS receiver.
• Your multifunction display may feature an internal GPS receiver.
• You can also connect an external GPS receiver using SeaTalk
ng
or NMEA 0183.
• Where appropriate use the System Settings menu to enable or
disable the internal GPS receiver.
Enabling or disabling the internal GPS
If your multifunction display features an internal GPS then this can
be enabled and disabled by following the steps below.
With the homescreen displayed:
1. Select
Set-Up
.
2. Select
System Settings
.
3. To enable the internal GPS, select
Internal GPS
so that On is
highlighted.
4. To disable the internal GPS, select
Internal GPS
so that Off
is highlighted.
Simulator mode
The Simulator mode enables you to practice operating your display
without data from a GPS antenna, radar scanner, AIS unit, or
fishfinder.
The simulator mode is switched on / off in the
System Setup Menu
.
Note:
Raymarine recommends that you do NOT use the
simulator mode whilst navigating.
Note:
The simulator will NOT display any real data, including any
safety messages (such as those received from AIS units).
84
New a Series / New c Series / New e Series
Summary of Contents for A65
Page 2: ......
Page 4: ......
Page 8: ...8 New a Series New c Series New e Series...
Page 12: ...12 New a Series New c Series New e Series...
Page 20: ...20 New a Series New c Series New e Series...
Page 36: ...36 New a Series New c Series New e Series...
Page 64: ...64 New a Series New c Series New e Series...
Page 86: ...86 New a Series New c Series New e Series...
Page 96: ...96 New a Series New c Series New e Series...
Page 106: ...106 New a Series New c Series New e Series...
Page 138: ...138 New a Series New c Series New e Series...
Page 192: ...192 New a Series New c Series New e Series...
Page 202: ...202 New a Series New c Series New e Series...
Page 206: ...206 New a Series New c Series New e Series...
Page 218: ...218 New a Series New c Series New e Series...
Page 228: ...228 New a Series New c Series New e Series...
Page 232: ...232 New a Series New c Series New e Series...
Page 242: ...242 New a Series New c Series New e Series...
Page 248: ...248 New a Series New c Series New e Series...
Page 286: ...286 New a Series New c Series New e Series...
Page 300: ...300 New a Series New c Series New e Series...
Page 307: ......
Page 308: ...www raymarine com...


