


3. Select
Yes
to confirm or
No
to cancel the action.
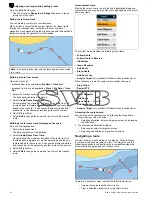
Moving a waypoint within a route
From the chart application:
1. Position the cursor over the waypoint you want to move.
The waypoint context menu is displayed.
2. Select
Move Waypoint
.
3. Select the new location for the waypoint.
Erasing routes
Erasing a displayed route
From the chart application:
1. Select the route.
The Route context menu is displayed.
2. Select
Erase Route
.
The erase route pop up message is displayed.
3. Select
Yes
to confirm, or
No
to cancel the action.
Erasing a route using the route list
From the chart application menu or the homescreen:
1. Select
My Data
.
2. Select
Route List
.
The route list is displayed.
3. Select the route you want to erase.
4. Select
Erase route
.
The erase route pop up message is displayed.
5. Select
Yes
to confirm, or
No
to cancel the action.
Note:
You can delete any route, except for the one that you are
currently following. When you erase a route, only those waypoints
associated with that route are deleted.
Erasing all routes
From the homescreen:
1. Select
My Data
.
2. Select
Erase Data From System
.
3. Select
Erase Routes From System
.
The erase routes from system dialog is displayed.
4. Select
Erase All
.
The confirm delete pop up message is displayed.
5. Select
Yes
to confirm, or
No
to cancel the action.
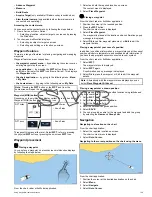
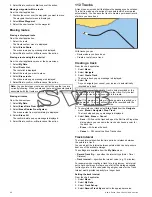
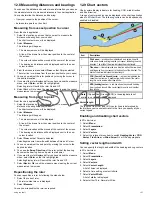
11.3 Tracks
A track is an on-screen trail that shows the passage you have taken.
This trail is made up of a series of track points which are created
automatically. You can save the track to create a permanent record
of where you have been
D
11754-2
With tracks you can:
• Review where you have been.
• Create a route from a track.
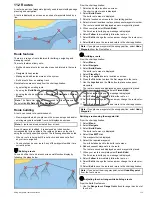
Creating a track
From the chart application:
1. Select
Menu
.
2. Select
Navigate
.
3. Select
Create Track
.
The create track pop up message is displayed.
4. Select
Ok
.
As you navigate your vessel, your journey is automatically
recorded as a track.
Note:
If the power fails whilst a track is being recorded or the
position fix is lost, a break will occur in the track. Only the last
segment of a track can be converted into a route.
Note:
If the maximum number of tracking points is reached, you
will be warned. The track will continue to be recorded with the
earlier tracking points being overwritten.
5. To complete your track select
Stop Track
from the
Navigate
menu:
Menu > Navigate > Stop Track
.
The track stopped pop up message is displayed.
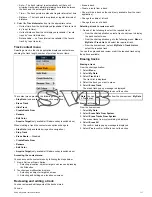
6. Select
Save
,
Erase
or
Cancel
.
•
Save
— Will save the track and open the Edit track Properties
dialog where you can name the track and choose a color for
the track line.
•
Erase
— Will erase the track.
•
Cancel
— Will cancel the Stop Track action.
Track interval
The track interval specifies the time period or distance between
the points in a track.
You can adjust the interval between points which can help ensure
best use of the available storage.
The settings are available from the
My Data
menu:
•
Record Track By
— specifies the interval type (Auto / Time /
Distance).
•
Track Interval
— specifies the interval value (e.g. 15 minutes).
For example when creating a track for a long journey, an interval
set to Auto could result in rapid use of all of the storage available
for track points. In this case selecting a higher value for the Track
Interval would provide capacity for a longer track.
Setting the track interval
From the chart application:
1. Select
Menu
.
2. Select
My Data
.
3. Select
Track Set-up
.
4. Select
Record Track By
and set to the appropriate value:
116
New a Series / New c Series / New e Series
Summary of Contents for A65
Page 2: ......
Page 4: ......
Page 8: ...8 New a Series New c Series New e Series...
Page 12: ...12 New a Series New c Series New e Series...
Page 20: ...20 New a Series New c Series New e Series...
Page 36: ...36 New a Series New c Series New e Series...
Page 64: ...64 New a Series New c Series New e Series...
Page 86: ...86 New a Series New c Series New e Series...
Page 96: ...96 New a Series New c Series New e Series...
Page 106: ...106 New a Series New c Series New e Series...
Page 138: ...138 New a Series New c Series New e Series...
Page 192: ...192 New a Series New c Series New e Series...
Page 202: ...202 New a Series New c Series New e Series...
Page 206: ...206 New a Series New c Series New e Series...
Page 218: ...218 New a Series New c Series New e Series...
Page 228: ...228 New a Series New c Series New e Series...
Page 232: ...232 New a Series New c Series New e Series...
Page 242: ...242 New a Series New c Series New e Series...
Page 248: ...248 New a Series New c Series New e Series...
Page 286: ...286 New a Series New c Series New e Series...
Page 300: ...300 New a Series New c Series New e Series...
Page 307: ......
Page 308: ...www raymarine com...


