Panasonic SAAK600 - MINI HES W/CD PLAYER, Operating Instructions Manual
The Panasonic SAAK600 - MINI HES W/CD PLAYER brings crystal clear sound and compact design to your space. With our easy-to-follow Operating Instructions Manual, you can effortlessly navigate all its features. Download this manual for free at manualshive.com and unlock the full potential of your Panasonic SAAK600.
Share
Download


Reviews:
No comments
Related manuals for SAAK600 - MINI HES W/CD PLAYER

Ranger 8600E
Brand: CADDX Pages: 6
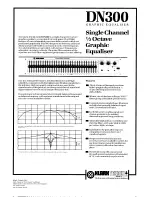
DN300
Brand: Klark Teknik Pages: 2

LA SPHERE - DATASHEET 2
Brand: CABASSE Pages: 8

PC-1.5
Brand: Phase Technology Pages: 11

Dream Sub
Brand: Pure Acoustics Pages: 1

DUBs240
Brand: DUB Edition Pages: 9

ET25K
Brand: Magicsing Pages: 23

NC - mod4
Brand: Alphatech Pages: 38

LHD60008
Brand: LONGHORN Pages: 15

SI4 Series
Brand: Abicor Binzel Pages: 2

PLD52MU
Brand: Pyle Pages: 24

WIRE-MATIC 250
Brand: Lincoln Electric Pages: 102

EagleEye Director
Brand: Polycom Pages: 13

Lc 265.1
Brand: Westlake Audio Pages: 21

DRA-1025R
Brand: Denon Pages: 15

FHF DSLB 20 LED
Brand: Eaton Pages: 28

SpectrAlert S1224MCW
Brand: System Sensor Pages: 4
AP50
Brand: Simrad Pages: 142


